后台管理系统开发记录
人力资源管理系统
本文记录开发一个 SpringBoot+Vue 前后端分离的人力资源管理系统
一、技术栈
后端技术栈
- Spring Boot
- Spring Security
- MyBatis
- MySQL
- Redis
- RabbitMQ
- Spring Cache
- WebSocket
前端技术栈
- Vue
- ElementUI
- axios
- vue-router
- Vuex
- WebSocket
- vue-cli4
为什么选用Vue?
Vue 是一套用于构建用户界面的渐进式框架。与其它大型框架不同的是,Vue 被设计为可以自底向上逐层应用。Vue 的核心库只关注视图层,不仅易于上手,还便于与第三方库或既有项目整合。另一方面,当与现代化的工具链以及各种支持类库结合使用时,Vue 也完全能够为复杂的单页应用提供驱动。
- 只关注视图层
- MVVM 框架
在使用 jQuery 过程中,掺杂了大量的 DOM 操作,修改视图或者获取 value ,都需要 DOM 操作,MVVM 是一种视图和数据模型双向绑定的框架,即数据发生变化,视图会跟着变化,视图发生变化,数据模型也会跟着变化,开发者再也不需要操作 DOM 节点
MVC与MVVM
MVC中的M就是单纯的从网络获取回来的数据模型,V指的我们的视图界面,而C就是我们的ViewController。
在其中,ViewController负责View和Model之间调度,View发生交互事件会通过target-action或者delegate方式回调给ViewController,与此同时ViewController还要承担把Model通过KVO、Notification方式传来的数据传输给View用于展示的责任。随着业务越来越复杂,视图交互越复杂,导致Controller越来越臃肿,负重前行。脏活累活都它干了,到头来还一点不讨好。福报修多了的结果就是,不行了就重构你,重构不了就换掉你。来一张斯坦福老头经典的MVC架构图。

所以为了解决这个问题,MVVM就闪亮登场了。他把View和Contrller都放在了View层(相当于把Controller一部分逻辑抽离了出来),Model层依然是服务端返回的数据模型。而ViewModel充当了一个UI适配器的角色,也就是说View中每个UI元素都应该在ViewModel找到与之对应的属性。除此之外,从Controller抽离出来的与UI有关的逻辑都放在了ViewModel中,这样就减轻了Controller的负担。下面是网上经典的MVVM的架构图
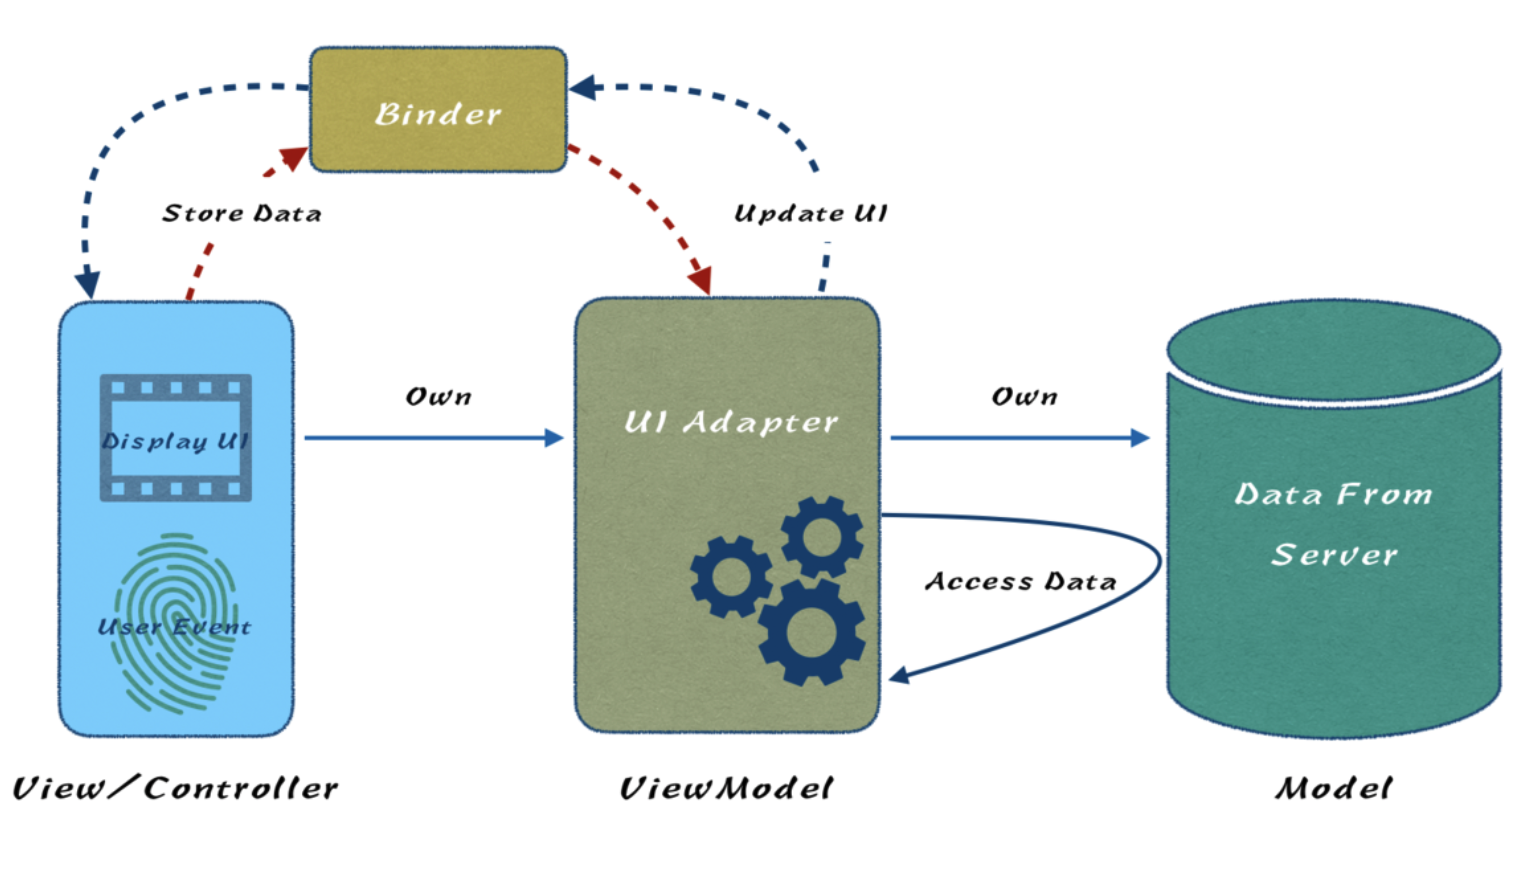
从以上的架构图中,我们可以很清晰的梳理出各自的分工。
- View层:视图展示。包含UIView以及UIViewController,View层是可以持有ViewModel的。
- ViewModel层:视图适配器。暴露属性与View元素显示内容或者元素状态一一对应。一般情况下ViewModel暴露的属性建议是readOnly的。还有一点,ViewModel层是可以持有Model的,但是ViewModel不能持有View,1.ViewModel可测性,即单元测试方便进行。2.团队人员可分离开发(View和ViewModel开发可以是两个人同时进行)。
- Model层:数据模型与持久化抽象模型。数据模型很好理解,就是从服务器拉回来的JSON数据。而持久化抽象模型暂时放在Model层,是因为MVVM诞生之初就没有对这块进行很细致的描述。按照经验,我们通常把数据库、文件操作封装成Model,并对外提供操作接口。(有些公司把数据存取操作单拎出来一层,称之为DataAdapter层,所以在业内会有很多MVVM的变种,但其本质上都是MVVM)。
- Binder:MVVM的灵魂。可惜在MVVM这几个英文单词中并没有它的一席之地,它的最主要作用是在View和ViewModel之间做了双向数据绑定。如果MVVM没有Binder,那么它与MVC的差异不是很大。
我们发现,正是因为View、ViewModel以及Model间的清晰的持有关系,所以在三个模块间的数据流转有了很好的控制
二、SPA
简介
单页应用(英语:single-page application,缩写SPA)是一种网络应用程序或网站的模型,它通过动态重写当前页面来与用户交互,而非传统的从服务器重新加载整个新页面。这种方法避免了页面之间切换打断用户体验,使应用程序更像一个桌面应用程序。它将所有的活动局限于一个 Web 页面中,仅在该 Web 页面初始化时加载相应的 HTML、JavaScript、CSS。一旦页面加载完成,SPA 不会因为用户的操作而进行页面的重新加载或跳转,而是利用 JavaScript 动态的变换 HTML(采用的是 div 切换显示和隐藏),从而实现UI与用户的交互。在 SPA 应用中,应用加载之后就不会再有整页刷新。
优点
1) 有良好的交互体验
能提升页面切换体验,用户在访问应用页面是不会频繁的去切换浏览页面,从而避免了页面的重新加载;
2) 前后端分离开发
单页Web应用可以和 RESTful 规约一起使用,通过 REST API 提供接口数据,并使用 Ajax 异步获取,这样有助于分离客户端和服务器端工作。更进一步,可以在客户端也可以分解为静态页面和页面交互两个部分;
3) 减轻服务器压力
服务器只用出数据就可以,不用管展示逻辑和页面合成,吞吐能力会提高几倍;
4) 共用一套后端程序代码
不用修改后端程序代码就可以同时用于 Web 界面、手机、平板等多种客户端;
缺点
1) SEO难度较高
由于所有的内容都在一个页面中动态替换显示,所以在SEO上其有着天然的弱势,所以如果你的站点对SEO很看重,且要用单页应用,那么就做些静态页面给搜索引擎用吧;
2) 前进、后退管理
由于单页Web应用在一个页面中显示所有的内容,所以不能使用浏览器的前进后退功能,所有的页面切换需要自己建立堆栈管理,当然此问题也有解决方案,比如利用URI中的散列+iframe实现;
3) 初次加载耗时多
为实现单页Web应用功能及显示效果,需要在加载页面的时候将JavaScript、CSS统一加载,部分页面可以在需要的时候加载。所以必须对JavaScript及CSS代码进行合并压缩处理;
本项目是后台管理系统,因为不需要搜索引擎优化,所以选用了单页面应用的技术
三、Vue的构建
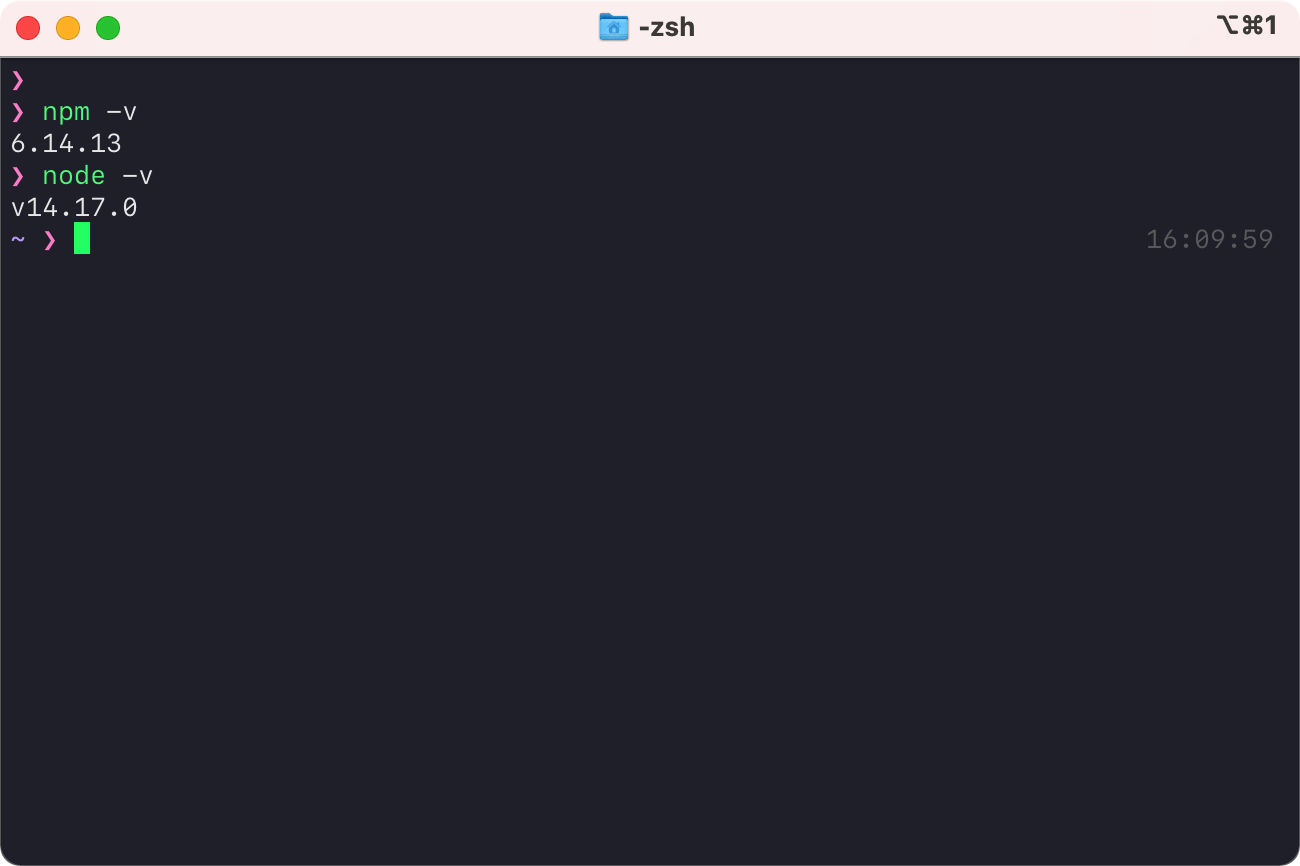
安装NodeJS与npm
新建项目
npm install -g vue-cli   # 只需要第一次安装时执行
vue init webpack my-project  # 使用webpack模板创建一个vue项目
cd my-project #进入到项目目录中
npm install  # 下载依赖(如果在项目创建的最后一步选择了自动执行npm install,则该步骤可以省略)
npm run dev # 启动项目
Vue 项目结构介绍
Vue 项目创建完成后,使用 Web Storm 打开项目,项目目录如下:
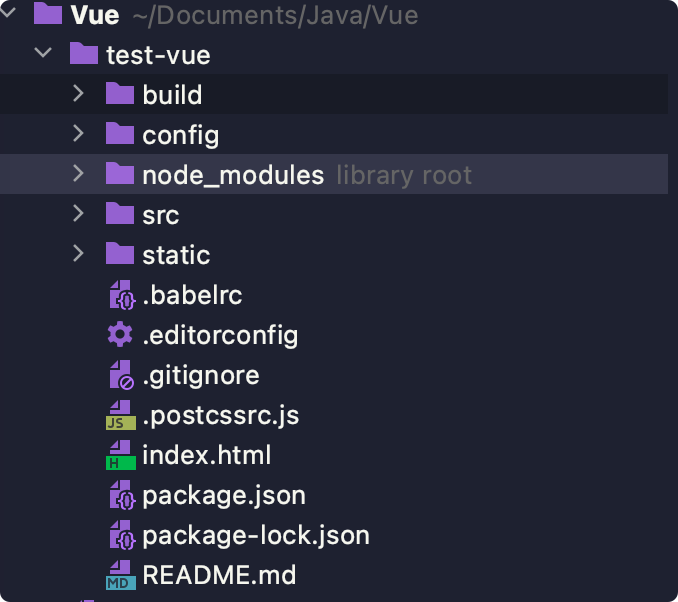
- build 文件夹,用来存放项目构建脚本
- config 中存放项目的一些基本配置信息,最常用的就是端口转发
- node_modules 这个目录存放的是项目的所有依赖,即 npm install 命令下载下来的文件
- src 这个目录下存放项目的源码,即开发者写的代码放在这里
- static 用来存放静态资源
- index.html 则是项目的首页,入口页,也是整个项目唯一的HTML页面
- package.json 中定义了项目的所有依赖,包括开发时依赖和发布时依赖
对于开发者来说,以后 99.99% 的工作都是在 src 中完成的,src 中的文件目录如下:
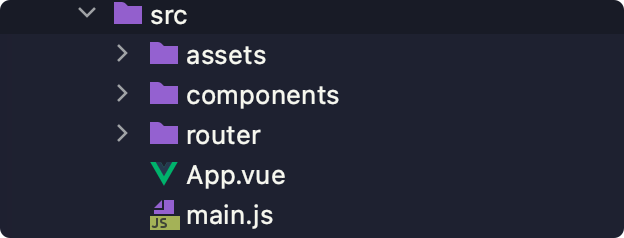
- assets 目录用来存放资产文件
- components 目录用来存放组件(一些可复用,非独立的页面),当然开发者也可以在 components 中直接创建完整页面。
- 推荐在 components 中存放组件,另外单独新建一个 page 文件夹,专门用来放完整页面。
- router 目录中,存放了路由的js文件
- App.vue 是一个Vue组件,也是项目的第一个Vue组件
- main.js相当于Java中的main方法,是整个项目的入口js
main.js 内容如下:
import Vue from 'vue'
import App from './App'
import router from './router'
Vue.config.productionTip = false
/* eslint-disable no-new */
new Vue({
  el: '#app',
  router,
  components: { App },
  template: '<App/>'
})- 在main.js 中,首先导入 Vue 对象
- 导入 App.vue ,并且命名为 App
- 导入router,注意,由于router目录下路由默认文件名为 index.js ,因此可以省略
- 所有东西都导入成功后,创建一个Vue对象,设置要被Vue处理的节点是 ‘#app’,’#app’ 指提前在index.html 文件中定义的一个div
- 将 router 设置到 vue 对象中,这里是一个简化的写法,完整的写法是 router:router,如果 key/value 一模一样,则可以简写。
- 声明一个组件 App,App 这个组件在一开始已经导入到项目中了,但是直接导入的组件无法直接使用,必须要声明。
- template 中定义了页面模板,即将 App 组件中的内容渲染到 ‘#app’ 这个div 中。
因此,可以猜测,项目启动成功后,看到的页面效果定义在 App.vue 中
<template>
  <div id="app">
    <img src="./assets/logo.png">
    <router-view/>
  </div>
</template>

<script>
export default {
  name: 'App'
}
</script>

<style>
#app {
  font-family: 'Avenir', Helvetica, Arial, sans-serif;
  -webkit-font-smoothing: antialiased;
  -moz-osx-font-smoothing: grayscale;
  text-align: center;
  color: #2c3e50;
  margin-top: 60px;
}
</style>- App.vue 是一个vue组件,这个组件中包含三部分内容:
- 页面模板(template)
- 页面脚本(script);
- 页面样式(style)
- 页面模板中,定义了页面的 HTML 元素,这里定义了两个,一个是一张图片,另一个则是一个 router-view
- 页面脚本主要用来实现当前页面数据初始化、事件处理等等操作
- 页面样式就是针对 template 中 HTML 元素的页面美化操作
需要额外解释的是,router-view,这个指展示路由页面的位置,可以简单理解为一个占位符,这个占位符展示的内容将根据当前具体的 URL 地址来定。具体展示的内容,要参考路由表,即 router/index.js 文件,该文件如下:
import Vue from 'vue'
import Router from 'vue-router'
import HelloWorld from '@/components/HelloWorld'
Vue.use(Router)
export default new Router({
  routes: [
    {
      path: '/',
      name: 'HelloWorld',
      component: HelloWorld
    }
  ]
})- 这个文件中,首先导入了Vue对象、Router对象以及 HelloWorld 组件,
- 创建一个Router对象,并定义路由表
- 这里定义的路由表,path为
/,对应的组件为 HelloWorld,即浏览器地址为/时,在router-view位置显示 HelloWorld 组件
项目编译
这么大一个前端项目,肯定没法直接发布运行,当开发者完成项目开发后,将 cmd 命令行定位到当前项目目录,然后执行如下命令对项目进行打包:
$ npm run build打包成功后,当前项目目录下会生成一个 dist 文件夹,这个文件夹中有两个文件,分别是 index.html 和 static ,index.html 页面就是我们 SPA 项目中唯一的 HTML 页面了,static 中则保存了编译后的 js、css等文件,项目发布时,可以使用 nginx 独立部署 dist 中的静态文件,也可以将静态文件拷贝到 Spring Boot 项目的 static 目录下,然后对 Spring Boot 项目进行编译打包发布。
使用Vue-cli3构建项目
Vue 提供了一个官方的 CLI,为单页面应用 (SPA) 快速搭建繁杂的脚手架。它为现代前端工作流提供了 batteries-included 的构建设置。只需要几分钟的时间就可以运行起来并带有热重载、保存时 lint 校验,以及生产环境可用的构建版本
# 安装
npm install -g @vue/cli
# 创建项目
vue create vuehr
$ cd vuehr
$ npm run serve
整体项目变得更加简洁
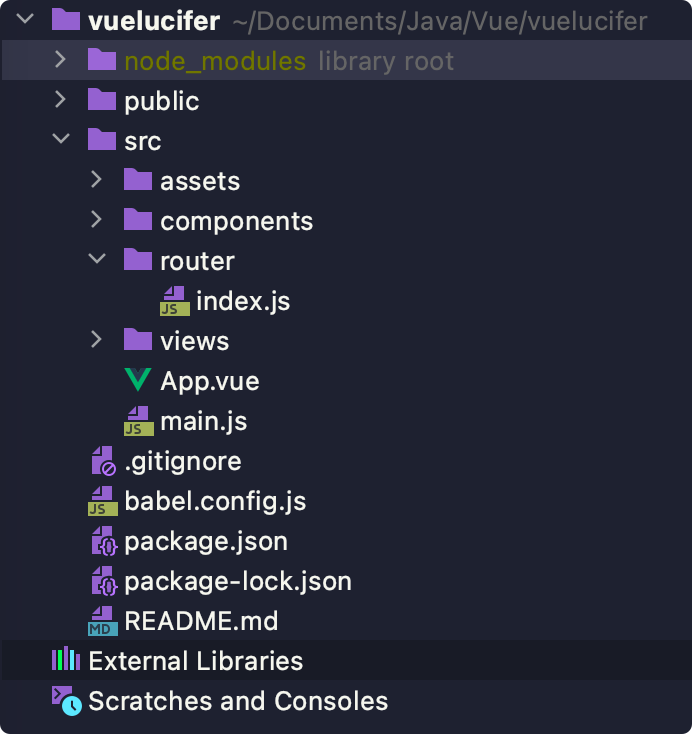
至此,前端部分的准备工作已经结束,现在可以开始搭建项目
四、前端的搭建
安装element
npm i element-ui -S引用element
import ElementUI from 'element-ui';
import 'element-ui/lib/theme-chalk/index.css';
Vue.use(ElementUI);
基础配置
main.js
import {postKeyValueRequest} from "./utils/api";
import {putRequest} from "./utils/api";
import {getRequest} from "./utils/api";
import {deleteRequest} from "./utils/api";

Vue.prototype.postRequest = postRequest;
Vue.prototype.postKeyValueRequest = postKeyValueRequest;
Vue.prototype.putRequest = putRequest;
Vue.prototype.getRequest = getRequest;
Vue.prototype.deleteRequest = deleteRequest;

Vue.use(ElementUI);

Vue.config.productionTip = false

new Vue({
  router,
  render: h => h(App)
}).$mount('#app')
router里配置index.js
import Vue from 'vue'
import VueRouter from 'vue-router'
import Login from '../views/Login.vue'
import Home from '../views/Home.vue'


Vue.use(VueRouter)

const routes = [
    {
      path: '/',
      name: 'Login',
      component: Login
    },
    {
      path: '/home',
      name: 'Home',
      component: Home

    }
]

const router = new VueRouter({
  routes
})

export default router
登录页面
Login.vue
<template>
<div>
<!--  v-model:rules=:rules-->
  <el-form :rules="rules" ref="loginForm" :model="loginForm" class="loginContainer">
    <h3 class="login-title">系统登录</h3>

    <el-form-item prop="username">
      <el-input type="text" v-model="loginForm.username" auto-complete="off" placeholder="请输入你的用户名"></el-input>
    </el-form-item>

    <el-form-item prop="password">
      <el-input type="password" v-model="loginForm.password" auto-complete="off" placeholder="请输入密码"></el-input>
    </el-form-item>

    <el-checkbox class="loginRemember" v-model="checked"></el-checkbox>

    <el-button type="primary" style="width:100%;" @click="submitLogin">登录</el-button>
  </el-form>
</div>
</template>

<script>

export default {
  name: "Login",
  data(){
    return {
      loginForm:{
        username:'admin',
        password:'123'
      },
      checked: true,
      rules:{
        username:[{required: true, message:"请输入你的用户名",trigger:"blur"}],
        password:[{required: true, message:"请输入密码",trigger:"blur"}]
      }
    }
  },
  methods:{
    submitLogin(){
      this.$refs.loginForm.validate((valid) => {
        if (valid) {
          this.postKeyValueRequest('/doLogin',this.loginForm).then(resp => {
            if (resp){
              window.sessionStorage.setItem("user", JSON.stringify(resp.obj));
              this.$router.replace('/home')
            }
          })
          // alert('提交成功!');
        } else {
          this.$message.error('请输入所有字段');
          return false;
        }
      });
    }
  }
}
</script>

<style scoped>
.loginContainer{
  border-radius: 15px;
  background-clip: padding-box;
  margin: 180px auto;
  width:350px;
  padding:35px 35px 15px 35px;
  background: #fff;
  border: 1px solid #eaeaea;
  box-shadow: 0 0 25px #cac6c6;
}
.login-title{
  margin:10px auto 20px auto;
  text-align:center;
  color: #000000;
}
.loginRemember{
  text-align:left;
  margin:0 0 15px 0;
}

</style>
制作基本页面
Home.vue
<template>
    <div>
        <el-container>
            <el-header class="homeHeader">
                <div class="title">Lucifer</div>
                <div>
                    <el-button icon="el-icon-bell" type="text" style="margin-right: 8px;color: #000000;" size="normal" @click="goChat"></el-button>
                    <el-dropdown class="userInfo" @command="commandHandler">
  <span class="el-dropdown-link">
    {{user.name}}<i><img :src="user.userface" alt=""></i>
  </span>
                        <el-dropdown-menu slot="dropdown">
                            <el-dropdown-item command="userinfo">个人中心</el-dropdown-item>
                            <el-dropdown-item command="setting">设置</el-dropdown-item>
                            <el-dropdown-item command="logout" divided>注销登录</el-dropdown-item>
                        </el-dropdown-menu>
                    </el-dropdown>
                </div>
            </el-header>
            <el-container>
                <el-aside width="200px">
                    <el-menu router unique-opened>
                        <el-submenu :index="index+''" v-for="(item,index) in routes" v-if="!item.hidden" :key="index">
                            <template slot="title">
                                <i style="color: #409eff;margin-right: 5px" :class="item.iconCls"></i>
                                <span>{{item.name}}</span>
                            </template>
                            <el-menu-item :index="child.path" v-for="(child,indexj) in item.children" :key="indexj">
                                {{child.name}}
                            </el-menu-item>
                        </el-submenu>
                    </el-menu>
                </el-aside>
                <el-main>
                    <el-breadcrumb separator-class="el-icon-arrow-right" v-if="this.$router.currentRoute.path!='/home'">
                        <el-breadcrumb-item :to="{ path: '/home' }">首页</el-breadcrumb-item>
                        <el-breadcrumb-item>{{this.$router.currentRoute.name}}</el-breadcrumb-item>
                    </el-breadcrumb>
                    <div class="homeWelcome" v-if="this.$router.currentRoute.path=='/home'">
                        欢迎来到Lucifer管理系统!
                    </div>
                    <router-view class="homeRouterView"/>
                </el-main>
            </el-container>
        </el-container>
    </div>
</template>

<script>
    export default {
        name: "Home",
        data() {
            return {
                // user: JSON.parse(window.sessionStorage.getItem("user"))
            }
        },
        computed: {
            routes() {
                return this.$store.state.routes;
            },
            user() {
                return this.$store.state.currentHr;
            }
        },
        methods: {
            goChat() {
                this.$router.push("/chat");
            },
            commandHandler(cmd) {
                if (cmd == 'logout') {
                    this.$confirm('此操作将注销登录, 是否继续?', '提示', {
                        confirmButtonText: '确定',
                        cancelButtonText: '取消',
                        type: 'warning'
                    }).then(() => {
                        this.getRequest("/logout");
                        window.sessionStorage.removeItem("user")
                        this.$store.commit('initRoutes', []);
                        this.$router.replace("/");
                    }).catch(() => {
                        this.$message({
                            type: 'info',
                            message: '已取消操作'
                        });
                    });
                }else if (cmd == 'userinfo') {
                    this.$router.push('/hrinfo');
                }
            }
        }
    }
</script>

<style>
    .homeRouterView {
        margin-top: 10px;
    }

    .homeWelcome {
        text-align: center;
        font-size: 30px;
        font-family: 华文行楷;
        color: #409eff;
        padding-top: 50px;
    }

    .homeHeader {
        background-color: #409eff;
        display: flex;
        align-items: center;
        justify-content: space-between;
        padding: 0px 15px;
        box-sizing: border-box;
    }

    .homeHeader .title {
        font-size: 30px;
        font-family: 华文行楷;
        color: #ffffff
    }

    .homeHeader .userInfo {
        cursor: pointer;
    }

    .el-dropdown-link img {
        width: 48px;
        height: 48px;
        border-radius: 24px;
        margin-left: 8px;
    }

    .el-dropdown-link {
        display: flex;
        align-items: center;
    }
</style>
制作Menu菜单
Home.vue
<div>

  <el-container>
    <el-header class="homeHeader">
      <div class="title">后台管理系统</div>

            <el-dropdown class="userInfo" @command="commandHandler">
      <span class="el-dropdown-link">
        {{user.name}}<i><img :src="user.userface" alt=""></i>
      </span>
              <el-dropdown-menu slot="dropdown">
                <el-dropdown-item command="userinfo">个人中心</el-dropdown-item>
                <el-dropdown-item command="setting">设置</el-dropdown-item>
                <el-dropdown-item command="logout" divided>注销登录</el-dropdown-item>
              </el-dropdown-menu>
            </el-dropdown>

    </el-header>
    <el-container>
      <el-aside width="200px">
        <el-menu router>
          <el-submenu index="1" v-for="(item,index) in this.$router.options.routes" v-if="!item.hidden" :key="index">
            <template slot="title">
              <i class="el-icon-location"></i>
              <span>导航一</span>
            </template>
              <el-menu-item :index="child.path" v-for="(child,indexj) in item.children" :key="indexj">
                {{child.name}}
              </el-menu-item>
          </el-submenu>
        </el-menu>
      </el-aside>
      <el-main>
        <router-view/>
      </el-main>
    </el-container>
  </el-container>

</div>新增router中的跳转index.js
import Vue from 'vue'
import VueRouter from 'vue-router'
import Login from '../views/Login.vue'
import Home from '../views/Home.vue'
import Test1 from '../views/Test1.vue'
import Test2 from '../views/Test2.vue'


Vue.use(VueRouter)

const routes = [
    {
      path: '/',
      name: 'Login',
      component: Login,
      hidden:true
    },
    {
      path: '/home',
      name: 'Home',
      component: Home,
      hidden:true
    },
    {
        path: '/home',
        name: '导航一',
        component: Home,
        children: [
            {
                path: '/test1',
                name: '选项1',
                component: Test1
            },
            {
                path: '/test2',
                name: '选项2',
                component: Test2
            }
        ]
    }

]

const router = new VueRouter({
  routes
})

export default router
根据数据库中存储的menu表
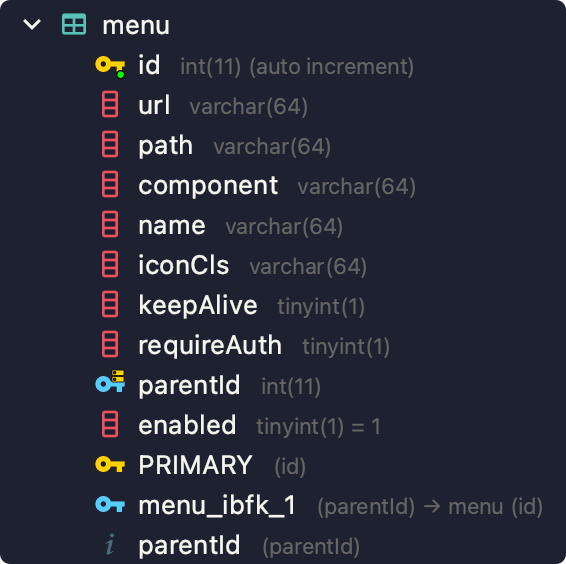
可以给每个角色分配不同的menu访问权限
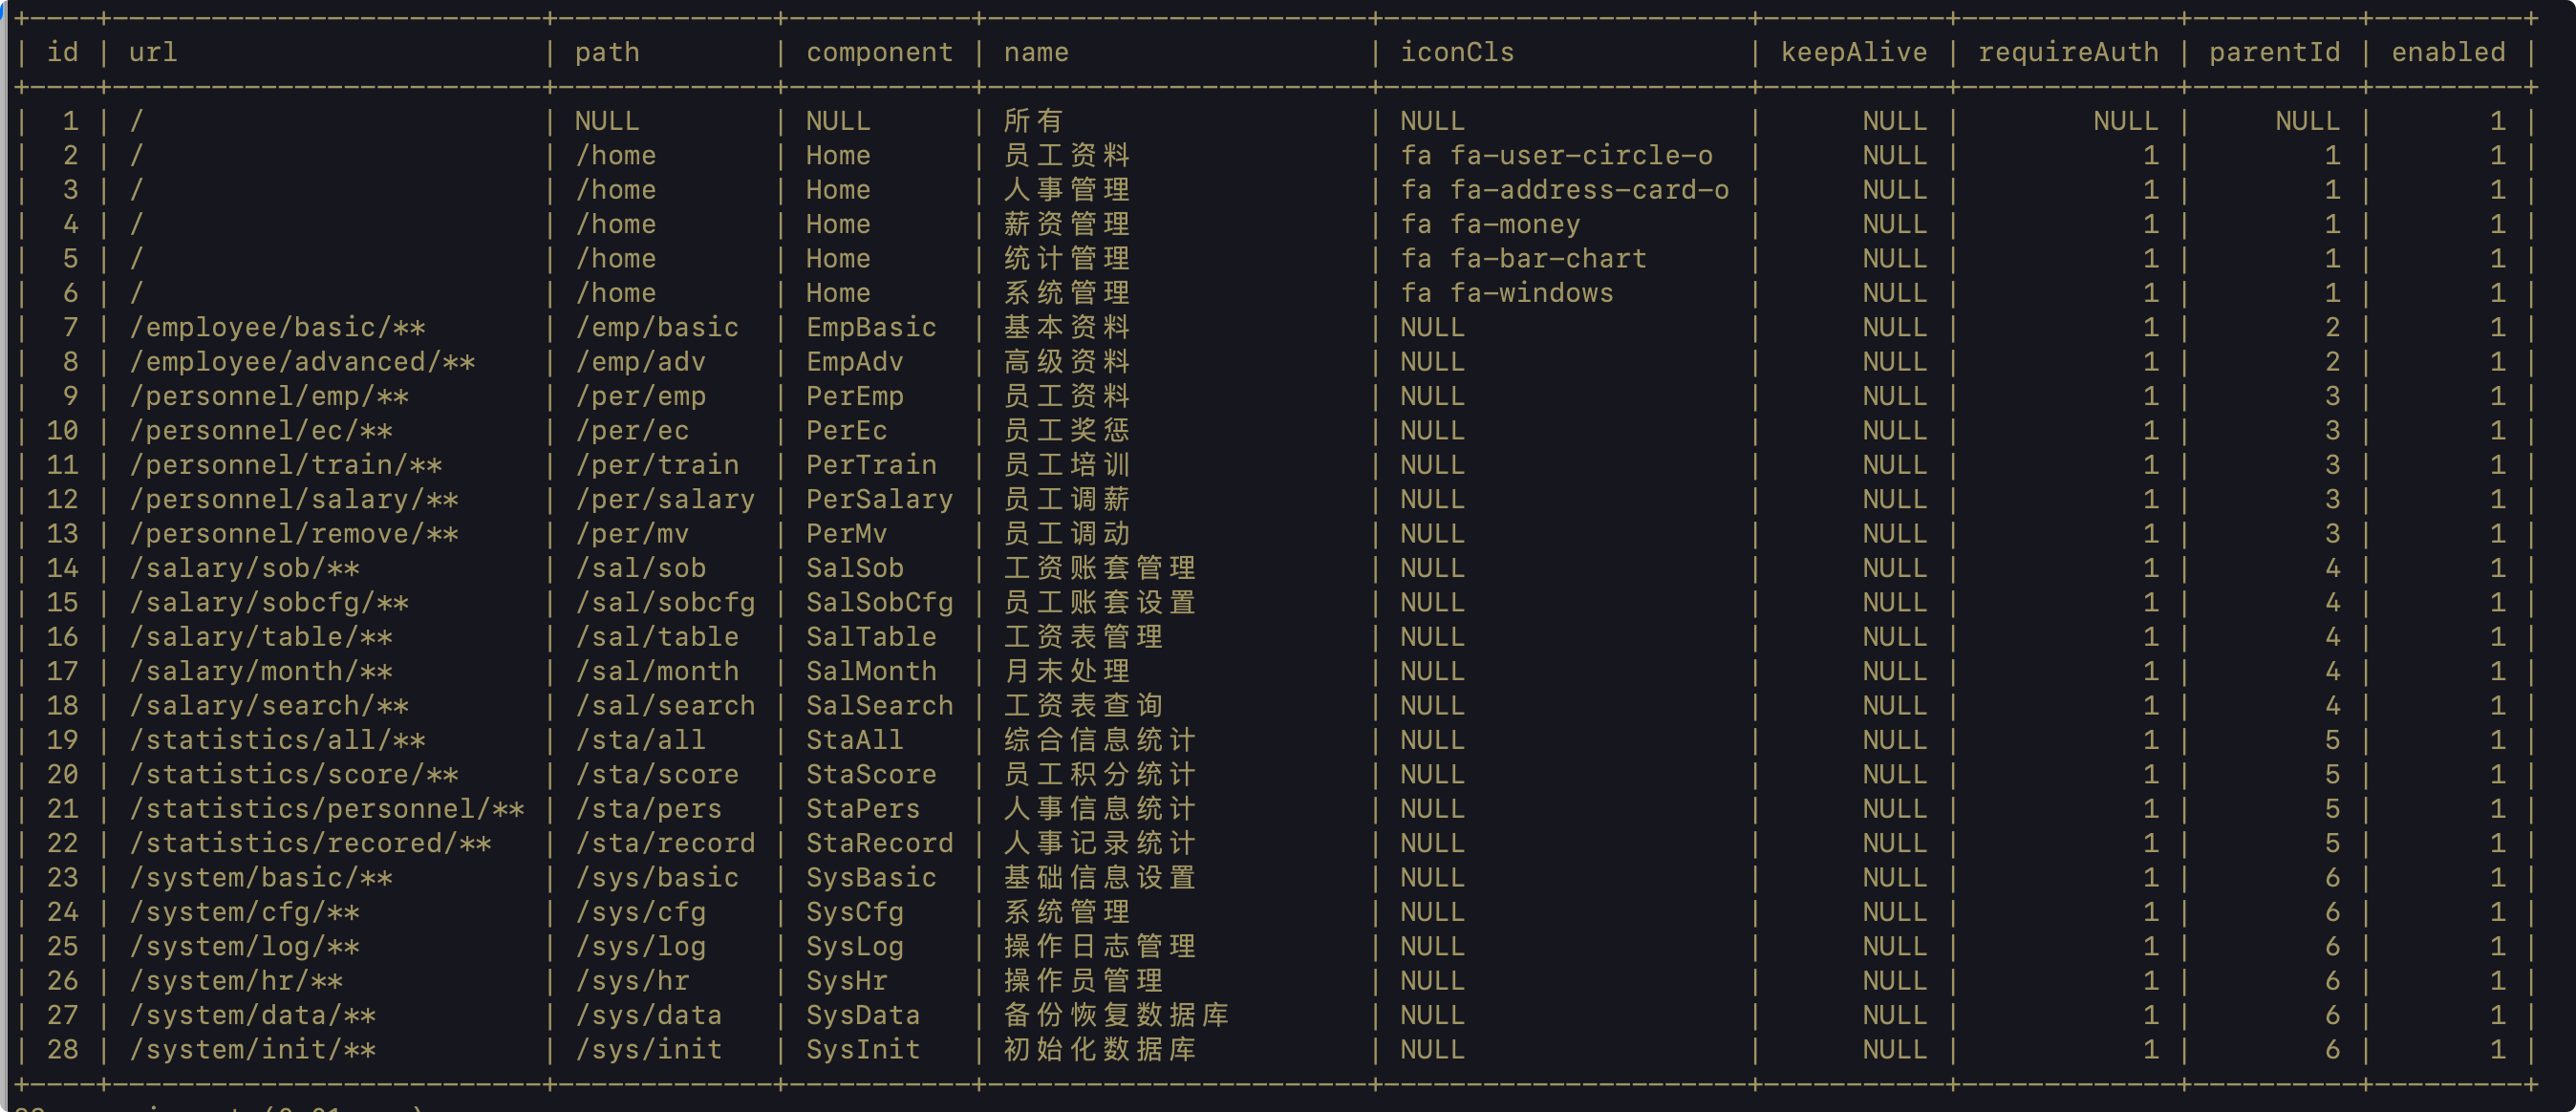
这样就不用去router中自己定义每个menu的名字和显示的类别,通过读取数据库,当前用户根据不同的权限去访问不同的menu,[此部分在后端搭建部分补充](# 数据库驱动Menu菜单)
Vuex
下一步引入Vuex来做状态管理,是所有状态都放在一个公共的位置,实现状态实时转换,首先安装
npm install vuex建立组件store下的index.js实现vuex
import Vue from 'vue'
import Vuex from 'vuex'

Vue.use(Vuex)


export default new Vuex.Store({

    state:{
        routes:[]
    },
    mutations:{
        initRoutes(state, data){
            state.routes = data;
        }
    },
    actions:{

    }

})配置工具类menus.js
import {getRequest} from "@/utils/api";

export const initMenu=(router,store)=>{
    //正常的跳转
    if (store.state.routes.length > 0){
        return;
    }
    //F5刷新
    getRequest("/system/config/menu").then(data => {
        if (data){
            let fmtRoutes = formatRoutes(data);
            router.addRoutes(fmtRoutes);
            store.commit('initRoutes', fmtRoutes)
        }
    })
}

export const formatRoutes = (routes) => {
    let fmRoutes = [];
    routes.forEach(router => {
        let  {
            path,
            component,
            name,
            meta,
            iconCls,
            children
        } = router;
        if (children && children instanceof Array){
            children = formatRoutes(children);
        }
        let fmRouter = {
            path:path,
            name:name,
            iconCls:iconCls,
            meta:meta,
            children: children,
            component(resolve) {
                if (component.startsWith("Emp")){
                    require (['../views/emp/' + component + '.vue'], resolve)
                }
                if (component.startsWith("Per")){
                    require (['../views/per/' + component + '.vue'], resolve)
                }
                if (component.startsWith("Sal")){
                    require (['../views/sal/' + component + '.vue'], resolve)
                }
                if (component.startsWith("Sta")){
                    require (['../views/sta/' + component + '.vue'], resolve)
                }
                if (component.startsWith("Sys")){
                    require (['../views/sys/' + component + '.vue'], resolve)
                }
            }
        }
        fmRoutes.push(fmRouter)

    })
    return fmRoutes;
}最后在main.js中配置跳转
import {initMenu} from "@/utils/menus";

router.beforeEach((to,from,next) => {
  if (to.path == '/') {
    next();
  } else {
    initMenu(router, store);
    next();
  }
})在Home.vue中加载
<script>
export default {
computed : {
  routes() {
    return this.$store.state.routes
  }
}
</script>
安装图表库
npm install font-awesome在main.js中引入
import 'font-awesome/css/font-awesome.min.css'Home.vue
<i style="color: #409eff; margin-right: 8px" :class="item.iconCls"></i>配置权限的跳转
main.js中
router.beforeEach((to,from,next) => {
  if (to.path == '/') {
    next();
  } else {
      if (window.sessionStorage.getItem("user")){
        initMenu(router, store);
        next();
      } else {

        next('/?redirect=' + to.path);

      }

  }
})为了让登录时的url在登录后同样适用,配置Login.vue
let path = this.$route.query.redirect;

this.$router.replace((path == '/home' || path == undefined)? '/home' : path)
五、前后端对接
基础连接
安装axios
npm install axios封装工具类api.js,处理登录请求的状态码信息
import axios from 'axios'
import { Message } from 'element-ui'
import router from '../router'

axios.interceptors.response.use(success=>{

    if (success.status && success.status ==200 && success.data.status ==500){
        Message.error({message:success.data.msg})
        return;
    }
    if (success.data.msg){
        Message.success({message:success.data.msg})
    }

    return success.data;

},error => {
    if (error.response.status == 504 || error.response.status == 404){
        Message.error({message:'服务器GG了哦 ╮( ̄▽ ̄"")╭'})
    } else if (error.response.status == 403) {
        Message.error({message:'您的权限不够哦 ╮( ̄▽ ̄"")╭'})
    } else if (error.response.status == 401){
        Message.error({message:'尚未登录,请登录'})
        router.replace('/')
    } else {
        if (error.response.data.msg){
            Message.error({message:error.response.data.msg})
        } else {
            Message.error({message:'未知错误(;゜0゜)'})
        }
    }
    return;
})

let base = '';

export const postKeyValueRequest = (url, params) =>{
    return axios({
        method:'POST',
        url:`${base}${url}`,
        data:params,
        transformRequest:[function (data){
            let ret = '';
            for (let i in data){
                ret+=encodeURIComponent(i) + '=' + encodeURIComponent(data[i]) + '&'
            }
            console.log(ret);
            return ret;
        }],
        headers:{
            'Content-Type':'application/x-www-form-urlencoded'
        }
    });
}

export const postRequest = (url, params) => {
    return axios ({
        method : 'post',
        url:`${base}${url}`,
        data:params
    })
}

export const putRequest = (url, params) => {
    return axios ({
        method : 'put',
        url:`${base}${url}`,
        data:params
    })
}

export const getRequest = (url, params) => {
    return axios ({
        method : 'get',
        url:`${base}${url}`,
        data:params
    })
}

export const deleteRequest = (url, params) => {
    return axios ({
        method : 'delete',
        url:`${base}${url}`,
        data:params
    })
}在Login.vue下引入
<script>
import {postKeyValueRequest} from "@/utils/api";

  export default {
  name: "Login",
  data(){
    return {
      loginForm:{
        username:'admin',
        password:'123'
      },
      checked: true,
      rules:{
        username:[{required: true, message:"请输入你的用户名",trigger:"blur"}],
        password:[{required: true, message:"请输入密码",trigger:"blur"}]
      }
    }
  },
  methods:{
    submitLogin(){
      this.$refs.loginForm.validate((valid) => {
        if (valid) {
          postKeyValueRequest('/doLogin',this.loginForm).then(resp => {
            if (resp){
              alert(JSON.stringify(resp))
            }
          })
          // alert('提交成功!');
        } else {
          this.$message.error('请输入所有字段');
          return false;
        }
      });
    }
  }
}
</script>
前后端连接配置vue.config.js
let proxyObj = {};
proxyObj ['/'] = {
    ws:false,
    target:'http://localhost:8081',
    changeOrigin:true,
    pathRewrite:{
        '^/':''
    }
}

module.exports={
    devServer:{
        host:'localhost',
        port:8080,
        proxy:proxyObj
    }
}
登录成功
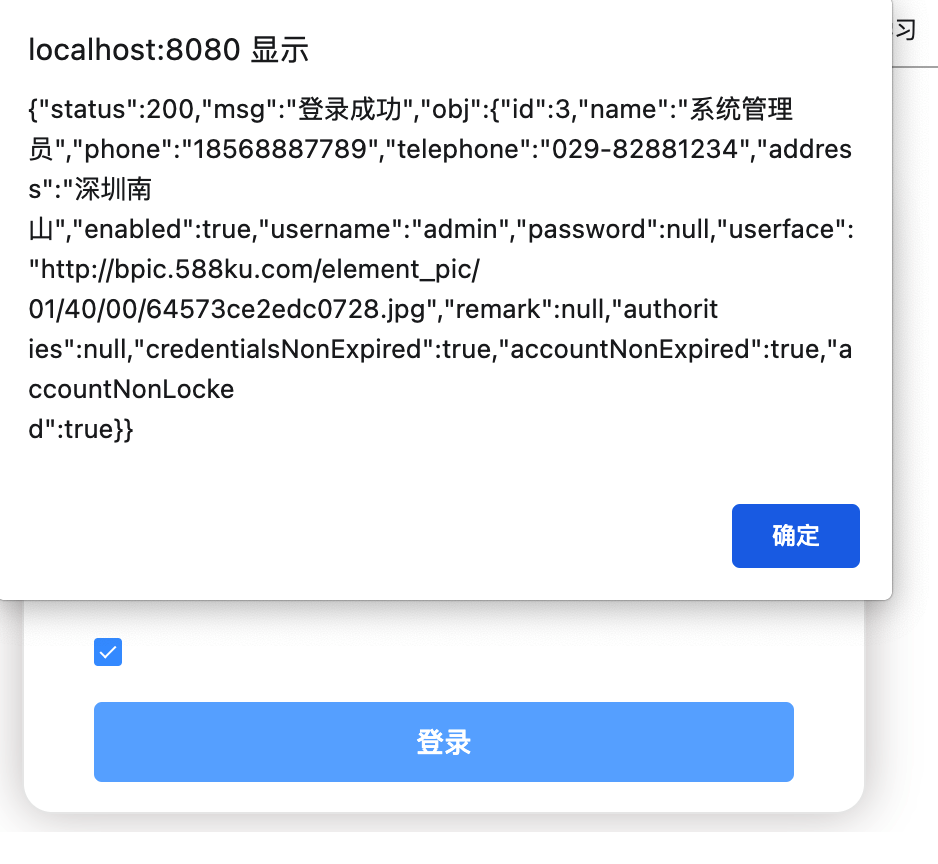
返回的是从数据库中读取到的JSON信息
登录失败
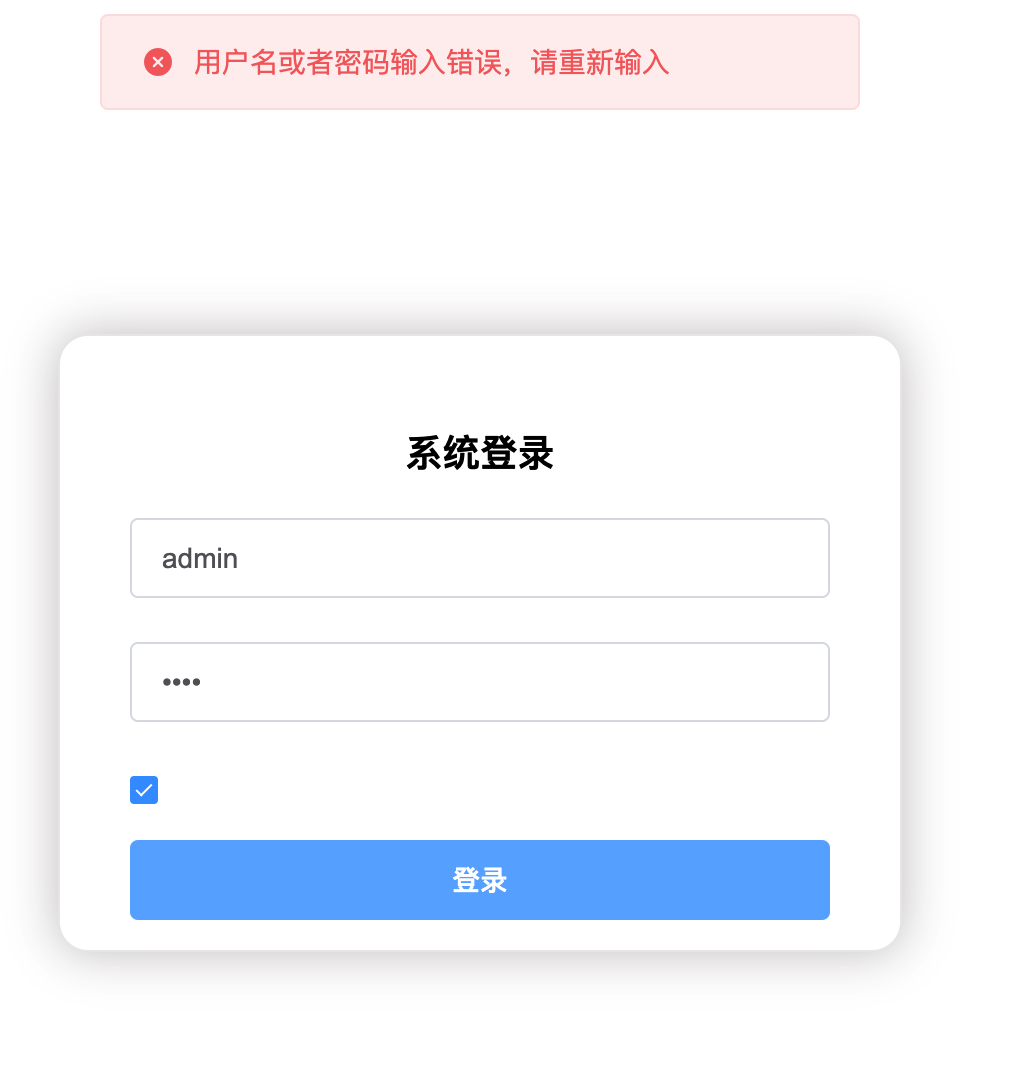
对应着后端配置类中的failureHandle中的处理字段,到目前为止,前后端已经对接成功
权限管理
在传统的前后端不分的开发中,权限管理主要通过过滤器或者拦截器来进行(权限管理框架本身也是通过过滤器来实现功能),如果用户不具备某一个角色或者某一个权限,则无法访问某一个页面。
但是在前后端分离中,页面的跳转统统交给前端去做,后端只提供数据,这种时候,权限管理不能再按照之前的思路来。
首先要明确一点,前端是展示给用户看的,所有的菜单显示或者隐藏目的不是为了实现权限管理,而是为了给用户一个良好的体验,不能依靠前端隐藏控件来实现权限管理,即数据安全不能依靠前端。
这点就像普通的表单提交一样,前端做数据校验是为了提高效率,提高用户体验,后端才是真正的确保数据完整性。
所以,真正的数据安全管理是在后端实现的,后端在接口设计的过程中,就要确保每一个接口都是在满足某种权限的基础上才能访问,也就是说,不怕将后端数据接口地址暴露出来,即使暴露出来,只要你没有相应的角色,也是访问不了的。
前端为了良好的用户体验,需要将用户不能访问的接口或者菜单隐藏起来。
有人说,如果用户直接在地址拦输入某一个页面的路径,怎么办?此时,如果没有做任何额外的处理的话,用户确实可以通过直接输入某一个路径进入到系统中的某一个页面中,但是,不用担心数据泄露问题,因为没有相关的角色,就无法访问相关的接口。
但是,如果用户非这样操作,进入到一个空白的页面,用户体验不好,此时,我们可以使用 Vue 中的前置路由导航守卫,来监听页面跳转,如果用户想要去一个未获授权的页面,则直接在前置路由导航守卫中将之拦截下来,重定向到登录页,或者直接就停留在当前页,不让用户跳转,也可以顺手再给用户一点点未获授权的提示信息。
总而言之一句话,前端的所有操作,都是为了提高用户体验,不是为了数据安全,真正的权限校验要在后端来做,后端如果是 SSM 架构,建议使用 Shiro ,如果是 Spring Boot + 微服务,建议使用 Spring Security,本系统就是利用 Spring Security 来实现的
六、后端的搭建
服务器环境的搭建
创建项目,添加依赖

<dependency>
    <groupId>com.alibaba</groupId>
    <artifactId>druid-spring-boot-starter</artifactId>
    <version>1.1.10</version>
</dependency>
 <dependency>
   <groupId>mysql</groupId>
   <artifactId>mysql-connector-java</artifactId>
   <scope>runtime</scope>
   <version>5.1.47</version>
</dependency>
数据库设计
权限数据库主要包含了五张表,分别是资源表、角色表、用户表、资源角色表、用户角色表,数据库关系模型如下:
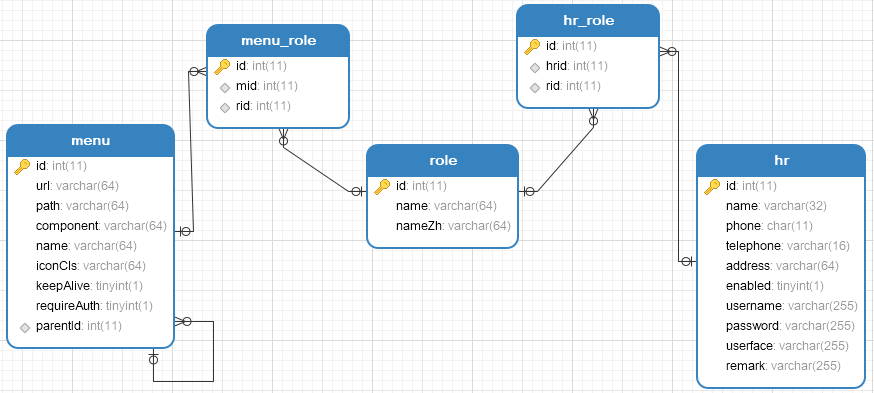
- hr表是用户表,存放了用户的基本信息。
- role是角色表,name字段表示角色的英文名称,按照SpringSecurity的规范,将以
ROLE_开始,nameZh字段表示角色的中文名称。 - menu表是一个资源表,该表涉及到的字段有点多,由于我的前端采用了Vue来做,因此当用户登录成功之后,系统将根据用户的角色动态加载需要的模块,所有模块的信息将保存在menu表中,menu表中的path、component、iconCls、keepAlive、requireAuth等字段都是Vue-Router中需要的字段,也就是说menu中的数据到时候会以json的形式返回给前端,再由vue动态更新router,menu中还有一个字段url,表示一个url pattern,即路径匹配规则,假设有一个路径匹配规则为
/admin/**,那么当用户在客户端发起一个/admin/user的请求,将被/admin/**拦截到,系统再去查看这个规则对应的角色是哪些,然后再去查看该用户是否具备相应的角色,进而判断该请求是否合法
共有22个表
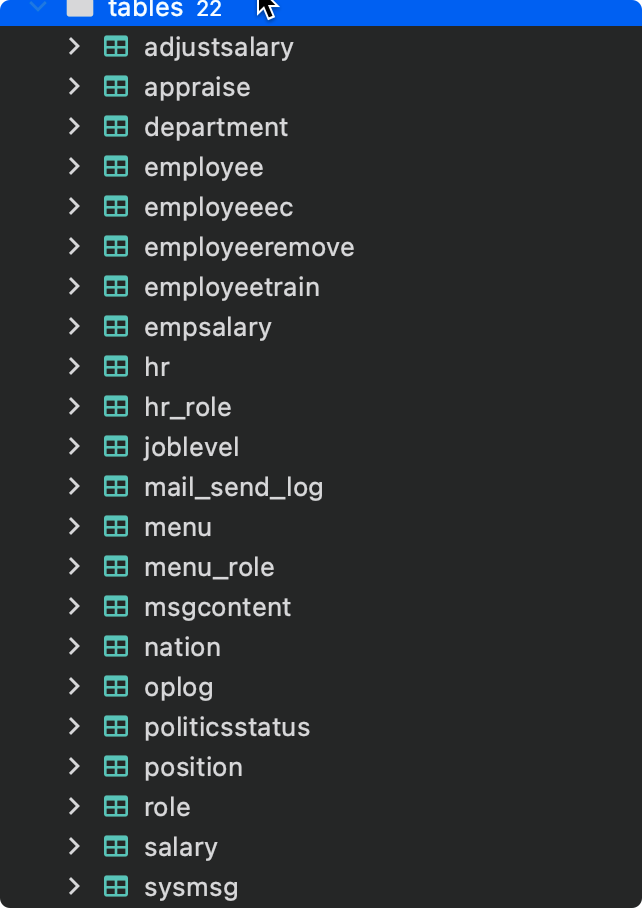
同时导入mapper和model模板文件,见项目中代码model和mapper
配置mapper扫描和pom文件
@MapperScan(basePackages="org.lucifer.vbluciferpro.mapper")<build>
<resources>
<resource>
<directory>src/main/resources</directory>
</resource>
<resource>
<directory>src/main/java</directory>
<includes>
<include>**/*.xml</include>
</includes>
</resource>
</resources>
<plugins>
<plugin>
<groupId>org.springframework.boot</groupId>
<artifactId>spring-boot-maven-plugin</artifactId>
</plugin>
</plugins>
</build>并完成JDBC的相关配置
spring.datasource.type=com.alibaba.druid.pool.DruidDataSource
spring.datasource.username=root
spring.datasource.password=Root!123
spring.datasource.url=jdbc:mysql://localhost:3306/vhr?useUnicode=true&characterEncoding=UTF-8&serverTimezone=Asia/Shanghai
# 前端Vue的接口为8080
server.port=8081
简单的测试
这里先简单的测试一个接口的效果
用户类配置
为了使用SpringSecurity,需要实现UserDetails接口并重写方法,因为重写了isEnabled方法,需要删除生成的getEnabled方法
public class Hr implements UserDetails {
    private Integer id;

    private String name;

    private String phone;

    private String telephone;

    private String address;

    private Boolean enabled;

    private String username;

    private String password;

    private String userface;

    private String remark;

   @Override
    public boolean isAccountNonExpired() {
        return true;
    }

    @Override
    public boolean isAccountNonLocked() {
        return true;
    }

    @Override
    public boolean isCredentialsNonExpired() {
        return true;
    }

    @Override
    public boolean isEnabled() {
        return enabled;
    }

    @Override
    public Collection<? extends GrantedAuthority> getAuthorities() {
        return null;
    }

}
Service
@Service
public class HrService implements UserDetailsService {

    @Autowired
    HrMapper hrMapper;

    @Override
    public UserDetails loadUserByUsername(String username) throws UsernameNotFoundException {

        Hr hr = hrMapper.loadUserByUsername(username);
        if (hr == null){
            throw new UsernameNotFoundException("用户名不存在!");
        }

        return hr;
    }
}
Mapper接口
public interface HrMapper {
    Hr loadUserByUsername(String username);
}
Mapper.xml
<mapper namespace="org.lucifer.vbluciferpro.mapper.HrMapper" >
  <resultMap id="BaseResultMap" type="org.lucifer.vbluciferpro.model.Hr" >
    <id column="id" property="id" jdbcType="INTEGER" />
    <result column="name" property="name" jdbcType="VARCHAR" />
    <result column="phone" property="phone" jdbcType="CHAR" />
    <result column="telephone" property="telephone" jdbcType="VARCHAR" />
    <result column="address" property="address" jdbcType="VARCHAR" />
    <result column="enabled" property="enabled" jdbcType="BIT" />
    <result column="username" property="username" jdbcType="VARCHAR" />
    <result column="password" property="password" jdbcType="VARCHAR" />
    <result column="userface" property="userface" jdbcType="VARCHAR" />
    <result column="remark" property="remark" jdbcType="VARCHAR" />
  </resultMap>

<select id="loadUserByUsername" resultMap="BaseResultMap">
  select * from hr where username=#{username}
</select>

</mapper>
Security配置类
@Configuration
public class SecurityConfig extends WebSecurityConfigurerAdapter {

    @Autowired
    HrService hrService;

    @Bean
    PasswordEncoder passwordEncoder(){
        return new BCryptPasswordEncoder();
    }

    @Override
    protected void configure(AuthenticationManagerBuilder auth) throws Exception {
        auth.userDetailsService(hrService);
    }

}
Controller
@RestController
public class HelloController {

    @GetMapping("/hello")
    public String hello(){
        return "hello";
    }
}这样通过登录就能访问到hello了,接下来,我们开始对Security进行登录成功失败相关配置,首先创建响应实体类(实体类都有setter/getter方法,只不过为了优雅,在这里就不展示)
public class RespBean {
    private Integer status;
    private String msg;
    private Object obj;

    public static RespBean ok(String msg){
        return new RespBean(200, msg,null);
    }
    public static RespBean ok(String msg, Object obj){
        return new RespBean(200, msg, obj);
    }
    public static RespBean error(String msg){
        return new RespBean(500,msg,null);
    }

    public static RespBean error(String msg, Object obj){
        return new RespBean(500, msg, obj);
    }

    private RespBean(Integer status, String msg, Object obj) {
        this.status = status;
        this.msg = msg;
        this.obj = obj;
    }

    private RespBean() {
    }

}
接着继续完善配置类
@Configuration
public class SecurityConfig extends WebSecurityConfigurerAdapter {

    @Autowired
    HrService hrService;

    @Bean
    PasswordEncoder passwordEncoder(){
        return new BCryptPasswordEncoder();
    }

    @Override
    protected void configure(AuthenticationManagerBuilder auth) throws Exception {
        auth.userDetailsService(hrService);
    }

    @Override
    protected void configure(HttpSecurity http) throws Exception {
        http.authorizeRequests()
                .anyRequest().authenticated()
                .and()
                .formLogin()
                .usernameParameter("username")
                .passwordParameter("password")
                .loginProcessingUrl("/doLogin")
                .loginPage("/login")
                .successHandler(new AuthenticationSuccessHandler() {
                    @Override
                    public void onAuthenticationSuccess(HttpServletRequest req, HttpServletResponse resp, Authentication authentication) throws IOException, ServletException {
                        resp.setContentType("application/json;charset=utf-8");
                        PrintWriter out = resp.getWriter();
                        Hr hr = (Hr) authentication.getPrincipal();
                        hr.setPassword(null);
                        RespBean ok = RespBean.ok("登录成功", hr);
                        String s = new ObjectMapper().writeValueAsString(ok);
                        out.write(s);
                        out.flush();
                        out.close();
                    }
                })

                .failureHandler(new AuthenticationFailureHandler() {
                    @Override
                    public void onAuthenticationFailure(HttpServletRequest req, HttpServletResponse resp, AuthenticationException exception) throws IOException, ServletException {
                        resp.setContentType("application/json;charset=utf-8");
                        PrintWriter out = resp.getWriter();
                        RespBean respBean = RespBean.error("登录失败");
                        if (exception instanceof LockedException){
                            respBean.setMsg("账户被锁定,请联系管理员");
                        } else if (exception instanceof CredentialsExpiredException){
                            respBean.setMsg("密码已过期,请联系管理员");
                        } else if (exception instanceof AccountExpiredException){
                            respBean.setMsg("账号已过期,请联系管理员");
                        } else if (exception instanceof DisabledException){
                            respBean.setMsg("账户被禁用,请联系管理员");
                        } else if (exception instanceof BadCredentialsException){
                            respBean.setMsg("用户名或者密码输入错误");
                        }
                        out.write(new ObjectMapper().writeValueAsString(respBean));
                        out.flush();
                        out.close();
                    }
                })
                .permitAll()
                .and()
                .logout()
                .logoutSuccessHandler(new LogoutSuccessHandler() {
                    @Override
                    public void onLogoutSuccess(HttpServletRequest req, HttpServletResponse resp, Authentication authentication) throws IOException, ServletException {
                        resp.setContentType("application/json;charset=utf-8");
                        PrintWriter out = resp.getWriter();
                        out.write(new ObjectMapper().writeValueAsString(RespBean.ok("注销成功")));
                        out.flush();
                        out.close();
                    }
                })
                .permitAll()
                .and()
                .csrf().disable();
    }
}
设置登录的接口
@RestController
public class LoginController {

    @GetMapping("/login")
    public RespBean login(){
        return RespBean.error("尚未登录,请登录");
    }

}
数据库驱动Menu菜单
新建实体类
public class Menu {
    private Integer id;

    private String url;

    private String path;

    private String component;

    private String name;

    private String iconCls;

    private Meta meta;

    //对应router中的子级菜单
    private List<Menu> children;

    private Integer parentId;

    private Boolean enabled;
}

public class Meta {

    private Boolean keepAlive;

    private Boolean requireAuth;
}
创建Service
@Service
public class MenuService {

    @Autowired
    MenuMapper menuMapper;

    public List<Menu> getMenusByHrId() {
        return menuMapper.getMenusByHrId(((Hr) SecurityContextHolder.getContext().getAuthentication().getPrincipal()).getId());
    }
}
调用Mapper
public interface MenuMapper {
	List<Menu> getMenusByHrId(Integer hrid);
}
根据数据库的id,设计SQL
<resultMap id="BaseResultMap" type="org.lucifer.vbluciferpro.model.Menu" >
  <id column="id" property="id" jdbcType="INTEGER" />
  <result column="url" property="url" jdbcType="VARCHAR" />
  <result column="path" property="path" jdbcType="VARCHAR" />
  <result column="component" property="component" jdbcType="VARCHAR" />
  <result column="name" property="name" jdbcType="VARCHAR" />
  <result column="iconCls" property="iconCls" jdbcType="VARCHAR" />
  <result column="parentId" property="parentId" jdbcType="INTEGER" />
  <result column="enabled" property="enabled" jdbcType="BIT" />
  <association property="meta" javaType="org.lucifer.vbluciferpro.model.Meta">
    <result column="keepAlive" property="keepAlive" jdbcType="BIT" />
    <result column="requireAuth" property="requireAuth" jdbcType="BIT" />
  </association>
</resultMap>
<sql id="Base_Column_List" >
  id, url, path, component, name, iconCls, keepAlive, requireAuth, parentId, enabled
</sql>
<resultMap id="Menus2" type="org.lucifer.vbluciferpro.model.Menu" extends="BaseResultMap">
  <collection property="children" ofType="org.lucifer.vbluciferpro.model.Menu">
    <id column="id2" property="id" jdbcType="INTEGER" />
    <result column="url2" property="url" jdbcType="VARCHAR" />
    <result column="path2" property="path" jdbcType="VARCHAR" />
    <result column="component2" property="component" jdbcType="VARCHAR" />
    <result column="name2" property="name" jdbcType="VARCHAR" />
    <result column="iconCls2" property="iconCls" jdbcType="VARCHAR" />
    <result column="parentId2" property="parentId" jdbcType="INTEGER" />
    <result column="enabled2" property="enabled" jdbcType="BIT" />
    <association property="meta" javaType="org.lucifer.vbluciferpro.model.Meta">
      <result column="keepAlive2" property="keepAlive" jdbcType="BIT" />
      <result column="requireAuth2" property="requireAuth" jdbcType="BIT" />
    </association>
  </collection>
</resultMap>
<select id="getMenusByHrId" resultMap="Menus2">
  SELECT DISTINCT  m1.*, m2.`id` as id2, m2.`component` as component2, m2.`enabled` as enabled2,
         m2.`iconCls` as iconCls2, m2.`keepAlive` as keepAlive2, m2.`name` as name2,
         m2.`parentId` as parentId2, m2.`requireAuth` as requireAuth2, m2.`path` as path2
  FROM menu m1,menu m2, hr_role hrr,menu_role mr
  where m1.`id`=m2.`parentId` and hrr.`hrid`=#{hrid} and hrr.`rid`=mr.`rid` and mr.`mid`=m2.`id` and m2.`enabled`=true
  ORDER BY m1.`id`,m2.`id`
</select>
测试用Controller
@RestController
@RequestMapping("/system/config")
public class SystemConfigController {

    @Autowired
    MenuService menuService;

    @GetMapping("/menu")
    public List<Menu> getMenusByHrId(){
        return menuService.getMenusByHrId();
    }

}
后端接口权限设计
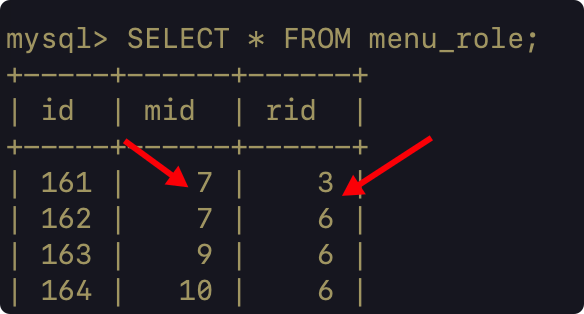
根据Menu表中的path/id/name可以确定前端发过来的请求的url访问的名字以及id
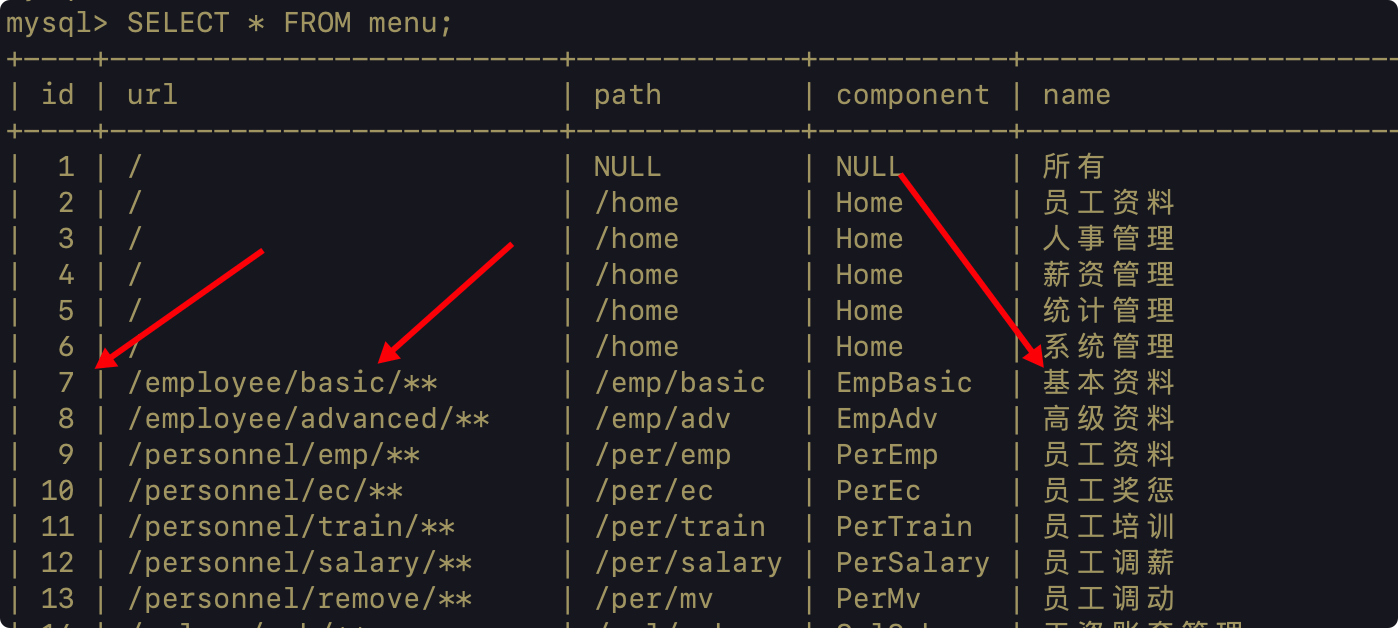
然后在Menu_role表中可以发现那些role具有当前mid的权限rid,去检查rid是否为当前登录的角色
新增配置类
/**
 * @author lucifer
 *
 * 根据用户传来的请求地址,分析出请求需要的角色
 */

@Component
public class CustomFilterInvocationSecurityMetadataSource implements FilterInvocationSecurityMetadataSource {

    @Autowired
    MenuService menuService;

    AntPathMatcher antPathMatcher = new AntPathMatcher();

    @Override
    public Collection<ConfigAttribute> getAttributes(Object object) throws IllegalArgumentException {
        String requestUrl = ((FilterInvocation) object).getRequestUrl();
        List<Menu> menus = menuService.getAllMenusWithRole();
        for (Menu menu : menus) {
            if (antPathMatcher.match(menu.getUrl(), requestUrl)) {
                List<Role> roles = menu.getRoles();

                String[] str = new String[roles.size()];
                for (int i = 0; i < roles.size(); i++) {
                    str[i] = roles.get(i).getName();
                }

                return SecurityConfig.createList(str);
            }
        }
        return SecurityConfig.createList("ROLE_LOGIN");
    }

    @Override
    public Collection<ConfigAttribute> getAllConfigAttributes() {
        return null;
    }

    @Override
    public boolean supports(Class<?> clazz) {
        return false;
    }
}


@Component
public class CustomUrlDecisionManager implements AccessDecisionManager {

    @Override
    public void decide(Authentication authentication, Object object, Collection<ConfigAttribute> configAttributes) throws AccessDeniedException, InsufficientAuthenticationException {
        for (ConfigAttribute configAttribute : configAttributes) {
            String needRole = configAttribute.getAttribute();
            if ("ROLE_LOGIN".equals(needRole)) {
                if (authentication instanceof AnonymousAuthenticationToken){
                    throw new AccessDeniedException("尚未登录,请登录!");
                } else {
                    return;
                }
            }
            Collection<? extends GrantedAuthority> authorities = authentication.getAuthorities();
            for (GrantedAuthority authority : authorities) {
                //需要的角色能被检测到
                if (authority.getAuthority().equals(needRole)){
                    return;
                }
            }
        }
        throw new AccessDeniedException("权限不足,请返回!");
    }

    @Override
    public boolean supports(ConfigAttribute attribute) {
        return false;
    }

    @Override
    public boolean supports(Class<?> clazz) {
        return false;
    }
}
在Security配置类中注入
@Autowired
CustomFilterInvocationSecurityMetadataSource customFilterInvocationSecurityMetadataSource;

@Autowired
CustomUrlDecisionManager customUrlDecisionManager;

 @Override
    public void configure(WebSecurity web) throws Exception {
        //防止访问登录页面死循环,不用进入Security拦截
        web.ignoring().antMatchers("/login");
    }


 @Override
    protected void configure(HttpSecurity http) throws Exception {
        http.authorizeRequests()

                .withObjectPostProcessor(new ObjectPostProcessor<FilterSecurityInterceptor>() {
                    @Override
                    public <O extends FilterSecurityInterceptor> O postProcess(O object) {
                        object.setAccessDecisionManager(customUrlDecisionManager);
                        object.setSecurityMetadataSource(customFilterInvocationSecurityMetadataSource);
                        return object;
                    }
                })
                //.anyRequest().authenticated()


                  //解决没登录时,重定向的跨域问题,这里直接处理,不重定向
                .csrf().disable().exceptionHandling().authenticationEntryPoint(new AuthenticationEntryPoint() {
            @Override
            public void commence(HttpServletRequest req, HttpServletResponse resp, AuthenticationException authException) throws IOException, ServletException {
                resp.setContentType("application/json;charset=utf-8");
              	//重启服务器的时候,设置状态码,跳转登录页面
              	resp.setStatus(401);
                PrintWriter out = resp.getWriter();
                RespBean respBean = RespBean.error("访问失败");
                //session失效,跳转登录页面
                if (authException instanceof InsufficientAuthenticationException){
                    respBean.setMsg("请求失败,请联系管理员!");
                }
                out.write(new ObjectMapper().writeValueAsString(respBean));
                out.flush();
            }
实体类Hr新增Role属性
private List<Role> roles;实体类Menu同样新增Role属性
private List<Role> roles;MenuService新增方法
//@Cacheable
public List<Menu> getAllMenusWithRole() {
    return menuMapper.getAllMenusWithRole();
}
MenuMapper
<resultMap id="MenuWithRole" type="org.lucifer.vbluciferpro.model.Menu" extends="BaseResultMap">
  <collection property="roles" ofType="org.lucifer.vbluciferpro.model.Role">
    <id column="rid" property="id"/>
    <result column="rname" property="name"/>
    <result column="rnameZh" property="nameZh"/>
  </collection>
</resultMap>


<select id="getAllMenusWithRole" resultMap="MenuWithRole">
  SELECT m.*, r.`id` as rid, r.`name` as rname, r.`nameZh` as rnameZh
  FROM menu m, menu_role mr, role r
  WHERE m.`id` = mr.`mid` AND mr.`rid` = r.`id`
  ORDER BY m.`id`;
</select>HrService中需要添加注入角色的字段,不然为null
hr.setRoles(hrMapper.getHrRolesById(hr.getId()));HrMapper
<select id="getHrRolesById" resultType="org.lucifer.vbluciferpro.model.Role">
  SELECT r.* FROM role r, hr_role hrr WHERE hrr.`rid` = r.`id` AND hrr.`hrid` = #{id}
</select>
测试类
@GetMapping("/employee/basic/hello")
public String test(){
    return "/employee/basic/hello";
}

@GetMapping("/employee/advanced/hello")
public String test2(){
    return "/employee/advanced/hello";
}
七、业务模块
系统管理
基础信息设置
views/sys/SysBasic.vue下定义每个标签
<template>
    <div>
      <el-tabs v-model="activeName" type="card">
        <el-tab-pane label="部门管理" name="first"><DepMana></DepMana></el-tab-pane>
        <el-tab-pane label="职位管理" name="second"><PosMana></PosMana></el-tab-pane>
        <el-tab-pane label="职称管理" name="third"><JobLevelMana></JobLevelMana></el-tab-pane>
        <el-tab-pane label="奖惩规则" name="fourth"><EcMana></EcMana></el-tab-pane>
        <el-tab-pane label="权限组" name="fifth"><PermissMana></PermissMana></el-tab-pane>
      </el-tabs>
    </div>
</template>

<script>
    import DepMana from "@/components/sys/basic/DepMana";
    import EcMana from "@/components/sys/basic/EcMana";
    import JobLevelMana from "@/components/sys/basic/JobLevelMana";
    import PermissMana from "@/components/sys/basic/PermissMana";
    import PosMana from "@/components/sys/basic/PosMana";
    export default {
        name: "SysBasic",
        data(){
            return {
              activeName: ''
            }
        },
        components:{
          DepMana,
          EcMana,
          JobLevelMana,
          PermissMana,
          PosMana
        }
    }
</script>

<style scoped>

</style>其中的<DepMana>等标签,对应components/sys/basic/DepMana.vue,这样就可以对不同的标签进行开发
职位管理
前端部分
PosMana.vue
<template>

  <div>
    <div>
      <el-input
          size="small"
          class="addPosInput"
          placeholder="添加职位"
          prefix-icon="el-icon-plus"
          v-model="pos.name">
      </el-input>
      <el-button icon="el-icon-plus" size="small" type="primary">添加</el-button>
    </div>
    <div class="posManaMain">
    <el-table
          :data="positions"
          border
          stripe
          style="width: 70%">
        <el-table-column
            prop="id"
            label="编号"
            width="55">
        </el-table-column>
        <el-table-column
            prop="name"
            label="职位名称"
            width="120">
        </el-table-column>
        <el-table-column
            prop="createDate"
            label="创建时间">
        </el-table-column>
      </el-table>

    </div>
  </div>


</template>

<script>
export default {
  name: "PosMana",
  data(){
    return {
      pos: {
        name: ''
      },
      positions: []
    }
}


}
</script>

<style scoped>
.addPosInput {
  width: 300px;
  margin-right: 8px
}

.posManaMain {
  margin-top: 10px;
}

</style>
后端部分
先写测试接口
@RestController
@RequestMapping("/system/basic/pos")
public class PositionController {

    @Autowired
    PositionService positionService;

    @GetMapping("/")
    public List<Position> getAllPositions(){
        return positionService.getAllPositions();
    }

    @PostMapping("/")
    public RespBean addPosition(@RequestBody Position position){
        if (positionService.addPosition(position) == 1){
            return RespBean.ok("添加成功");
        }
        return RespBean.error("添加失败");
    }

    @PutMapping("/")
    public RespBean updatePositions(@RequestBody Position position) {
        if (positionService.updatePositions(position) == 1) {
            return RespBean.ok("更新成功!");
        }
        return RespBean.error("更新失败!");
    }

    @DeleteMapping("/{id}")
    public RespBean deletePositionById(@PathVariable Integer id) {
        if (positionService.deletePositionById(id) == 1) {
            return RespBean.ok("删除成功!");
        }
        return RespBean.error("删除失败!");
    }
Service
@Service
public class PositionService {

    @Autowired
    PositionMapper positionMapper;

    public List<Position> getAllPositions() {
        return positionMapper.getAllPositions();
    }

    public Integer addPosition(Position position) {
        position.setEnabled(true);
        position.setCreateDate(new Date());
        return positionMapper.insertSelective(position);

    }

    public Integer updatePositions(Position position) {
        return positionMapper.updateByPrimaryKeySelective(position);
    }

    public Integer deletePositionById(Integer id) {
        return positionMapper.deleteByPrimaryKey(id);
    }

}
Mapper
public interface PositionMapper {
    int deleteByPrimaryKey(Integer id);

    int insert(Position record);

    int insertSelective(Position record);

    Position selectByPrimaryKey(Integer id);

    int updateByPrimaryKeySelective(Position record);

    int updateByPrimaryKey(Position record);

    List<Position> getAllPositions();

}
对应的xml文件
<select id="getAllPositions" resultMap="BaseResultMap">
  SELECT * FROM position;
</select>
这样就完成了对职位管理的添加,更新,删除操作
前后端对接
先针对PosMana进行删除添加相关的补充
<template>

  <div>
    <div>
      <el-input
          size="small"
          class="addPosInput"
          placeholder="添加职位"
          prefix-icon="el-icon-plus"
          @keydown.enter.native="addPosition"
          v-model="pos.name">
      </el-input>
      <el-button icon="el-icon-plus" size="small" type="primary" @click="addPosition">添加</el-button>
    </div>
    <div class="posManaMain">
    <el-table
          :data="positions"
          @selection-change="handleSelectionChange"
          border
          stripe
          style="width: 70%">
      <el-table-column
          type="selection"
          width="55">
      </el-table-column>
        <el-table-column
            prop="id"
            label="编号"
            width="55">
        </el-table-column>
        <el-table-column
            prop="name"
            label="职位名称"
            width="150">
        </el-table-column>
        <el-table-column
            prop="createDate"
            width="150"
            label="创建时间">
        </el-table-column>

      <el-table-column label="操作">
        <template slot-scope="scope">
          <el-button
              size="mini"
              @click="showEditView(scope.$index, scope.row)">编辑
          </el-button>
          <el-button
              size="mini"
              type="danger"
              @click="handleDelete(scope.$index, scope.row)">删除
          </el-button>
        </template>
      </el-table-column>
      </el-table>
      <el-button @click="deleteMany" type="danger" size="small" style="margin-top: 8px"
                 :disabled="multipleSelection.length==0">批量删除
      </el-button>
    </div>
    <el-dialog
        title="修改职位"
        :visible.sync="dialogVisible"
        width="30%">
      <div>
        <el-tag>职位名称</el-tag>
        <el-input class="updatePosInput" size="small" v-model="updatePos.name"></el-input>
      </div>
      <span slot="footer" class="dialog-footer">
 <el-button size="small" @click="dialogVisible = false">取 消</el-button>
    <el-button size="small" type="primary" @click="doUpdate">确 定</el-button>
  </span>
    </el-dialog>
  </div>
</template>

<script>
export default {
  name: "PosMana",
  data() {
    return {
      pos: {
        name: ''
      },
      dialogVisible: false,
      updatePos: {
        name: '',
        enabled: false
      },
      positions: [],
      multipleSelection: [],
    }
  },

  // 钩子函数
  mounted() {
    this.initPositions();
  },
  methods:{
    initPositions() {
      this.getRequest("/system/basic/pos/").then(resp => {
        if (resp) {
          this.positions = resp;
        }
      })
    },
    handleSelectionChange(val) {
      this.multipleSelection = val;
    },
    showEditView(index, data) {
      Object.assign(this.updatePos, data);
      this.dialogVisible = true;
    },
    handleDelete(index, data) {
      this.$confirm('此操作将永久删除【' + data.name + '】职位, 是否继续?', '提示', {
        confirmButtonText: '确定',
        cancelButtonText: '取消',
        type: 'warning'
      }).then(() => {
        this.deleteRequest("/system/basic/pos/" + data.id).then(resp => {
          if (resp) {
            this.initPositions();
          }
        })
      }).catch(() => {
        this.$message({
          type: 'info',
          message: '已取消删除'
        });
      });
    },
    addPosition() {
      if (this.pos.name) {
        this.postRequest("/system/basic/pos/", this.pos).then(resp => {
          if (resp) {
            this.initPositions();
            this.pos.name = '';
          }
        })
      } else {
        this.$message.error('职位名称不可以为空');
      }
    },
    doUpdate() {
      this.putRequest("/system/basic/pos/", this.updatePos).then(resp => {
        if (resp) {
          this.initPositions();
          this.updatePos.name = '';
          this.dialogVisible = false;
        }
      })
    },
    deleteMany() {
      this.$confirm('此操作将永久删除 ' + this.multipleSelection.length + ' 条记录, 是否继续?', '提示', {
        confirmButtonText: '确定',
        cancelButtonText: '取消',
        type: 'warning'
      }).then(() => {
        let ids = '?';
        this.multipleSelection.forEach(item => {
          ids += 'ids=' + item.id + '&';
        })
        this.deleteRequest("/system/basic/pos/" + ids).then(resp => {
          if (resp) {
            this.initPositions();
          }
        })
      }).catch(() => {
        this.$message({
          type: 'info',
          message: '已取消删除'
        });
      });
    },


  }
}
</script>

<style scoped>
.addPosInput {
  width: 300px;
  margin-right: 8px
}

.posManaMain {
  margin-top: 10px;
}

.updatePosInput {
  width: 200px;
  margin-left: 8px;
}

</style>
删除的时候,有些职位并不能删除,需要做全局异常处理
@RestControllerAdvice
public class GlobalExceptionHandler {

    @ExceptionHandler(SQLException.class)
    public RespBean sqlException(SQLException e){
        if (e instanceof MySQLIntegrityConstraintViolationException){
            return RespBean.error("该数据有关联数据,操作失败!");
        }
        return RespBean.error("数据库异常,操作失败!");
    }
}
并添加批量删除的接口
@DeleteMapping("/")
public RespBean deletePositionsByIds(Integer[] ids) {
    if (positionService.deletePositionsByIds(ids) == ids.length) {
        return RespBean.ok("删除成功!");
    }
    return RespBean.error("删除失败!");
}
并生成相应的Service和Mapper接口,最终在mapper.xml文件中完善sql语句
<delete id="deletePositionsByIds">
  DELETE FROM position WHERE id in
  <foreach collection="ids" item="id" separator="," open="(" close=")">
    #{id}
  </foreach>
</delete>
职称管理
前端部分
JobLevelMana.vue
<template>

  <div>
    <div>
      <el-input size="small" v-model="jl.name" style="width: 300px;" prefix-icon="el-icon-plus"
                placeholder="添加职称">
      </el-input>
      <el-select v-model="jl.titleLevel" placeholder="职称等级" size="small"
                 style="margin-left: 5px;margin-right: 5px">
        <el-option
            v-for="item in titleLevels"
            :key="item"
            :label="item"
            :value="item">
        </el-option>
      </el-select>
      <el-button icon="el-icon-plus" type="primary" size="small">添加</el-button>
      </div>
    <div style="margin-top: 10px">
      <el-table
          :data="jls"
          border
          size="small"
          style="width: 80%">
        <el-table-column
            type="selection"
            width="55">
        </el-table-column>
        <el-table-column
            prop="id"
            label="编号"
            width="55">
        </el-table-column>
        <el-table-column
            prop="name"
            label="职称名称"
            width="150">
        </el-table-column>
        <el-table-column
            prop="titleLevel"
            label="职称级别">
        </el-table-column>
        <el-table-column
            prop="createDate"
            label="创建时间">
        </el-table-column>
<!--        <el-table-column
            label="是否启用">
          <template slot-scope="scope">
            <el-tag type="success" v-if="scope.row.enabled">已启用</el-tag>
            <el-tag type="danger" v-else>未启用</el-tag>
          </template>
        </el-table-column>-->
        <el-table-column
            label="操作">
          <template slot-scope="scope">
            <el-button size="small" >编辑</el-button>
            <el-button size="small" type="danger" >删除</el-button>
          </template>
        </el-table-column>
      </el-table>
    </div>

  </div>

</template>

<script>
export default {
  name: "JobLevelMana",
  data() {
    return {
      jl: {
        name: '',
        titleLevel: ''
      },
      jls: [],
      titleLevels: [
        '正高级',
        '副高级',
        '中级',
        '初级',
        '员级',
      ]
    }
  }
}
</script>

<style scoped>

</style>
后端部分
接口
@RestController
@RequestMapping("/system/basic/joblevel")
public class JobLevelController {

    @Autowired
    JobLevelService jobLevelService;

    @GetMapping("/")
    public List<Position> getAllJobLevels(){
        return jobLevelService.getAllJobLevels();
    }

    @PostMapping("/")
    public RespBean addJobLevel(@RequestBody JobLevel jobLevel) {
        if (jobLevelService.addJobLevel(jobLevel) == 1) {
            return RespBean.ok("添加成功!");
        }
        return RespBean.error("添加失败!");
    }

    @PutMapping("/")
    public RespBean updateJobLevelById(@RequestBody JobLevel jobLevel) {
        if (jobLevelService.updateJobLevelById(jobLevel) == 1) {
            return RespBean.ok("更新成功!");
        }
        return RespBean.error("更新失败!");
    }

    @DeleteMapping("/{id}")
    public RespBean deleteJobLevelById(@PathVariable Integer id) {
        if (jobLevelService.deleteJobLevelById(id) == 1) {
            return RespBean.ok("删除成功!");
        }
        return RespBean.error("删除失败!");
    }

    @DeleteMapping("/")
    public RespBean deleteJobLevelsByIds(Integer[] ids) {
        if (jobLevelService.deleteJobLevelsByIds(ids) == ids.length) {
            return RespBean.ok("删除成功!");
        }
        return RespBean.error("删除失败!");
    }

}
业务类
@Service
public class JobLevelService {

    @Autowired
    JobLevelMapper jobLevelMapper;

    public List<Position> getAllJobLevels() {
     return jobLevelMapper.getAllJobLevels();
    }

    public Integer addJobLevel(JobLevel jobLevel) {
        jobLevel.setCreateDate(new Date());
        jobLevel.setEnabled(true);
        return jobLevelMapper.insertSelective(jobLevel);
    }

    public Integer updateJobLevelById(JobLevel jobLevel) {
        return jobLevelMapper.updateByPrimaryKeySelective(jobLevel);
    }

    public Integer deleteJobLevelById(Integer id) {
        return jobLevelMapper.deleteByPrimaryKey(id);
    }

    public Integer deleteJobLevelsByIds(Integer[] ids) {
        return jobLevelMapper.deleteJobLevelsByIds(ids);
    }

}
Mapper
public interface JobLevelMapper {
    int deleteByPrimaryKey(Integer id);

    int insert(JobLevel record);

    int insertSelective(JobLevel record);

    JobLevel selectByPrimaryKey(Integer id);

    int updateByPrimaryKeySelective(JobLevel record);

    int updateByPrimaryKey(JobLevel record);

    List<Position> getAllJobLevels();

    Integer deleteJobLevelsByIds(@Param("ids") Integer[] ids);

}<select id="getAllJobLevels" resultMap="BaseResultMap">
SELECT * FROM joblevel;
</select>
<delete id="deleteJobLevelsByIds">
delete from joblevel where id in
<foreach collection="ids" item="id" close=")" open="(" separator=",">
#{id}
</foreach>
</delete>前后端对接
主要对添加,编辑,删除按钮进行设计
<template>

  <div>
    <div>
      <el-input size="small" v-model="jl.name" style="width: 300px;" prefix-icon="el-icon-plus"
                placeholder="添加职称">
      </el-input>
      <el-select v-model="jl.titleLevel" placeholder="职称等级" size="small"
                 style="margin-left: 5px;margin-right: 5px">
        <el-option
            v-for="item in titleLevels"
            :key="item"
            :label="item"
            :value="item">
        </el-option>
      </el-select>
      <el-button icon="el-icon-plus" type="primary" size="small" @click="addJobLevel">添加</el-button>
      </div>
    <div style="margin-top: 10px">
      <el-table
          :data="jls"
          border
          size="small"
          @selection-change="handleSelectionChange"
          style="width: 80%">
        <el-table-column
            type="selection"
            width="55">
        </el-table-column>
        <el-table-column
            prop="id"
            label="编号"
            width="55">
        </el-table-column>
        <el-table-column
            prop="name"
            label="职称名称"
            width="150">
        </el-table-column>
        <el-table-column
            prop="titleLevel"
            label="职称级别">
        </el-table-column>
        <el-table-column
            prop="createDate"
            label="创建时间">
        </el-table-column>
        <el-table-column
            label="是否启用">
          <template slot-scope="scope">
            <el-tag type="success" v-if="scope.row.enabled">已启用</el-tag>
            <el-tag type="info" v-else>未启用</el-tag>
          </template>
        </el-table-column>
        <el-table-column
            label="操作">
          <template slot-scope="scope">
            <el-button size="small" @click="showEditView(scope.row)">编辑</el-button>
            <el-button size="small" type="danger" @click="deleteHandler(scope.row)">删除</el-button>
          </template>
        </el-table-column>
      </el-table>
      <el-button type="danger" size="small" style="margin-top: 10px" :disabled="multipleSelection.length==0"
                 @click="deleteMany">批量删除
      </el-button>
    </div>

    <el-dialog
        title="修改职称"
        :visible.sync="dialogVisible"
        width="30%">
      <div>
        <table>
          <tr>
            <td>
              <el-tag>职称名</el-tag>
            </td>
            <td>
              <el-input size="small" v-model="updateJl.name"></el-input>
            </td>
          </tr>
          <tr>
            <td>
              <el-tag>职称级别</el-tag>
            </td>
            <td>
              <el-select v-model="updateJl.titleLevel" placeholder="职称等级" size="small"
                         style="margin-left: 5px;margin-right: 5px">
                <el-option
                    v-for="item in titleLevels"
                    :key="item"
                    :label="item"
                    :value="item">
                </el-option>
              </el-select>
            </td>
          </tr>
          <tr>
            <td>
              <el-tag>是否启用</el-tag>
            </td>
            <td>
              <el-switch
                  v-model="updateJl.enabled"
                  active-text="启用"
                  inactive-text="禁用">
              </el-switch>
            </td>
          </tr>
        </table>
      </div>
      <span slot="footer" class="dialog-footer">
    <el-button size="small" @click="dialogVisible = false">取 消</el-button>
    <el-button size="small" type="primary" @click="doUpdate">确 定</el-button>
  </span>
    </el-dialog>

  </div>

</template>

<script>
export default {
  name: "JobLevelMana",
  data() {
    return {
      multipleSelection: [],
      dialogVisible: false,
      updateJl: {
        name: '',
        titleLevel: '',
        enabled: false
      },

      jl: {
        name: '',
        titleLevel: ''
      },
      jls: [],
      titleLevels: [
        '正高级',
        '副高级',
        '中级',
        '初级',
        '员级',
      ]
    }
  },
  mounted() {
    this.initJls();
  },
  methods: {
    handleSelectionChange(val) {
      this.multipleSelection = val;
    },
    deleteMany() {
      this.$confirm('此操作将永久删除 ' + this.multipleSelection.length + ' 条记录, 是否继续?', '提示', {
        confirmButtonText: '确定',
        cancelButtonText: '取消',
        type: 'warning'
      }).then(() => {
        let ids = '?';
        this.multipleSelection.forEach(item => {
          ids += 'ids=' + item.id + '&';
        })
        this.deleteRequest("/system/basic/joblevel/" + ids).then(resp => {
          if (resp) {
            this.initJls();
          }
        })
      }).catch(() => {
        this.$message({
          type: 'info',
          message: '已取消删除'
        });
      });
    },
    doUpdate() {
      this.putRequest("/system/basic/joblevel/", this.updateJl).then(resp => {
        if (resp) {
          this.initJls();
          this.dialogVisible = false;
        }
      })
    },
    showEditView(data) {
      Object.assign(this.updateJl, data);
      this.dialogVisible = true;
    },
    deleteHandler(data) {
      this.$confirm('此操作将永久 ' + data.name + ' 职称, 是否继续?', '提示', {
        confirmButtonText: '确定',
        cancelButtonText: '取消',
        type: 'warning'
      }).then(() => {
        this.deleteRequest("/system/basic/joblevel/" + data.id).then(resp => {
          if (resp) {
            this.initJls();
          }
        })
      }).catch(() => {
        this.$message({
          type: 'info',
          message: '已取消删除'
        });
      });
    },
    addJobLevel() {
      if (this.jl.name && this.jl.titleLevel) {

        this.postRequest("/system/basic/joblevel/", this.jl).then(resp => {
          if (resp) {
            this.initJls();
          }
        });
      } else {
        this.$message.error("添加字段不可以为空!");
      }
    },
    initJls() {
      this.getRequest("/system/basic/joblevel/").then(resp => {
        if (resp) {
          this.jls = resp;
          this.jl = {
            name: '',
            titleLevel: ''
          };
        }
      })
    }
  }
}
</script>

<style scoped>

</style>
权限组
前端部分
PermissMana.vue
<template>

  <div>
    <div class="permissManaTool">
      <el-input size="small" placeholder="请输入角色英文名" v-model="role.name">
        <template slot="prepend">ROLE_</template>
      </el-input>

      <el-input size="small" placeholder="请输入角色中文名" v-model="role.nameZh"
                @keydown.enter.native="doAddRole">
      </el-input>

      <el-button type="primary" size="small" icon="el-icon-plus" @click="doAddRole">添加角色</el-button>
    </div>

    <div class="permissManaMain">
      <el-collapse v-model="activeName" @change="change">
        <el-collapse-item :title="r.nameZh" :name="r.id" v-for="(r,index) in roles" :key="index">

          <el-card class="box-card">
            <div slot="header" class="clearfix">
              <span>可访问的资源</span>
              <el-button style="float: right; padding: 3px 0;color: #ff0000;" icon="el-icon-delete"
                         type="text" @click="deleteRole(r)"></el-button>
            </div>
            <div>
              <el-tree
                  show-checkbox
                  node-key="id"
                  ref="tree"
                  :key="index"
                  :default-checked-keys="selectedMenus"
                  :data="allmenus" :props="defaultProps">
              </el-tree>
              <div style="display: flex;justify-content: flex-end">
                <el-button size="small" @click="cancelUpdate">取消修改</el-button>
                <el-button size="small" type="primary" @click="doUpdate(r.id,index)">确认修改</el-button>
              </div>
            </div>
          </el-card>

        </el-collapse-item>
      </el-collapse>
    </div>
  </div>

</template>

<script>
export default {
  name: "PermissMana",
  data() {
    return {
      role: {
        name: '',
        nameZh: ''
      },
      activeName: -1,
      roles: [],
      allmenus: [],
      selectedMenus: [],
      defaultProps: {
        children: 'children',
        label: 'name'
      }

    }
  },

  mounted() {
    this.initRoles();
  },

  methods: {
    initRoles() {
      this.getRequest("/system/basic/permiss/").then(resp => {
        if (resp) {
          this.roles = resp;
        }
      })
    },
    change(rid) {
      if (rid) {
        this.initAllMenus();
        this.initSelectedMenus(rid);
      }
    },
    doUpdate(rid, index) {
      let tree = this.$refs.tree[index];
      let selectedKeys = tree.getCheckedKeys(true);
      let url = '/system/basic/permiss/?rid=' + rid;
      selectedKeys.forEach(key => {
        url += '&mids=' + key;
      })
      this.putRequest(url).then(resp => {
        if (resp) {
          this.activeName = -1;
        }
      })
    },
    cancelUpdate() {
      this.activeName = -1;
    },
    initAllMenus() {
      this.getRequest("/system/basic/permiss/menus").then(resp => {
        if (resp) {
          this.allmenus = resp;
        }
      })
    },
    initSelectedMenus(rid) {
      this.getRequest("/system/basic/permiss/mids/" + rid).then(resp => {
        if (resp) {
          this.selectedMenus = resp;
        }
      })
    },
    doAddRole() {
      if (this.role.name && this.role.nameZh) {
        this.postRequest("/system/basic/permiss/role", this.role).then(resp => {
          if (resp) {
            this.role.name = '';
            this.role.nameZh = '';
            this.initRoles();
          }
        })
      } else {
        this.$message.error('数据不可以为空');
      }
    },
    deleteRole(role) {
      this.$confirm('此操作将永久删除 ' + role.nameZh + ' 角色, 是否继续?', '提示', {
        confirmButtonText: '确定',
        cancelButtonText: '取消',
        type: 'warning'
      }).then(() => {
        this.deleteRequest("/system/basic/permiss/role/" + role.id).then(resp => {
          if (resp) {
            this.initRoles();
          }
        })
      }).catch(() => {
        this.$message({
          type: 'info',
          message: '已取消删除'
        });
      });
    },
  }
  }
</script>

<style scoped>

.permissManaTool {
  display: flex;
  justify-content: flex-start;
}
.permissManaTool .el-input {
  width: 300px;
  margin-right: 6px;
}

.permissManaMain {
  margin-top: 10px;
  width: 700px;
}

</style>
后端部分
测试接口类
@RestController
@RequestMapping("/system/basic/permiss")
public class PermissController {
    @Autowired
    RoleService roleService;
    @Autowired
    MenuService menuService;
    @GetMapping("/")
    public List<Role> getAllRoles() {
        return roleService.getAllRoles();
    }
    @GetMapping("/menus")
    public List<Menu> getAllMenus() {
        return menuService.getAllMenus();
    }

    @GetMapping("/mids/{rid}")
    public List<Integer> getMidsByRid(@PathVariable Integer rid) {
        return menuService.getMidsByRid(rid);
    }

    @PutMapping("/")
    public RespBean updateMenuRole(Integer rid, Integer[] mids) {
        if (menuService.updateMenuRole(rid, mids)) {
            return RespBean.ok("更新成功!");
        }
        return RespBean.error("更新失败!");
    }

    @PostMapping("/role")
    public RespBean addRole(@RequestBody Role role) {
        if (roleService.addRole(role) == 1) {
            return RespBean.ok("添加成功!");
        }
        return RespBean.error("添加失败!");
    }

    @DeleteMapping("/role/{rid}")
    public RespBean deleteRoleById(@PathVariable Integer rid) {
        if (roleService.deleteRoleById(rid) == 1) {
            return RespBean.ok("删除成功!");
        }
        return RespBean.error("删除失败!");
    }
}
用户绑定菜单的权限,所以定义MenuService和RoleService
@Service
public class MenuService {

    @Autowired
    MenuMapper menuMapper;

    @Autowired
    MenuRoleMapper menuRoleMapper;

    public List<Menu> getMenusByHrId() {
        return menuMapper.getMenusByHrId(((Hr) SecurityContextHolder.getContext().getAuthentication().getPrincipal()).getId());
    }

    //@Cacheable
    public List<Menu> getAllMenusWithRole() {
        return menuMapper.getAllMenusWithRole();
    }

    public List<Menu> getAllMenus() {
        return menuMapper.getAllMenus();
    }

    public List<Integer> getMidsByRid(Integer rid) {
        return menuMapper.getMidsByRid(rid);
    }

    @Transactional
    public boolean updateMenuRole(Integer rid, Integer[] mids) {
        menuRoleMapper.deleteByRid(rid);
        if (mids == null || mids.length == 0) {
            return true;
        }
        Integer result = menuRoleMapper.insertRecord(rid, mids);
        return result==mids.length;
    }
}


@Service
public class RoleService {

    @Autowired
    RoleMapper roleMapper;

    public List<Role> getAllRoles() {
        return roleMapper.getAllRoles();

    }

    public Integer addRole(Role role) {
      if (!role.getName().startsWith("ROLE_")){
        role.setName("ROLE_" + role.getName());
      }
      return roleMapper.insert(role);
    }

    public Integer deleteRoleById(Integer rid) {
        return roleMapper.deleteByPrimaryKey(rid);
    }
}
Menumapper
<resultMap id="MenuWithChildren" type="org.lucifer.vbluciferpro.model.Menu" extends="BaseResultMap">
  <id column="id1" property="id"/>
  <result column="name1" property="name"/>
  <collection property="children" ofType="org.lucifer.vbluciferpro.model.Menu">
    <id column="id2" property="id"/>
    <result column="name2" property="name"/>
    <collection property="children" ofType="org.lucifer.vbluciferpro.model.Menu">
      <id column="id3" property="id"/>
      <result column="name3" property="name"/>
    </collection>
  </collection>
</resultMap>

  <select id="getAllMenus" resultMap="MenuWithChildren">
    SELECT m1.`id` as id1,m1.`name` as name1,m2.`id` as id2,m2.`name` as name2,m3.`id` as id3,m3.`name` as name3
    FROM menu m1,menu m2,menu m3
    WHERE m1.`id`=m2.`parentId` AND m2.`id`=m3.`parentId` AND m3.`enabled`=true
    ORDER BY m1.`id`,m2.`id`,m3.`id`
  </select>


  <select id="getMidsByRid" resultType="java.lang.Integer">
    select mid from menu_role where rid=#{rid};
  </select>
Rolemapper
<select id="getAllRoles" resultMap="BaseResultMap">
  select * from role;
</select>由于需要更新每个Role的管理权限,所以还要更新MenuRoleMapper
<delete id="deleteByRid">
  delete from menu_role where rid=#{rid}
</delete>
<insert id="insertRecord">
	insert into menu_role (mid,rid) values
	<foreach collection="mids" separator="," item="mid">
	(#{mid},#{rid})
	</foreach>
</insert>
部门管理
前端部分
<template>

  <div style="width: 500px;">

    <el-input
        placeholder="请输入部门名称进行搜索..."
        prefix-icon="el-icon-search"
        v-model="filterText">
    </el-input>

    <el-tree
        style="margin-top: 10px;"
        :data="deps"
        :props="defaultProps"
        :expand-on-click-node="false"
        :filter-node-method="filterNode"
        ref="tree">
      <span class="custom-tree-node" style="display: flex;justify-content:space-between;width: 100%;"
                  slot-scope="{ node, data }">
        <span>{{data.name }}</span>
        <span>
          <el-button
              type="primary"
              size="small"
              class="depBtn"
              @click="() => showAddDepView(data)">
            添加部门
          </el-button>
          <el-button
              type="danger"
              size="small"
              class="depBtn"
              @click="() => deleteDep(data)">
            删除部门
          </el-button>
        </span>
      </span>
    </el-tree>

    <el-dialog
        title="添加部门"
        :visible.sync="dialogVisible"
        width="30%">
      <div>
        <table>
          <tr>
            <td>
              <el-tag>上级部门</el-tag>
            </td>
            <td>{{pname}}</td>
          </tr>
          <tr>
            <td>
              <el-tag>部门名称</el-tag>
            </td>
            <td>
              <el-input v-model="dep.name" placeholder="请输入部门名称..."></el-input>
            </td>
          </tr>
        </table>
      </div>
      <span slot="footer" class="dialog-footer">
    <el-button @click="dialogVisible = false">取 消</el-button>
    <el-button type="primary" @click="doAddDep">确 定</el-button>
      </span>
  </el-dialog>

  </div>

</template>

<script>
export default {
  name: "DepMana",
  data() {
    return {
      filterText: '',
      deps: [],
      defaultProps: {
        children: 'children',
        label: 'name'
      },
      pname: '',
      dep: {
        name: '',
        parentId: -1
      },
      dialogVisible: false,
    }
  },

  watch: {
    filterText(val) {
      this.$refs.tree.filter(val);
    }
  },

  mounted() {
    this.initDeps();
  },

  methods : {

    initDeps() {
      this.getRequest("/system/basic/department/").then(resp => {
        if (resp) {
          this.deps = resp;
        }
      })
    },

    filterNode(value, data) {
      if (!value) return true;
      return data.name.indexOf(value) !== -1;
    },

    showAddDepView(data) {
      this.pname = data.name;
      this.dep.parentId = data.id;
      this.dialogVisible = true;
    },

    initDep() {
      this.dep = {
        name: '',
        parentId: -1
      }
      this.pname = '';
    },

    doAddDep() {
      this.postRequest("/system/basic/department/", this.dep).then(resp => {
        if (resp) {
          this.addDep2Deps(this.deps, resp.obj);
          this.dialogVisible = false;
          //初始化变量
          this.initDep();
        }
      })
    },

    addDep2Deps(deps, dep) {
      for (let i = 0; i < deps.length; i++) {
        let d = deps[i];
        if (d.id == dep.parentId) {
          d.children = d.children.concat(dep);
          if (d.children.length > 0) {
            d.parent = true;
          }
          return;
        } else {
          this.addDep2Deps(d.children, dep);
        }
      }
    },

    deleteDep(data) {
      if (data.parent) {
        this.$message.error("父部门删除失败");
      } else {
        this.$confirm('此操作将永久删除 ' + data.name + ' 部门, 是否继续?', '提示', {
          confirmButtonText: '确定',
          cancelButtonText: '取消',
          type: 'warning'
        }).then(() => {
          this.deleteRequest("/system/basic/department/"+data.id).then(resp=>{
            if (resp) {
              this.removeDepFromDeps(null,this.deps,data.id);
            }
          })
        }).catch(() => {
          this.$message({
            type: 'info',
            message: '已取消删除'
          });
        });
      }
    },

    removeDepFromDeps(p,deps, id) {
      for(let i = 0;i < deps.length;i++){
        let d = deps[i];
        if (d.id == id) {
          deps.splice(i, 1);
          if (deps.length == 0) {
            p.parent = false;
          }
          return;
        }else{
          this.removeDepFromDeps(d,d.children, id);
        }
      }
    },

  }

}
</script>

<style scoped>
  .depBtn {
    padding: 2px;
  }
</style>
后端部分
因为这部分SQL代码比较多,所以这里使用存储过程,生成添加和删除部门的存储过程
#添加
create
    definer = root@`172.16.211.4` procedure addDep(IN depName varchar(32), IN parentId int, IN enabled tinyint(1),
                                                   OUT result int, OUT result2 int)
begin
  declare did int;
  declare pDepPath varchar(64);
  insert into department set name=depName,parentId=parentId,enabled=enabled;
  select row_count() into result;
  select last_insert_id() into did;
  set result2=did;
  select depPath into pDepPath from department where id=parentId;
  update department set depPath=concat(pDepPath,'.',did) where id=did;
  update department set isParent=true where id=parentId;
end;

#删除
create
    definer = root@`172.16.211.4` procedure deleteDep(IN did int, OUT result int)
begin
  declare ecount int;
  declare pid int;
  declare pcount int;
  declare a int;
  select count(*) into a from department where id=did and isParent=false;
  if a=0 then set result=-2;
  else
  select count(*) into ecount from employee where departmentId=did;
  if ecount>0 then set result=-1;
  else
  select parentId into pid from department where id=did;
  delete from department where id=did and isParent=false;
  select row_count() into result;
  select count(*) into pcount from department where parentId=pid;
  if pcount=0 then update department set isParent=false where id=pid;
  end if;
  end if;
  end if;
end;对Department实体类进行修改
public class Department {
    private Integer id;

    private String name;

    private Integer parentId;

    private String depPath;

    private Boolean enabled;

    private Boolean isParent;

    private List<Department> children = new ArrayList<>();

    private Integer result;
}
Controller
@RestController
@RequestMapping("/system/basic/department")
public class DepartmentController {

    @Autowired
    DepartmentService departmentService;

    @GetMapping("/")
    public List<Department> getAllDepartments(){
        return departmentService.getAllDepartments();
    }

    //调用存储过程
    @PostMapping("/")
    public RespBean addDep(@RequestBody Department dep) {
        departmentService.addDep(dep);
        if (dep.getResult() == 1) {
            return RespBean.ok("添加成功", dep);
        }
        return RespBean.error("添加失败");
    }

    @DeleteMapping("/{id}")
    public RespBean deleteDepById(@PathVariable Integer id) {
        Department dep = new Department();
        dep.setId(id);
        departmentService.deleteDepById(dep);
        if (dep.getResult() == -2) {
            return RespBean.error("该部门下有子部门,删除失败");
        } else if (dep.getResult() == -1) {
            return RespBean.error("该部门下有员工,删除失败");
        } else if (dep.getResult() == 1) {
            return RespBean.ok("删除成功");
        }
        return RespBean.error("删除失败");
    }

}
Service
@Service
public class DepartmentService {


    @Autowired
    DepartmentMapper departmentMapper;

    public List<Department> getAllDepartments() {
        return departmentMapper.getAllDepartmentsByParentId(-1);
    }

    public void addDep(Department dep) {
        dep.setEnabled(true);
        departmentMapper.addDep(dep);
    }

    public void deleteDepById(Department dep) {
        departmentMapper.deleteDepById(dep);
    }
}
Mapper接口
public interface DepartmentMapper {
    int deleteByPrimaryKey(Integer id);

    int insert(Department record);

    int insertSelective(Department record);

    Department selectByPrimaryKey(Integer id);

    int updateByPrimaryKeySelective(Department record);

    int updateByPrimaryKey(Department record);

    List<Department> getAllDepartmentsByParentId(Integer pid);

    void addDep(Department dep);

    void deleteDepById(Department dep);

    List<Department> getAllDepartmentsWithOutChildren();
}
Mapper
<!--调用存储过程-->
    <select id="addDep" statementType="CALLABLE">
    call addDep(#{name,mode=IN,jdbcType=VARCHAR},#{parentId,mode=IN,jdbcType=INTEGER},
        #{enabled,mode=IN,jdbcType=BOOLEAN},#{result,mode=OUT,jdbcType=INTEGER},#{id,mode=OUT,jdbcType=INTEGER})
  </select>

    <select id="deleteDepById" statementType="CALLABLE">
    call deleteDep(#{id,mode=IN,jdbcType=INTEGER},#{result,mode=OUT,jdbcType=INTEGER})
  </select>
操作员管理
前端部分
在SysHr.vue中完善以下部分
<template>
  <div>
    <div style="margin-top: 10px;display: flex;justify-content: center">
      <el-input v-model="keywords" placeholder="通过用户名搜索用户" prefix-icon="el-icon-search"
                style="width: 400px;margin-right: 10px" @keydown.enter.native="doSearch"></el-input>
      <el-button icon="el-icon-search" type="primary" @click="doSearch">搜索</el-button>
    </div>

    <div class="hr-container">
      <el-card class="hr-card" v-for="(hr,index) in hrs" :key="index">
        <div slot="header" class="clearfix">
          <span>{{hr.name}}</span>
          <el-button style="float: right; padding: 3px 0;color: #e30007;" type="text"
                     icon="el-icon-delete" @click="deleteHr(hr)"></el-button>
        </div>
        <div>
          <div class="img-container">
            <img :src="hr.userface" :alt="hr.name" :title="hr.name" class="userface-img">
          </div>
          <div class="userinfo-container">
            <div>用户名:{{hr.name}}</div>
            <div>手机号码:{{hr.phone}}</div>
            <div>电话号码:{{hr.telephone}}</div>
            <div>地址:{{hr.address}}</div>
            <div>用户状态:
              <el-switch
                  v-model="hr.enabled"
                  active-text="启用"
                  @change="enabledChange(hr)"
                  active-color="#13ce66"
                  inactive-color="#ff4949"
                  inactive-text="禁用">
              </el-switch>
            </div>
            <div>用户角色:
              <el-tag type="success" style="margin-right: 6px"
                      v-for="(role,indexj) in hr.roles" :key="indexj">
                {{role.nameZh}}
              </el-tag>
              <el-popover
                  placement="right"
                  title="角色列表"
                  @show="showPop(hr)"
                  @hide="hidePop(hr)"
                  width="150"
                  trigger="click">
                <el-select v-model="selectedRoles" multiple placeholder="请选择">
                  <el-option
                      v-for="(r,indexk) in allroles"
                      :key="indexk"
                      :label="r.nameZh"
                      :value="r.id">
                  </el-option>
                </el-select>
                <el-button slot="reference" icon="el-icon-more" type="text"></el-button>
              </el-popover>
            </div>
            <div>备注:{{hr.remark}}</div>
          </div>
        </div>
      </el-card>

    </div>


  </div>
</template>

<script>
export default {
  name: "SysHr",
  data() {
    return {
      keywords: '',
      hrs: [],
      selectedRoles: [],
      allroles: []
    }
  },

  mounted() {
    this.initHrs();
  },

  methods: {
    initHrs() {
      this.getRequest("/system/hr/?keywords="+this.keywords).then(resp => {
        if (resp) {
          this.hrs = resp;
        }
      })
    },
    enabledChange(hr) {
      delete hr.roles;
      this.putRequest("/system/hr/", hr).then(resp => {
        if (resp) {
          this.initHrs();
        }
      })
    },
    showPop(hr) {
      this.initAllRoles();
      let roles = hr.roles;
      this.selectedRoles = [];
      roles.forEach(r => {
        this.selectedRoles.push(r.id);
      })
    },
    initAllRoles() {
      this.getRequest("/system/hr/roles").then(resp => {
        if (resp) {
          this.allroles = resp;
        }
      })
    },

    hidePop(hr) {
      let roles = [];
      //拷贝一份
      Object.assign(roles, hr.roles);
      let flag = false;
      if (roles.length != this.selectedRoles.length) {
        flag = true;
      } else {
        for (let i = 0; i < roles.length; i++) {
          let role = roles[i];
          for (let j = 0; j < this.selectedRoles.length; j++) {
            let sr = this.selectedRoles[j];
            if (role.id == sr) {
              roles.splice(i, 1);
              i--;
              break;
            }
          }
        }
        if (roles.length != 0) {
          flag = true;
        }
      }
      if (flag) {
        let url = '/system/hr/role?hrid=' + hr.id;
        this.selectedRoles.forEach(sr => {
          url += '&rids=' + sr;
        });
        this.putRequest(url).then(resp => {
          if (resp) {
            this.initHrs();
          }
        });
      }
    },

    doSearch() {
      this.initHrs();
    },

    deleteHr(hr) {
      this.$confirm('此操作将永久删除 '+hr.name+' , 是否继续?', '提示', {
        confirmButtonText: '确定',
        cancelButtonText: '取消',
        type: 'warning'
      }).then(() => {
        this.deleteRequest("/system/hr/"+hr.id).then(resp=>{
          if (resp) {
            this.initHrs();
          }
        })
      }).catch(() => {
        this.$message({
          type: 'info',
          message: '已取消删除'
        });
      });
    },

  }

}
</script>

<style scoped>

.hr-container {
  margin-top: 10px;
  display: flex;
  flex-wrap: wrap;
  justify-content: space-around;
}

.hr-card {
  width: 350px;
  margin-bottom: 20px;
}

.img-container {
  width: 100%;
  display: flex;
  justify-content: center;
}

.userface-img {
  width: 72px;
  height: 72px;
  border-radius: 72px;
}

.userinfo-container {
  margin-top: 20px;
}

.userinfo-container div {
  font-size: 12px;
  color: #409eff;
}


</style>
后端部分
接口设计
@RestController
@RequestMapping("/system/hr")
public class HrController {

    @Autowired
    HrService hrService;

    @Autowired
    RoleService roleService;

    @GetMapping("/")
    public List<Hr> getAllHrs(String keywords) {
        return hrService.getAllHrs(keywords);
    }

    @PutMapping("/")
    public RespBean updateHr(@RequestBody Hr hr) {
        if (hrService.updateHr(hr) == 1) {
            return RespBean.ok("更新成功!");
        }
        return RespBean.error("更新失败!");
    }

    @GetMapping("/roles")
    public List<Role> getAllRoles() {
        return roleService.getAllRoles();
    }

    @PutMapping("/role")
    public RespBean updateHrRole(Integer hrid, Integer[] rids) {
        if (hrService.updateHrRole(hrid, rids)) {
            return RespBean.ok("更新成功!");
        }
        return RespBean.error("更新失败!");
    }

    @DeleteMapping("/{id}")
    public RespBean deleteHrById(@PathVariable Integer id) {
        if (hrService.deleteHrById(id) == 1) {
            return RespBean.ok("删除成功!");
        }
        return RespBean.error("删除失败!");
}继续在Service层完善
@Service
public class HrService implements UserDetailsService {

    @Autowired
    HrMapper hrMapper;

    @Autowired
    HrRoleMapper hrRoleMapper;

    @Override
    public UserDetails loadUserByUsername(String username) throws UsernameNotFoundException {

        Hr hr = hrMapper.loadUserByUsername(username);
        if (hr == null){
            throw new UsernameNotFoundException("用户名不存在!");
        }

        hr.setRoles(hrMapper.getHrRolesById(hr.getId()));

        return hr;
    }

    public List<Hr> getAllHrs(String keywords) {
        return hrMapper.getAllHrs(HrUtils.getCurrentHr().getId(),keywords);
    }

    public Integer updateHr(Hr hr) {
        return hrMapper.updateByPrimaryKeySelective(hr);
    }

    @Transactional
    public boolean updateHrRole(Integer hrid, Integer[] rids) {
        hrRoleMapper.deleteByHrid(hrid);
        return hrRoleMapper.addRole(hrid,rids) == rids.length;
    }

    public Integer deleteHrById(Integer id) {
        return hrMapper.deleteByPrimaryKey(id);
    }

}
在实体类Hr中忽略传入的role的Json
@Override
@JsonIgnore
public Collection<? extends GrantedAuthority> getAuthorities() {
    List<SimpleGrantedAuthority> authorities = new ArrayList<>(roles.size());
    for (Role role : roles) {
        authorities.add(new SimpleGrantedAuthority(role.getName()));
    }
    return authorities;
}
HrRoleMapper
<delete id="deleteByHrid">
  delete from hr_role where hrid=#{hrid}
</delete>

<insert id="addRole">
  insert into hr_role (hrid,rid) values
  <foreach collection="rids" item="rid" separator=",">
    (#{hrid},#{rid})
  </foreach>
</insert>
HrMapper
<resultMap id="HrWithRoles" type="org.lucifer.vbluciferpro.model.Hr" extends="BaseResultMap">
  <collection property="roles" ofType="org.lucifer.vbluciferpro.model.Role">
    <id column="rid" property="id"/>
    <result column="rname" property="name"/>
    <result column="rnameZh" property="nameZh"/>
  </collection>
</resultMap>

<select id="getAllHrs" resultMap="HrWithRoles">
  SELECT hr.id, hr.name, hr.phone, hr.telephone, hr.address, hr.enabled,
  hr.username, hr.password, hr.userface, hr.remark, r.id as rid, r.name as rname, r.nameZh as rnameZh
  FROM hr LEFT JOIN hr_role hrr ON hr.id = hrr.hrid
  LEFT JOIN role r ON hrr.rid = r.id
  WHERE hr.id != #{hrid}
  <if test="keywords!=null">
    and hr.name like concat('%',#{keywords},'%')
  </if>
  ORDER BY hr.id
</select>
员工资料
此部分代码较多,但实现的功能和上面类似,不再展示
具体可去https://github.com/Lucifer2u/x-luciferpro中的版本信息查看
这里补充设计到的新知识点,导入和导出数据到Excel
导出数据
先引入依赖
<dependency>
    <groupId>org.apache.poi</groupId>
    <artifactId>poi</artifactId>
    <version>3.9</version>
</dependency>
后端代码
@RestController
@RequestMapping("/employee/basic")
public class EmpBasicController {
    @GetMapping("/export")
    public ResponseEntity<byte[]> exportData() {
        List<Employee> list = (List<Employee>) employeeService.getEmployeeByPage(null, null, null).getData();
        return POIUtils.employee2Excel(list);

    }
}
生成Excel的工具类
public class POIUtils {

    public static ResponseEntity<byte[]> employee2Excel(List<Employee> list) {
        //1. 创建一个 Excel 文档
        HSSFWorkbook workbook = new HSSFWorkbook();
        //2. 创建文档摘要
        workbook.createInformationProperties();
        //3. 获取并配置文档信息
        DocumentSummaryInformation docInfo = workbook.getDocumentSummaryInformation();
        //文档类别
        docInfo.setCategory("员工信息");
        //文档管理员
        docInfo.setManager("lucifer");
        //设置公司信息
        docInfo.setCompany("www.lucifer.org");
        //4. 获取文档摘要信息
        SummaryInformation summInfo = workbook.getSummaryInformation();
        //文档标题
        summInfo.setTitle("员工信息表");
        //文档作者
        summInfo.setAuthor("lucifer");
        // 文档备注
        summInfo.setComments("本文档由 lucifer 提供");
        //5. 创建样式
        //创建标题行的样式
        HSSFCellStyle headerStyle = workbook.createCellStyle();
        headerStyle.setFillForegroundColor(IndexedColors.YELLOW.index);
        headerStyle.setFillPattern(FillPatternType.SOLID_FOREGROUND);
        //设置日期格式
        HSSFCellStyle dateCellStyle = workbook.createCellStyle();
        dateCellStyle.setDataFormat(HSSFDataFormat.getBuiltinFormat("m/d/yy"));
        HSSFSheet sheet = workbook.createSheet("员工信息表");
        //设置列的宽度
        sheet.setColumnWidth(0, 5 * 256);
        sheet.setColumnWidth(1, 12 * 256);
        sheet.setColumnWidth(2, 10 * 256);
        sheet.setColumnWidth(3, 5 * 256);
        sheet.setColumnWidth(4, 12 * 256);
        sheet.setColumnWidth(5, 20 * 256);
        sheet.setColumnWidth(6, 10 * 256);
        sheet.setColumnWidth(7, 10 * 256);
        sheet.setColumnWidth(8, 16 * 256);
        sheet.setColumnWidth(9, 12 * 256);
        sheet.setColumnWidth(10, 15 * 256);
        sheet.setColumnWidth(11, 20 * 256);
        sheet.setColumnWidth(12, 16 * 256);
        sheet.setColumnWidth(13, 14 * 256);
        sheet.setColumnWidth(14, 14 * 256);
        sheet.setColumnWidth(15, 12 * 256);
        sheet.setColumnWidth(16, 8 * 256);
        sheet.setColumnWidth(17, 20 * 256);
        sheet.setColumnWidth(18, 20 * 256);
        sheet.setColumnWidth(19, 15 * 256);
        sheet.setColumnWidth(20, 8 * 256);
        sheet.setColumnWidth(21, 25 * 256);
        sheet.setColumnWidth(22, 14 * 256);
        sheet.setColumnWidth(23, 15 * 256);
        sheet.setColumnWidth(24, 15 * 256);
        //6. 创建标题行
        HSSFRow r0 = sheet.createRow(0);

        HSSFCell c0 = r0.createCell(0);
        c0.setCellValue("编号");
        c0.setCellStyle(headerStyle);
        HSSFCell c1 = r0.createCell(1);
        c1.setCellStyle(headerStyle);
        c1.setCellValue("姓名");
        HSSFCell c2 = r0.createCell(2);
        c2.setCellStyle(headerStyle);
        c2.setCellValue("工号");
        HSSFCell c3 = r0.createCell(3);
        c3.setCellStyle(headerStyle);
        c3.setCellValue("性别");
        HSSFCell c4 = r0.createCell(4);
        c4.setCellStyle(headerStyle);
        c4.setCellValue("出生日期");
        HSSFCell c5 = r0.createCell(5);
        c5.setCellStyle(headerStyle);
        c5.setCellValue("身份证号码");
        HSSFCell c6 = r0.createCell(6);
        c6.setCellStyle(headerStyle);
        c6.setCellValue("婚姻状况");
        HSSFCell c7 = r0.createCell(7);
        c7.setCellStyle(headerStyle);
        c7.setCellValue("民族");
        HSSFCell c8 = r0.createCell(8);
        c8.setCellStyle(headerStyle);
        c8.setCellValue("籍贯");
        HSSFCell c9 = r0.createCell(9);
        c9.setCellStyle(headerStyle);
        c9.setCellValue("政治面貌");
        HSSFCell c10 = r0.createCell(10);
        c10.setCellStyle(headerStyle);
        c10.setCellValue("电话号码");
        HSSFCell c11 = r0.createCell(11);
        c11.setCellStyle(headerStyle);
        c11.setCellValue("联系地址");
        HSSFCell c12 = r0.createCell(12);
        c12.setCellStyle(headerStyle);
        c12.setCellValue("所属部门");
        HSSFCell c13 = r0.createCell(13);
        c13.setCellStyle(headerStyle);
        c13.setCellValue("职称");
        HSSFCell c14 = r0.createCell(14);
        c14.setCellStyle(headerStyle);
        c14.setCellValue("职位");
        HSSFCell c15 = r0.createCell(15);
        c15.setCellStyle(headerStyle);
        c15.setCellValue("聘用形式");
        HSSFCell c16 = r0.createCell(16);
        c16.setCellStyle(headerStyle);
        c16.setCellValue("最高学历");
        HSSFCell c17 = r0.createCell(17);
        c17.setCellStyle(headerStyle);
        c17.setCellValue("专业");
        HSSFCell c18 = r0.createCell(18);
        c18.setCellStyle(headerStyle);
        c18.setCellValue("毕业院校");
        HSSFCell c19 = r0.createCell(19);
        c19.setCellStyle(headerStyle);
        c19.setCellValue("入职日期");
        HSSFCell c20 = r0.createCell(20);
        c20.setCellStyle(headerStyle);
        c20.setCellValue("在职状态");
        HSSFCell c21 = r0.createCell(21);
        c21.setCellStyle(headerStyle);
        c21.setCellValue("邮箱");
        HSSFCell c22 = r0.createCell(22);
        c22.setCellStyle(headerStyle);
        c22.setCellValue("合同期限(年)");
        HSSFCell c23 = r0.createCell(23);
        c23.setCellStyle(headerStyle);
        c23.setCellValue("合同起始日期");
        HSSFCell c24 = r0.createCell(24);
        c24.setCellStyle(headerStyle);
        c24.setCellValue("合同终止日期");

        for (int i = 0; i < list.size(); i++) {
            Employee emp = list.get(i);
            HSSFRow row = sheet.createRow(i + 1);
            row.createCell(0).setCellValue(emp.getId());
            row.createCell(1).setCellValue(emp.getName());
            row.createCell(2).setCellValue(emp.getWorkID());
            row.createCell(3).setCellValue(emp.getGender());
            HSSFCell cell4 = row.createCell(4);
            cell4.setCellStyle(dateCellStyle);
            cell4.setCellValue(emp.getBirthday());
            row.createCell(5).setCellValue(emp.getIdCard());
            row.createCell(6).setCellValue(emp.getWedlock());
            row.createCell(7).setCellValue(emp.getNation().getName());
            row.createCell(8).setCellValue(emp.getNativePlace());
            row.createCell(9).setCellValue(emp.getPoliticsstatus().getName());
            row.createCell(10).setCellValue(emp.getPhone());
            row.createCell(11).setCellValue(emp.getAddress());
            row.createCell(12).setCellValue(emp.getDepartment().getName());
            row.createCell(13).setCellValue(emp.getJobLevel().getName());
            row.createCell(14).setCellValue(emp.getPosition().getName());
            row.createCell(15).setCellValue(emp.getEngageForm());
            row.createCell(16).setCellValue(emp.getTiptopDegree());
            row.createCell(17).setCellValue(emp.getSpecialty());
            row.createCell(18).setCellValue(emp.getSchool());
            HSSFCell cell19 = row.createCell(19);
            cell19.setCellStyle(dateCellStyle);
            cell19.setCellValue(emp.getBeginDate());
            row.createCell(20).setCellValue(emp.getWorkState());
            row.createCell(21).setCellValue(emp.getEmail());
            row.createCell(22).setCellValue(emp.getContractTerm());
            HSSFCell cell23 = row.createCell(23);
            cell23.setCellStyle(dateCellStyle);
            cell23.setCellValue(emp.getBeginContract());
            HSSFCell cell24 = row.createCell(24);
            cell24.setCellStyle(dateCellStyle);
            cell24.setCellValue(emp.getEndContract());
/*            HSSFCell cell25 = row.createCell(25);
            cell25.setCellStyle(dateCellStyle);
            cell25.setCellValue(emp.getConversionTime());*/
        }

        ByteArrayOutputStream baos = new ByteArrayOutputStream();
        HttpHeaders headers = new HttpHeaders();
        try {
            headers.setContentDispositionFormData("attachment", new String("员工表.xls".getBytes("UTF-8"), "ISO-8859-1"));
            headers.setContentType(MediaType.APPLICATION_OCTET_STREAM);
            workbook.write(baos);
        } catch (IOException e) {
            e.printStackTrace();
        }

        return new ResponseEntity<byte[]>(baos.toByteArray(), headers, HttpStatus.CREATED);

    }

}
前端在EmpBasic.vue填写方法
<script>
export default {
  methods: {
		exportData() {
 		 window.open('/employee/basic/export', '_parent');
		}
  }
</script>
导入数据
定义接口
@PostMapping("/import")
public RespBean importData(MultipartFile file) throws IOException {
    List<Employee> list = POIUtils.excel2Employee(file, nationService.getAllNations(), politicsstatusService.getAllPoliticsstatus(), departmentService.getAllDepartmentsWithOutChildren(), positionService.getAllPositions(), jobLevelService.getAllJobLevels());
    if (employeeService.addEmps(list) == list.size()) {
        return RespBean.ok("上传成功");
    }
    return RespBean.error("上传失败");
}
后端添加工具类中的代码
// Excel 解析成员工数据集合

public static List<Employee> excel2Employee(MultipartFile file, List<Nation> allNations, List<Politicsstatus> allPoliticsstatus, List<Department> allDepartments, List<Position> allPositions, List<JobLevel> allJobLevels) {
    List<Employee> list = new ArrayList<>();
    Employee employee = null;
    try {
        //1. 创建一个 workbook 对象
        HSSFWorkbook workbook = new HSSFWorkbook(file.getInputStream());
        //2. 获取 workbook 中表单的数量
        int numberOfSheets = workbook.getNumberOfSheets();
        for (int i = 0; i < numberOfSheets; i++) {
            //3. 获取表单
            HSSFSheet sheet = workbook.getSheetAt(i);
            //4. 获取表单中的行数
            int physicalNumberOfRows = sheet.getPhysicalNumberOfRows();
            for (int j = 0; j < physicalNumberOfRows; j++) {
                //5. 跳过标题行
                if (j == 0) {
                    continue;//跳过标题行
                }
                //6. 获取行
                HSSFRow row = sheet.getRow(j);
                if (row == null) {
                    continue;//防止数据中间有空行
                }
                //7. 获取列数
                int physicalNumberOfCells = row.getPhysicalNumberOfCells();
                employee = new Employee();
                for (int k = 0; k < physicalNumberOfCells; k++) {
                    HSSFCell cell = row.getCell(k);
                    if (cell.getCellType() == CellType.STRING) {
                        String cellValue = cell.getStringCellValue();
                        switch (k) {
                            case 1:
                                employee.setName(cellValue);
                                break;
                            case 2:
                                employee.setWorkID(cellValue);
                                break;
                            case 3:
                                employee.setGender(cellValue);
                                break;
                            case 5:
                                employee.setIdCard(cellValue);
                                break;
                            case 6:
                                employee.setWedlock(cellValue);
                                break;
                            case 7:
                                int nationIndex = allNations.indexOf(new Nation(cellValue));
                                employee.setNationId(allNations.get(nationIndex).getId());
                                break;
                            case 8:
                                employee.setNativePlace(cellValue);
                                break;
                            case 9:
                                int politicstatusIndex = allPoliticsstatus.indexOf(new Politicsstatus(cellValue));
                                employee.setPoliticId(allPoliticsstatus.get(politicstatusIndex).getId());
                                break;
                            case 10:
                                employee.setPhone(cellValue);
                                break;
                            case 11:
                                employee.setAddress(cellValue);
                                break;
                            case 12:
                                int departmentIndex = allDepartments.indexOf(new Department(cellValue));
                                employee.setDepartmentId(allDepartments.get(departmentIndex).getId());
                                break;
                            case 13:
                                int jobLevelIndex = allJobLevels.indexOf(new JobLevel(cellValue));
                                employee.setJobLevelId(allJobLevels.get(jobLevelIndex).getId());
                                break;
                            case 14:
                                int positionIndex = allPositions.indexOf(new Position(cellValue));
                                employee.setPosId(allPositions.get(positionIndex).getId());
                                break;
                            case 15:
                                employee.setEngageForm(cellValue);
                                break;
                            case 16:
                                employee.setTiptopDegree(cellValue);
                                break;
                            case 17:
                                employee.setSpecialty(cellValue);
                                break;
                            case 18:
                                employee.setSchool(cellValue);
                                break;
                            case 20:
                                employee.setWorkState(cellValue);
                                break;
                            case 21:
                                employee.setEmail(cellValue);
                                break;
                        }
                    } else {
                        switch (k) {
                            case 4:
                                employee.setBirthday(cell.getDateCellValue());
                                break;
                            case 19:
                                employee.setBeginDate(cell.getDateCellValue());
                                break;
                            case 23:
                                employee.setBeginContract(cell.getDateCellValue());
                                break;
                            case 24:
                                employee.setEndContract(cell.getDateCellValue());
                                break;
                            case 22:
                                employee.setContractTerm(cell.getNumericCellValue());
                                break;
                            case 25:
                                employee.setConversionTime(cell.getDateCellValue());
                                break;
                        }
                    }
                }
                list.add(employee);
            }
        }

    } catch (IOException e) {
        e.printStackTrace();
    }
    return list;
}注意:在new Nation(cellValue)里判断nationIndex的时候,重写hashcode和equals,同理于Politicsstatus、Department、JobLevel、Position
//只用name来判断,不使用id(按理来说应该id和name都一致)
@Override
public boolean equals(Object o) {
    if (this == o) {
        return true;
    }
    if (o == null || getClass() != o.getClass()) {
        return false;
    }
    Nation nation = (Nation) o;
    return Objects.equals(name, nation.name);
}

@Override
public int hashCode() {
    return Objects.hash(name);
}
Service
public Integer addEmps(List<Employee> list) {
    return employeeMapper.addEmps(list);
}
Mapper代码可以参考插入
<insert id="addEmps">
  insert into employee (name, gender,
  birthday, idCard, wedlock, nationId,
  nativePlace, politicId, email,
  phone, address, departmentId,
  jobLevelId, posId, engageForm,
  tiptopDegree, specialty, school,
  beginDate, workState, workID,
  contractTerm, conversionTime, notWorkDate,
  beginContract, endContract, workAge
  )
  values
  <foreach collection="list" separator="," item="emp">
    (#{emp.name,jdbcType=VARCHAR}, #{emp.gender,jdbcType=CHAR},
    #{emp.birthday,jdbcType=DATE}, #{emp.idCard,jdbcType=CHAR}, #{emp.wedlock,jdbcType=CHAR},
    #{emp.nationId,jdbcType=INTEGER},
    #{emp.nativePlace,jdbcType=VARCHAR}, #{emp.politicId,jdbcType=INTEGER}, #{emp.email,jdbcType=VARCHAR},
    #{emp.phone,jdbcType=VARCHAR}, #{emp.address,jdbcType=VARCHAR}, #{emp.departmentId,jdbcType=INTEGER},
    #{emp.jobLevelId,jdbcType=INTEGER}, #{emp.posId,jdbcType=INTEGER}, #{emp.engageForm,jdbcType=VARCHAR},
    #{emp.tiptopDegree,jdbcType=CHAR}, #{emp.specialty,jdbcType=VARCHAR}, #{emp.school,jdbcType=VARCHAR},
    #{emp.beginDate,jdbcType=DATE}, #{emp.workState,jdbcType=CHAR}, #{emp.workID,jdbcType=CHAR},
    #{emp.contractTerm,jdbcType=DOUBLE}, #{emp.conversionTime,jdbcType=DATE}, #{emp.notWorkDate,jdbcType=DATE},
    #{emp.beginContract,jdbcType=DATE}, #{emp.endContract,jdbcType=DATE}, #{emp.workAge,jdbcType=INTEGER}
    )
  </foreach>
</insert>
高级搜索
后端部分
针对搜索接口优化,不再简单使用关键词搜索,加入employee,beginDateScope等高级搜索需要用到的信息
@GetMapping("/")
public RespPageBean getEmployeeByPage(@RequestParam(defaultValue = "1")Integer page, @RequestParam(defaultValue = "10")Integer size, Employee employee, Date[] beginDateScope){
    return employeeService.getEmployeeByPage(page, size, employee, beginDateScope);
}
这里需要注意的是,Date需要转换器才能直接传入,在converter包下定义日期转换器
@Component
public class DateConverter implements Converter<String, Date> {
    SimpleDateFormat sdf = new SimpleDateFormat("yyyy-MM-dd");

    @Override
    public Date convert(String source) {
        try {
            return sdf.parse(source);
        } catch (ParseException e) {
            e.printStackTrace();
        }
        return null;
    }
}
Service优化
public RespPageBean getEmployeeByPage(Integer page, Integer size,  Employee employee, Date[] beginDateScope) {
    if (page != null && size != null) {
        page = (page - 1) * size;
    }
    List<Employee> data = employeeMapper.getEmployeeByPage(page, size, employee, beginDateScope);
    Long total = employeeMapper.getTotal(employee, beginDateScope);
    RespPageBean bean = new RespPageBean();
    bean.setData(data);
    bean.setTotal(total);
    return bean;
}
加入Mapper
<select id="getEmployeeByPage" resultMap="AllEmployeeInfo">
  select e.*,p.`id` as pid,p.`name` as pname,n.`id` as nid,n.`name` as nname,d.`id` as did,d.`name` as
  dname,j.`id` as jid,j.`name` as jname,pos.`id` as posid,pos.`name` as posname from employee e,nation
  n,politicsstatus p,department d,joblevel j,position pos where e.`nationId`=n.`id` and e.`politicId`=p.`id` and
  e.`departmentId`=d.`id` and e.`jobLevelId`=j.`id` and e.`posId`=pos.`id`
  <if test="emp.name !=null and emp.name!=''">
    and e.name like concat('%',#{emp.name},'%')
  </if>
  <if test="emp.politicId !=null">
    and e.politicId =#{emp.politicId}
  </if>
  <if test="emp.nationId !=null">
    and e.nationId =#{emp.nationId}
  </if>
  <if test="emp.departmentId !=null">
    and e.departmentId =#{emp.departmentId}
  </if>
  <if test="emp.jobLevelId !=null">
    and e.jobLevelId =#{emp.jobLevelId}
  </if>
  <if test="emp.engageForm !=null and emp.engageForm!=''">
    and e.engageForm =#{emp.engageForm}
  </if>
  <if test="emp.posId !=null">
    and e.posId =#{emp.posId}
  </if>
  <if test="beginDateScope !=null">
    and e.beginDate between #{beginDateScope[0]} and #{beginDateScope[1]}
  </if>
  <if test="page !=null and size!=null">
    limit #{page},#{size}
  </if>
</select>

  <select id="getTotal" resultType="java.lang.Long">
    select count(*) from employee e
    <where>
      <if test="emp!=null">
        <if test="emp.name !=null and emp.name!=''">
          and e.name like concat('%',#{emp.name},'%')
        </if>
        <if test="emp.politicId !=null">
          and e.politicId =#{emp.politicId}
        </if>
        <if test="emp.nationId !=null">
          and e.nationId =#{emp.nationId}
        </if>
        <if test="emp.jobLevelId !=null">
          and e.jobLevelId =#{emp.jobLevelId}
        </if>
        <if test="emp.departmentId !=null">
          and e.departmentId =#{emp.departmentId}
        </if>
        <if test="emp.engageForm !=null and emp.engageForm!=''">
          and e.engageForm =#{emp.engageForm}
        </if>
        <if test="emp.posId !=null">
          and e.posId =#{emp.posId}
        </if>
      </if>
      <if test="beginDateScope !=null">
        and e.beginDate between #{beginDateScope[0]} and #{beginDateScope[1]}
      </if>
    </where>
  </select>
前端部分
在原代码上继续进行添加,加入高级搜索框的编写:
<transition name="slide-fade">
<div v-show="showAdvanceSearchView"
    style="border: 1px solid #409eff;border-radius: 5px;box-sizing: border-box;padding: 5px;margin: 10px 0px;">
  <el-row>
    <el-col :span="5">
      政治面貌:
      <el-select v-model="searchValue.politicId" placeholder="政治面貌" size="mini"
                 style="width: 130px;">
        <el-option
            v-for="item in politicsstatus"
            :key="item.id"
            :label="item.name"
            :value="item.id">
        </el-option>
      </el-select>
    </el-col>
    <el-col :span="4">
      民族:
      <el-select v-model="searchValue.nationId" placeholder="民族" size="mini"
                 style="width: 130px;">
        <el-option
            v-for="item in nations"
            :key="item.id"
            :label="item.name"
            :value="item.id">
        </el-option>
      </el-select>
    </el-col>
    <el-col :span="4">
      职位:
      <el-select v-model="searchValue.posId" placeholder="职位" size="mini" style="width: 130px;">
        <el-option
            v-for="item in positions"
            :key="item.id"
            :label="item.name"
            :value="item.id">
        </el-option>
      </el-select>
    </el-col>
    <el-col :span="4">
      职称:
      <el-select v-model="searchValue.jobLevelId" placeholder="职称" size="mini"
                 style="width: 130px;">
        <el-option
            v-for="item in joblevels"
            :key="item.id"
            :label="item.name"
            :value="item.id">
        </el-option>
      </el-select>
    </el-col>
    <el-col :span="7">
      聘用形式:
      <el-radio-group v-model="searchValue.engageForm">
        <el-radio label="劳动合同">劳动合同</el-radio>
        <el-radio label="劳务合同">劳务合同</el-radio>
      </el-radio-group>
    </el-col>
  </el-row>

  <el-row style="margin-top: 10px">
    <el-col :span="5">
      所属部门:
      <el-popover
          placement="right"
          title="请选择部门"
          width="200"
          trigger="manual"
          v-model="popVisible">
        <el-tree default-expand-all :data="allDeps" :props="defaultProps"
                 @node-click="searvhViewHandleNodeClick"></el-tree>
        <div slot="reference"
             style="width: 130px;display: inline-flex;font-size: 13px;border: 1px solid #dedede;height: 26px;border-radius: 5px;cursor: pointer;align-items: center;padding-left: 8px;box-sizing: border-box;margin-left: 3px"
             @click="showDepView">{{inputDepName}}
        </div>
      </el-popover>
    </el-col>
    <el-col :span="10">
      入职日期:
      <el-date-picker
          v-model="searchValue.beginDateScope"
          type="daterange"
          size="mini"
          unlink-panels
          value-format="yyyy-MM-dd"
          range-separator="至"
          start-placeholder="开始日期"
          end-placeholder="结束日期">
      </el-date-picker>
    </el-col>
    <el-col :span="5" :offset="4">
      <el-button size="mini" @click="showAdvanceSearchView = !showAdvanceSearchView">取消</el-button>
      <el-button size="mini" icon="el-icon-search" type="primary" @click="initEmps('advanced')">搜索</el-button>
      <el-button size="mini" type="danger" @click="resetForm">重置</el-button>
    </el-col>
  </el-row>


</div>
</transition>

<script>
  methods: {
    searvhViewHandleNodeClick(data) {
      this.inputDepName = data.name;
      this.searchValue.departmentId = data.id;
      this.popVisible = !this.popVisible;
    },
}
</script>
更多细节的代码见github中的源代码
模块化改造
为了方便以后的业务需求,针对原项目进行改造,变成
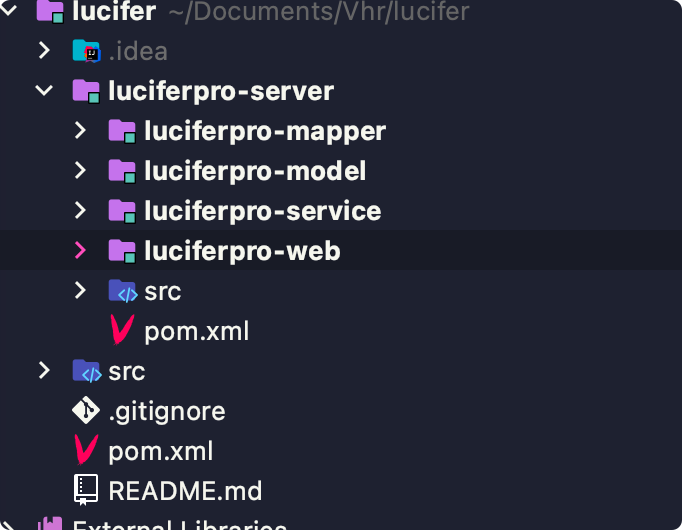
server里存的是目前为止的业务代码,以后会添加邮件模块,和server区分,具体的代码划分见代码
邮件服务
引入RabbitMQ后启动

新建模块
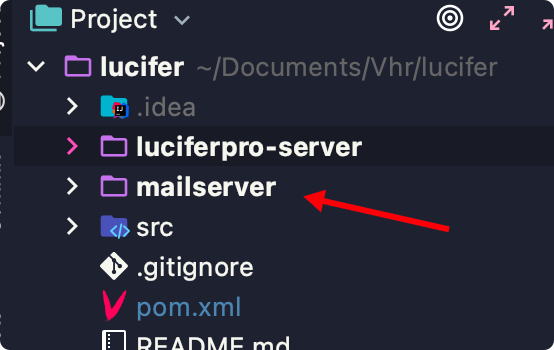
引入依赖
<dependency>
    <groupId>org.lucifer</groupId>
    <artifactId>luciferpro-model</artifactId>
    <version>1.0-SNAPSHOT</version>
</dependency>

<dependency>
    <groupId>org.springframework.boot</groupId>
    <artifactId>spring-boot-starter-amqp</artifactId>
</dependency>
<dependency>
    <groupId>org.springframework.boot</groupId>
    <artifactId>spring-boot-starter-mail</artifactId>
</dependency>
<dependency>
    <groupId>org.springframework.boot</groupId>
    <artifactId>spring-boot-starter-thymeleaf</artifactId>
</dependency>

<dependency>
    <groupId>org.springframework.boot</groupId>
    <artifactId>spring-boot-starter-test</artifactId>
    <scope>test</scope>
</dependency>
<dependency>
    <groupId>org.springframework.amqp</groupId>
    <artifactId>spring-rabbit-test</artifactId>
    <scope>test</scope>
</dependency>
配置类
server.port=8082

#邮件相关
spring.mail.host=smtp.qq.com
spring.mail.protocol=smtp
spring.mail.default-encoding=UTF-8
spring.mail.password=cxpuqalzrctubdib
spring.mail.username=xiaoweliang@qq.com
spring.mail.port=587
spring.mail.properties.mail.stmp.socketFactory.class=javax.net.ssl.SSLSocketFactory
spring.mail.properties.mail.debug=true

#消息中间价
spring.rabbitmq.username=guest
spring.rabbitmq.password=guest
spring.rabbitmq.host=172.16.211.4
spring.rabbitmq.port=5672
给员工发送邮件,所以需要序列化
public class Employee implements Serializable它里面包含的对象,同样也需要序列化
private Nation nation;
private Politicsstatus politicsstatus;
private Department department;
private JobLevel jobLevel;
private Position position;
建立模版
在templates下建立模版
<!DOCTYPE html>
<html lang="en">
<head>
    <meta charset="UTF-8">
    <title>入职欢迎邮件</title>
</head>
<body>

欢迎 <span th:text="${name}"></span> 加入 Shelby 大家庭,您的入职信息如下:
<table border="1">
    <tr>
        <td>姓名</td>
        <td th:text="${name}"></td>
    </tr>
    <tr>
        <td>职位</td>
        <td th:text="${posName}"></td>
    </tr>
    <tr>
        <td>职称</td>
        <td th:text="${joblevelName}"></td>
    </tr>
    <tr>
        <td>部门</td>
        <td th:text="${departmentName}"></td>
    </tr>
</table>

</body>
</html>
消息发送
import org.springframework.amqp.core.Queue;
import org.springframework.boot.SpringApplication;
import org.springframework.boot.autoconfigure.SpringBootApplication;
import org.springframework.context.annotation.Bean;


@SpringBootApplication
public class MailserverApplication {

    public static void main(String[] args) {
        SpringApplication.run(MailserverApplication.class, args);
    }
    //引入的队列是rabbitmq的
    @Bean
    Queue queue(){
        return new Queue("lucifer.mail.welcome");
    }
}
消息接收
这里用到的包有很多重名的情况,需要注意
package org.lucifer.mailserver.receiver;

import org.lucifer.vbluciferpro.model.Employee;
import org.slf4j.Logger;
import org.slf4j.LoggerFactory;
import org.springframework.amqp.rabbit.annotation.RabbitListener;
import org.springframework.beans.factory.annotation.Autowired;
import org.springframework.boot.autoconfigure.mail.MailProperties;
import org.springframework.mail.javamail.JavaMailSender;
import org.springframework.mail.javamail.MimeMessageHelper;
import org.springframework.stereotype.Component;
import org.thymeleaf.TemplateEngine;
import org.thymeleaf.context.Context;

import javax.mail.MessagingException;
import javax.mail.internet.MimeMessage;
import java.util.Date;

@Component
public class MailReceiver {

    public static final Logger logger = LoggerFactory.getLogger(MailReceiver.class);

    @Autowired
    JavaMailSender javaMailSender;
    @Autowired
    MailProperties mailProperties;
    @Autowired
    TemplateEngine templateEngine;

    @RabbitListener(queues =  "lucifer.mail.welcome")
    public void handler(Employee employee){
        //收到消息,发送邮件
        MimeMessage msg = javaMailSender.createMimeMessage();
        MimeMessageHelper helper = new MimeMessageHelper(msg);
        try {
            helper.setTo(employee.getEmail());
            helper.setFrom(mailProperties.getUsername());
            helper.setSubject("入职欢迎!");
            helper.setSentDate(new Date());
            Context context = new Context();
            context.setVariable("name", employee.getName());
            context.setVariable("posName", employee.getPosition().getName());
            context.setVariable("joblevelName", employee.getJobLevel().getName());
            context.setVariable("departmentName", employee.getDepartment().getName());
            //对应mail.html
            String mail = templateEngine.process("mail", context);
            helper.setText(mail, true);
            javaMailSender.send(msg);

        } catch (MessagingException e) {
            e.printStackTrace();
            //发送失败,返回日志
            logger.error("邮件发送失败:" + e.getMessage());
        }
    }
}
发送执行
在Service模块中需要用到rabbitmq,所以引入依赖
<dependency>
    <groupId>org.springframework.boot</groupId>
    <artifactId>spring-boot-starter-amqp</artifactId>
</dependency>
同时web需要连上rabbitmq,所以需要加上配置
#消息中间价
spring.rabbitmq.username=guest
spring.rabbitmq.password=guest
spring.rabbitmq.host=172.16.211.4
spring.rabbitmq.port=5672Service层执行具体的操作
在添加的时候还没有id,想要拿到id,必须主键回填
public Integer addEmp(Employee employee) {
	Employee emp = employeeMapper.getEmployeeById(employee.getId());
}首先在EmployeeMapper中针对int insertSelective(Employee record);
<insert id="insertSelective" parameterType="org.lucifer.vbluciferpro.model.Employee" useGeneratedKeys="true" keyProperty="id">让id能主键回填,这样在Service就能拿到id了
int result = employeeMapper.insertSelective(employee);最终Service代码
public Integer addEmp(Employee employee) {

    Date beginContract = employee.getBeginContract();
    Date endContract = employee.getEndContract();
    double month = (Double.parseDouble(yearFormat.format(endContract)) - Double.parseDouble(yearFormat.format(beginContract))) * 12
            + (Double.parseDouble(monthFormat.format(endContract)) - Double.parseDouble(monthFormat.format(beginContract)));
    employee.setContractTerm(Double.parseDouble(decimalFormat.format(month / 12)));
    //邮件发送
    int result = employeeMapper.insertSelective(employee);
    if (result == 1) {
        Employee emp = employeeMapper.getEmployeeById(employee.getId());
        rabbitTemplate.convertAndSend("lucifer.mail.welcome", emp);
    }
        return result;
}
相应的Mapper
<select id="getEmployeeById" resultMap="AllEmployeeInfo">
  select e.*,p.`id` as pid,p.`name` as pname,n.`id` as nid,n.`name` as nname,d.`id` as did,d.`name` as
  dname,j.`id` as jid,j.`name` as jname,pos.`id` as posid,pos.`name` as posname
  from employee e,nation n,politicsstatus p,department d,joblevel j,position pos
  where e.`nationId`=n.`id` and e.`politicId`=p.`id` and
    e.`departmentId`=d.`id` and e.`jobLevelId`=j.`id` and e.`posId`=pos.`id` and e.`id`=#{id}
</select>
薪资管理
工资套账管理
后端部分
接口
@RestController
@RequestMapping("/salary/sob")
public class SalaryController {

    @Autowired
    SalaryService salaryService;

    @GetMapping("/")
    public List<Salary> getAllSalaries() {
        return salaryService.getAllSalaries();
    }

    @PostMapping("/")
    public RespBean addSalary(@RequestBody Salary salary) {
        if (salaryService.addSalary(salary) == 1) {
            return RespBean.ok("添加成功!");
        }
        return RespBean.error("添加失败!");
    }

    @DeleteMapping("/{id}")
    public RespBean deleteSalaryById(@PathVariable Integer id) {
        if (salaryService.deleteSalaryById(id) == 1) {
            return RespBean.ok("删除成功!");
        }
        return RespBean.error("删除失败!");
    }

    @PutMapping("/")
    public RespBean updateSalaryById(@RequestBody Salary salary) {
        if (salaryService.updateSalaryById(salary) == 1) {
            return RespBean.ok("更新成功!");
        }
        return RespBean.error("更新失败!");
    }

}
Service
@Service
public class SalaryService {
    @Autowired
    SalaryMapper salaryMapper;

    public List<Salary> getAllSalaries() {
        return salaryMapper.getAllSalaries();
    }

    public Integer addSalary(Salary salary) {
        salary.setCreateDate(new Date());
        return salaryMapper.insertSelective(salary);
    }

    public Integer deleteSalaryById(Integer id) {
        return salaryMapper.deleteByPrimaryKey(id);
    }

    public Integer updateSalaryById(Salary salary) {
        return salaryMapper.updateByPrimaryKeySelective(salary);
    }

}
Mapper
<select id="getAllSalaries" resultMap="BaseResultMap">
  select
  <include refid="Base_Column_List"/>
  from salary
</select>
前端部分
SalSob.vue
<template>
  <div>

    <div style="display: flex;justify-content: space-between">
      <el-button icon="el-icon-plus" type="primary" @click="showAddSalaryView">添加工资账套</el-button>
      <el-button icon="el-icon-refresh" type="success" @click="initSalaries">刷新</el-button>
    </div>

    <div style="margin-top: 10px">
      <el-table :data="salaries" border stripe>
        <el-table-column type="selection" width="55"></el-table-column>
        <el-table-column width="120" prop="name" label="账套名称"></el-table-column>
        <el-table-column width="70" prop="basicSalary" label="基本工资"></el-table-column>
        <el-table-column width="70" prop="trafficSalary" label="交通补助"></el-table-column>
        <el-table-column width="70" prop="lunchSalary" label="午餐补助"></el-table-column>
        <el-table-column width="70" prop="bonus" label="奖金"></el-table-column>
        <el-table-column width="100" prop="createDate" label="启用时间"></el-table-column>
        <el-table-column label="养老金" align="center">
          <el-table-column width="70" prop="pensionPer" label="比率"></el-table-column>
          <el-table-column width="70" prop="pensionBase" label="基数"></el-table-column>
        </el-table-column>
        <el-table-column label="医疗保险" align="center">
          <el-table-column width="70" prop="medicalPer" label="比率"></el-table-column>
          <el-table-column width="70" prop="medicalBase" label="基数"></el-table-column>
        </el-table-column>
        <el-table-column label="公积金" align="center">
          <el-table-column width="70" prop="accumulationFundPer" label="比率"></el-table-column>
          <el-table-column width="70" prop="accumulationFundBase" label="基数"></el-table-column>
        </el-table-column>
        <el-table-column label="操作">
          <template slot-scope="scope">
            <el-button @click="showEditSalaryView(scope.row)">编辑</el-button>
            <el-button type="danger" @click="deleteSalary(scope.row)">删除</el-button>
          </template>
        </el-table-column>
      </el-table>
    </div>

    <el-dialog
        :title="dialogTitle"
        :visible.sync="dialogVisible"
        width="50%">
      <div style="display: flex;justify-content: space-around;align-items: center">
        <el-steps direction="vertical" :active="activeItemIndex">
          <el-step :title="itemName" v-for="(itemName,index) in salaryItemName" :key="index"></el-step>
        </el-steps>
        <el-input v-model="salary[title]" :placeholder="'请输入'+salaryItemName[index]+'...'"
                  v-for="(value,title,index) in salary"
                  :key="index" v-show="activeItemIndex==index" style="width: 200px">
        </el-input>
      </div>
      <span slot="footer" class="dialog-footer">
      <el-button @click="cancel">{{'取消'}}</el-button>
    <el-button @click="preStep">{{'上一步'}}</el-button>
    <el-button type="primary" @click="nextStep">{{activeItemIndex==10?'完成':'下一步'}}</el-button>
  </span>
    </el-dialog>


  </div>
</template>

<script>
export default {
  name: "SalSob",
  data() {
    return {
      dialogVisible: false,
      dialogTitle: '添加工资账套',
      salaries: [],
      activeItemIndex: 0,
      salaryItemName: [
        '基本工资',
        '交通补助',
        '午餐补助',
        '奖金',
        '养老金比率',
        '养老金基数',
        '医疗保险比率',
        '医疗保险基数',
        '公积金比率',
        '公积金基数',
        '账套名称'
      ],
      salary: {
        basicSalary: 0,
        trafficSalary: 0,
        lunchSalary: 0,
        bonus: 0,
        pensionPer: 0,
        pensionBase: 0,
        medicalPer: 0,
        medicalBase: 0,
        accumulationFundPer: 0,
        accumulationFundBase: 0,
        name: ''
      }
    }
  },
  mounted() {
    this.initSalaries();
  },

  methods: {
    initSalaries() {
      this.getRequest("/salary/sob/").then(resp => {
        if (resp) {
          this.salaries = resp;
        }
      })
    },
    showAddSalaryView() {
      //数据初始化
      this.salary = {
        basicSalary: '',
        trafficSalary: '',
        lunchSalary:  '',
        bonus:  '',
        pensionPer:  '',
        pensionBase:  '',
        medicalPer:  '',
        medicalBase:  '',
        accumulationFundPer:  '',
        accumulationFundBase:  '',
        name: ''
      }
      this.dialogTitle = '添加工资账套';
      this.activeItemIndex = 0;
      this.dialogVisible = true;
    },
    nextStep() {
      if (this.activeItemIndex == 10) {
        //id存在是更新操作,否则是添加操作
        if (this.salary.id) {
          this.putRequest("/salary/sob/", this.salary).then(resp=>{
            if (resp) {
              this.initSalaries();
              this.dialogVisible = false;
            }
          })
        } else {
          this.postRequest("/salary/sob/", this.salary).then(resp => {
            if (resp) {
              this.initSalaries();
              this.dialogVisible = false;
            }
          });
        }
        return;
      }
      this.activeItemIndex++;
    },
    cancel() {
      //关闭对话框
      this.dialogVisible = false;
      return;
    },

    preStep() {
      if (this.activeItemIndex == 0) {
        return;
      }
      this.activeItemIndex--;
    },

    deleteSalary(data) {
      this.$confirm('此操作将删除 ' + data.name + ' 账套,是否继续?', '提示', {
        cancelButtonText: '取消',
        confirmButtonText: '确定'
      }).then(() => {
        this.deleteRequest("/salary/sob/" + data.id).then(resp => {
          if (resp) {
            this.initSalaries();
          }
        })
      }).catch(() => {
        this.$message.info("取消删除!");
      })
    },

    showEditSalaryView(data) {
      this.dialogTitle = '修改工资账套';
      this.dialogVisible = true;
      this.salary.basicSalary = data.basicSalary;
      this.salary.trafficSalary = data.trafficSalary;
      this.salary.lunchSalary = data.lunchSalary;
      this.salary.bonus = data.bonus;
      this.salary.pensionPer = data.pensionPer;
      this.salary.pensionBase = data.pensionBase;
      this.salary.medicalPer = data.medicalPer;
      this.salary.medicalBase = data.medicalBase;
      this.salary.accumulationFundPer = data.accumulationFundPer;
      this.salary.accumulationFundBase = data.accumulationFundBase;
      this.salary.name = data.name;
      this.salary.id = data.id;
    },
  }
}
</script>

<style scoped>

</style>
员工工资套账管理
后端部分
在Employee实体类上补充工资属性
private Salary salary;接口
@RestController
@RequestMapping("/salary/sobcfg")
public class SobConfigController {

    @Autowired
    EmployeeService employeeService;

    @Autowired
    SalaryService salaryService;

    @GetMapping("/")
    public RespPageBean getEmployeeByPageWithSalary(@RequestParam(defaultValue = "1") Integer page, @RequestParam(defaultValue = "10") Integer size) {
        return employeeService.getEmployeeByPageWithSalary(page, size);
    }

    @GetMapping("/salaries")
    public List<Salary> getAllSalaries() {
        return salaryService.getAllSalaries();
    }

    @PutMapping("/")
    public RespBean updateEmployeeSalaryById(Integer eid, Integer sid) {
        Integer result = employeeService.updateEmployeeSalaryById(eid, sid);
        // REPLACE INTO 关键词 更新为1,插入为2
        if (result == 1 || result == 2) {
            return RespBean.ok("更新成功");
        }
        return RespBean.error("更新失败");
    }

}
在原先EmployeeService的基础上补充即可
public RespPageBean getEmployeeByPageWithSalary(Integer page, Integer size) {
    if (page != null && size != null) {
        page = (page - 1) * size;
    }
    List<Employee> list = employeeMapper.getEmployeeByPageWithSalary(page, size);
    RespPageBean respPageBean = new RespPageBean();
    respPageBean.setData(list);
    respPageBean.setTotal(employeeMapper.getTotal(null, null));
    return respPageBean;
}

public Integer updateEmployeeSalaryById(Integer eid, Integer sid) {
    return employeeMapper.updateEmployeeSalaryById(eid, sid);
}
Mapper
<resultMap id="EmployeeWithSalary" type="org.lucifer.vbluciferpro.model.Employee" extends="BaseResultMap">
  <association property="salary" javaType="org.lucifer.vbluciferpro.model.Salary">
    <id column="sid" property="id" jdbcType="INTEGER"/>
    <result column="sbasicSalary" property="basicSalary" jdbcType="INTEGER"/>
    <result column="sbonus" property="bonus" jdbcType="INTEGER"/>
    <result column="slunchSalary" property="lunchSalary" jdbcType="INTEGER"/>
    <result column="strafficSalary" property="trafficSalary" jdbcType="INTEGER"/>
    <result column="sallSalary" property="allSalary" jdbcType="INTEGER"/>
    <result column="spensionBase" property="pensionBase" jdbcType="INTEGER"/>
    <result column="spensionPer" property="pensionPer" jdbcType="REAL"/>
    <result column="screateDate" property="createDate" jdbcType="TIMESTAMP"/>
    <result column="smedicalBase" property="medicalBase" jdbcType="INTEGER"/>
    <result column="smedicalPer" property="medicalPer" jdbcType="REAL"/>
    <result column="saccumulationFundBase" property="accumulationFundBase" jdbcType="INTEGER"/>
    <result column="saccumulationFundPer" property="accumulationFundPer" jdbcType="REAL"/>
    <result column="sname" property="name" jdbcType="VARCHAR"/>
  </association>
  <association property="department" javaType="org.lucifer.vbluciferpro.model.Department">
    <result column="dname" property="name"/>
  </association>
</resultMap>


<select id="getEmployeeByPageWithSalary" resultMap="EmployeeWithSalary">
  SELECT e.*,d.`name` AS dname,s.`id` AS sid,s.`accumulationFundBase` AS
  saccumulationFundBase,s.`accumulationFundPer` AS saccumulationFundPer,s.`allSalary` AS
  sallSalary,s.`basicSalary` AS sbasicSalary,s.`bonus` AS sbonus,s.`createDate` AS screateDate,s.`lunchSalary` AS
  slunchSalary,s.`medicalBase` AS smedicalBase,s.`medicalPer` AS smedicalPer,s.`name` AS sname,s.`pensionBase` AS
  spensionBase,s.`pensionPer` AS spensionPer,s.`trafficSalary` AS strafficSalary
  FROM employee e
  LEFT JOIN empsalary es
  ON e.`id`=es.`eid`
  LEFT JOIN salary s
  ON es.`sid`=s.`id`
  LEFT JOIN department d
  ON e.`departmentId`=d.`id`
  order by e.id
  <if test="page !=null and size !=null">
    limit #{page},#{size}
  </if>
</select>


<insert id="updateEmployeeSalaryById">
  REPLACE INTO empsalary (eid,sid) VALUES(#{eid},#{sid})
</insert>
聊天功能
基本页面搭建
将Github上的脚手架引入自己的项目中,首先安装依赖
npm install sass-loader@7.3.1 --save-dev
npm install style-loader --save-dev
npm i node-sass@4.14.1 --sass_binary_site=https://npm.taobao.org/mirrors/node-sass/ --save-dev在views/chat下创建FriendChat.vue,在组件components/chat下新建脚手架中的四个组件:card、list、message、usertext,在首页中引入进入聊天的快捷按钮
<div>
  <el-button icon="el-icon-bell" type="text" style="margin-right: 8px;color: #000000;" size="normal" @click="goChat">Chat</el-button>
  <el-dropdown class="userInfo" @command="commandHandler">
                <span class="el-dropdown-link" style="color: #000000;">
                  {{user.name}}<i><img :src="user.userface" alt=""></i>
                </span>
    <el-dropdown-menu slot="dropdown">
      <el-dropdown-item command="userinfo">个人中心</el-dropdown-item>
      <el-dropdown-item command="setting">设置</el-dropdown-item>
      <el-dropdown-item command="logout" divided>注销登录</el-dropdown-item>
    </el-dropdown-menu>
  </el-dropdown>
</div>

goChat() {
this.$router.push("/chat");
},完善router,实现跳转
{
  path: '/home',
  name: 'Home',
  component: Home,
  hidden:true,
children: [
    {
        path: '/chat',
        name: '在线聊天',
        component: FriendChat,
        hidden: true
    },
]

},完善store下的index.js文件
import Vue from 'vue'
import Vuex from 'vuex'

Vue.use(Vuex)

const now = new Date();


const store = new Vuex.Store({

    state:{
        routes:[],

        sessions:[{
            id:1,
            user:{
                name:'示例介绍',
                img:'https://gimg2.baidu.com/image_search/src=http%3A%2F%2Fhbimg.b0.upaiyun.com%2F842eea2fef4be992c14222abf3df84af576f8d0d21049-YmLxJv_fw658&refer=http%3A%2F%2Fhbimg.b0.upaiyun.com&app=2002&size=f9999,10000&q=a80&n=0&g=0n&fmt=jpeg?sec=1628337952&t=02ebc923420e56695dadbe2933151ca0'
            },
            messages:[{
                content:'Hello,这是一个基于Vue + Vuex + Webpack构建的简单chat示例,聊天记录保存在localStorge, 有什么问题可以通过Github Issue问我。',
                date:now
            },{
                content:'项目地址(原作者): https://github.com/coffcer/vue-chat',
                date:now
            },{
                content:'本项目地址(重构): https://github.com/is-liyiwei',
                date:now
            }]
        },{
            id:2,
            user:{
                name:'webpack',
                img:'https://gimg2.baidu.com/image_search/src=http%3A%2F%2Fimage.biaobaiju.com%2Fuploads%2F20181113%2F23%2F1542122451-kZaRlqfLyK.jpg&refer=http%3A%2F%2Fimage.biaobaiju.com&app=2002&size=f9999,10000&q=a80&n=0&g=0n&fmt=jpeg?sec=1628338001&t=8d7e0245528edff2b25393d4573fd6ef'
            },
            messages:[{
                content:'Hi,我是webpack哦',
                date:now
            }]
        }],
        currentSessionId:1,
        filterKey:''

    },
    mutations:{
        initRoutes(state, data){
            state.routes = data;
        },
        changeCurrentSessionId (state,id) {
            state.currentSessionId = id;
        },
        addMessage (state,msg) {
            state.sessions[state.currentSessionId-1].messages.push({
                content:msg,
                date: new Date(),
                self:true
            })
        },
        INIT_DATA (state) {
            let data = localStorage.getItem('vue-chat-session');
            //console.log(data)
            if (data) {
                state.sessions = JSON.parse(data);
            }
        }
    },
    actions:{
        initData (context) {
            context.commit('INIT_DATA')
        }
    }
})

store.watch(function (state) {
    return state.sessions
}, function (val) {
    localStorage.setItem('vue-chat-session', JSON.stringify(val));
}, {
    deep: true/*这个貌似是开启watch监测的判断,官方说明也比较模糊*/
})

export default store;
动态展示
在card.vue和message.vue中从数据库读取用户信息和头像地址,不再写死到前端代码中
<script>
data () {
    return {
      user: JSON.parse(window.sessionStorage.getItem("user"))
    }
  }
</script>这样user.userface就可以调用图片,user.name就可以调用用户名称,然后后端加载数据库内容
ChatController
@RestController
@RequestMapping("/chat")
public class ChatController {
    @Autowired
    HrService hrService;


    @GetMapping("/hrs")
    public List<Hr> getAllHrs() {
        return hrService.getAllHrsExceptCurrentHr();
    }
}
HrService
public List<Hr> getAllHrsExceptCurrentHr() {
    return hrMapper.getAllHrsExceptCurrentHr(HrUtils.getCurrentHr().getId());
}
Mapper
<select id="getAllHrsExceptCurrentHr" resultMap="BaseResultMap">
  select * from hr where id !=#{id};
</select>
引入WebSocket
引入依赖
<dependency>
    <groupId>org.springframework.boot</groupId>
    <artifactId>spring-boot-starter-websocket</artifactId>
</dependency>
配置类
@Configuration
@EnableWebSocketMessageBroker
public class WebSocketConfig implements WebSocketMessageBrokerConfigurer {

    @Override
    public void registerStompEndpoints(StompEndpointRegistry registry) {
        registry.addEndpoint("/ws/ep")
                //允许前端发送
                .setAllowedOrigins("*")
                .withSockJS();
    }

    @Override
    public void configureMessageBroker(MessageBrokerRegistry registry) {
        registry.enableSimpleBroker("/queue");
    }
}
Controller
@Controller
public class WsController {
    @Autowired
    SimpMessagingTemplate simpMessagingTemplate;

    @MessageMapping("/ws/chat")
    public void handleMsg(Principal principal, ChatMsg chatMsg) {
        chatMsg.setFrom(principal.getName());
        chatMsg.setDate(new Date());
        simpMessagingTemplate.convertAndSendToUser(chatMsg.getTo(), "/queue/chat", chatMsg);
    }
}
实体类
import java.util.Date;

public class ChatMsg {
    private String from;
    private String to;
    private String content;
    private Date date;
    private String fromNickname;
}
消息的发送
在usertext.vue中将输入的内容发送
addMessage (e) {
 if (e.ctrlKey && e.keyCode ===13 && this.content.length) {
   let msgObj = new Object();
   	 msgObj.to = this.currentSession.username;
     msgObj.content = this.content;
   this.$store.state.stomp.send('ws/chat',{},JSON.stringify(msgObj));
  this.$store.commit('addMessage', msgObj);
  this.content='';
 }
}在router.js中执行发送
//消息发送
        addMessage (state,msg) {
            let mss = state.sessions[state.currentHr.username + '#' + msg.to];
            if (!mss) {
                // 此处消息不能自动刷新,需要用Vue.set
                // state.sessions[state.currentHr.username+'#'+msg.to] = [];
            Vue.set(state.sessions, state.currentHr.username + '#' + msg.to, []);
            }
            state.sessions[state.currentHr.username + '#' + msg.to].push({
                content: msg.content,
                date: new Date(),
                self: !msg.notSelf
            })
        },
消息的接收
在router.js中接收消息
//消息接收
connect(context) {
  context.state.stomp = Stomp.over(new SockJS('/ws/ep'));
  context.state.stomp.connect({}, success => {
    context.state.stomp.subscribe('/user/queue/chat', msg => {
      let receiveMsg = JSON.parse(msg.body);
      console.log('receiveMsg' + receiveMsg);
      if (!context.state.currentSession || receiveMsg.from != context.state.currentSession.username) {
        Notification.info({
          title: '【' + receiveMsg.fromNickname + '】发来一条消息',
          message: receiveMsg.content.length > 10 ? receiveMsg.content.substr(0, 10) : receiveMsg.content,
          position: 'bottom-right'
        })
        Vue.set(context.state.isDot, context.state.currentHr.username + '#' + receiveMsg.from, true);
      }
      receiveMsg.notSelf = true;
      receiveMsg.to = receiveMsg.from;
      context.commit('addMessage', receiveMsg);
    })
  }, error => {
  })
},
消息的展示
<template>
  <div id="message" v-scroll-bottom="sessions">
   <ul v-if="currentSession">
      <li v-for="entry in sessions[user.username+'#'+currentSession.username]">
      <p class="time">
      <span>{{entry.date | time}}</span>
     </p>
     <div class="main" :class="{self:entry.self}">
          <img class="avatar" :src="entry.self ? user.userface : currentSession.userface" alt="">
          <p class="text">{{entry.content}}</p>
     </div>
    </li>
   </ul>
  </div>
</template>
八、补充内容
登录生成验证码
后端
生成验证码
public class VerificationCode {

   private int width = 100;// 生成验证码图片的宽度
   private int height = 30;// 生成验证码图片的高度
   private String[] fontNames = { "宋体", "楷体", "隶书", "微软雅黑" };
   private Color bgColor = new Color(255, 255, 255);// 定义验证码图片的背景颜色为白色
   private Random random = new Random();
   private String codes = "0123456789abcdefghijklmnopqrstuvwxyzABCDEFGHIJKLMNOPQRSTUVWXYZ";
   private String text;// 记录随机字符串

   /**
    * 获取一个随意颜色
    *
    * @return
    */
   private Color randomColor() {
      int red = random.nextInt(150);
      int green = random.nextInt(150);
      int blue = random.nextInt(150);
      return new Color(red, green, blue);
   }

   /**
    * 获取一个随机字体
    *
    * @return
    */
   private Font randomFont() {
      String name = fontNames[random.nextInt(fontNames.length)];
      int style = random.nextInt(4);
      int size = random.nextInt(5) + 24;
      return new Font(name, style, size);
   }

   /**
    * 获取一个随机字符
    *
    * @return
    */
   private char randomChar() {
      return codes.charAt(random.nextInt(codes.length()));
   }

   /**
    * 创建一个空白的BufferedImage对象
    *
    * @return
    */
   private BufferedImage createImage() {
      BufferedImage image = new BufferedImage(width, height, BufferedImage.TYPE_INT_RGB);
      Graphics2D g2 = (Graphics2D) image.getGraphics();
      g2.setColor(bgColor);// 设置验证码图片的背景颜色
      g2.fillRect(0, 0, width, height);
      return image;
   }

   public BufferedImage getImage() {
      BufferedImage image = createImage();
      Graphics2D g2 = (Graphics2D) image.getGraphics();
      StringBuffer sb = new StringBuffer();
      for (int i = 0; i < 4; i++) {
         String s = randomChar() + "";
         sb.append(s);
         g2.setColor(randomColor());
         g2.setFont(randomFont());
         float x = i * width * 1.0f / 4;
         g2.drawString(s, x, height - 8);
      }
      this.text = sb.toString();
      drawLine(image);
      return image;
   }

   /**
    * 绘制干扰线
    *
    * @param image
    */
   private void drawLine(BufferedImage image) {
      Graphics2D g2 = (Graphics2D) image.getGraphics();
      int num = 5;
      for (int i = 0; i < num; i++) {
         int x1 = random.nextInt(width);
         int y1 = random.nextInt(height);
         int x2 = random.nextInt(width);
         int y2 = random.nextInt(height);
         g2.setColor(randomColor());
         g2.setStroke(new BasicStroke(1.5f));
         g2.drawLine(x1, y1, x2, y2);
      }
   }

   public String getText() {
      return text;
   }

   public static void output(BufferedImage image, OutputStream out) throws IOException {
      ImageIO.write(image, "JPEG", out);
   }
}
接口
@GetMapping("/verifyCode")
public void verifyCode(HttpServletRequest request, HttpServletResponse resp) throws IOException {
    VerificationCode code = new VerificationCode();
    BufferedImage image = code.getImage();
    String text = code.getText();
    HttpSession session = request.getSession(true);
    session.setAttribute("verify_code", text);
    VerificationCode.output(image,resp.getOutputStream());
}
Security不拦截
@Override
public void configure(WebSecurity web) throws Exception {
    //防止访问登录页面死循环,不用进入Security拦截
    web.ignoring().antMatchers("/css/**", "/js/**", "/index.html", "/img/**", "/fonts/**", "/favicon.ico", "/verifyCode");
}
自定义过滤器
登录前需要先校验验证码,所以需要自定义过滤器
public class LoginFilter extends UsernamePasswordAuthenticationFilter {
    @Autowired
    SessionRegistry sessionRegistry;
    @Override
    public Authentication attemptAuthentication(HttpServletRequest request, HttpServletResponse response) throws AuthenticationException {
        if (!request.getMethod().equals("POST")) {
            throw new AuthenticationServiceException(
                    "Authentication method not supported: " + request.getMethod());
        }
        String verify_code = (String) request.getSession().getAttribute("verify_code");
        if (request.getContentType().contains(MediaType.APPLICATION_JSON_VALUE) || request.getContentType().contains(MediaType.APPLICATION_JSON_UTF8_VALUE)) {
            Map<String, String> loginData = new HashMap<>();
            try {
                loginData = new ObjectMapper().readValue(request.getInputStream(), Map.class);
            } catch (IOException e) {
            }finally {
                String code = loginData.get("code");
                checkCode(response, code, verify_code);
            }
            String username = loginData.get(getUsernameParameter());
            String password = loginData.get(getPasswordParameter());
            if (username == null) {
                username = "";
            }
            if (password == null) {
                password = "";
            }
            username = username.trim();
            UsernamePasswordAuthenticationToken authRequest = new UsernamePasswordAuthenticationToken(
                    username, password);
            setDetails(request, authRequest);
            Hr principal = new Hr();
            principal.setUsername(username);
            sessionRegistry.registerNewSession(request.getSession(true).getId(), principal);
            return this.getAuthenticationManager().authenticate(authRequest);
        } else {
            checkCode(response, request.getParameter("code"), verify_code);
            return super.attemptAuthentication(request, response);
        }
    }

    public void checkCode(HttpServletResponse resp, String code, String verify_code) {
        if (code == null || verify_code == null || "".equals(code) || !verify_code.toLowerCase().equals(code.toLowerCase())) {
            //验证码不正确
            throw new AuthenticationServiceException("验证码不正确");
        }
    }
}
同时需要更改一下SecurityConfig,这里通过一个过滤器,同时检验用户名,密码和验证码
    @Bean
    LoginFilter loginFilter() throws Exception {
        LoginFilter loginFilter = new LoginFilter();
        loginFilter.setAuthenticationSuccessHandler((request, response, authentication) -> {
                    response.setContentType("application/json;charset=utf-8");
                    PrintWriter out = response.getWriter();
                    Hr hr = (Hr) authentication.getPrincipal();
                    hr.setPassword(null);
                    RespBean ok = RespBean.ok("登录成功!", hr);
                    String s = new ObjectMapper().writeValueAsString(ok);
                    out.write(s);
                    out.flush();
                    out.close();
                }
        );
        loginFilter.setAuthenticationFailureHandler((request, response, exception) -> {
                    response.setContentType("application/json;charset=utf-8");
                    PrintWriter out = response.getWriter();
                    RespBean respBean = RespBean.error(exception.getMessage());
                    if (exception instanceof LockedException) {
                        respBean.setMsg("账户被锁定,请联系管理员!");
                    } else if (exception instanceof CredentialsExpiredException) {
                        respBean.setMsg("密码过期,请联系管理员!");
                    } else if (exception instanceof AccountExpiredException) {
                        respBean.setMsg("账户过期,请联系管理员!");
                    } else if (exception instanceof DisabledException) {
                        respBean.setMsg("账户被禁用,请联系管理员!");
                    } else if (exception instanceof BadCredentialsException) {
                        respBean.setMsg("用户名或者密码输入错误,请重新输入!");
                    }
                    out.write(new ObjectMapper().writeValueAsString(respBean));
                    out.flush();
                    out.close();
                }
        );
        loginFilter.setAuthenticationManager(authenticationManagerBean());
        loginFilter.setFilterProcessesUrl("/doLogin");
        ConcurrentSessionControlAuthenticationStrategy sessionStrategy = new ConcurrentSessionControlAuthenticationStrategy(sessionRegistry());
        sessionStrategy.setMaximumSessions(1);
        loginFilter.setSessionAuthenticationStrategy(sessionStrategy);
        return loginFilter;
    }

    @Bean
    SessionRegistryImpl sessionRegistry() {
        return new SessionRegistryImpl();
    }

    @Override
    protected void configure(HttpSecurity http) throws Exception {
        http.authorizeRequests()
                .withObjectPostProcessor(new ObjectPostProcessor<FilterSecurityInterceptor>() {
                    @Override
                    public <O extends FilterSecurityInterceptor> O postProcess(O object) {
                        object.setAccessDecisionManager(customUrlDecisionManager);
                        object.setSecurityMetadataSource(customFilterInvocationSecurityMetadataSource);
                        return object;
                    }
                })
                .and()
                .logout()
                .logoutSuccessHandler((req, resp, authentication) -> {
                            resp.setContentType("application/json;charset=utf-8");
                            PrintWriter out = resp.getWriter();
                            out.write(new ObjectMapper().writeValueAsString(RespBean.ok("注销成功!")));
                            out.flush();
                            out.close();
                        }
                )
                .permitAll()
                .and()
                .csrf().disable().exceptionHandling()
                //没有认证时,在这里处理结果,不要重定向
                .authenticationEntryPoint((req, resp, authException) -> {
                            resp.setContentType("application/json;charset=utf-8");
                            resp.setStatus(401);
                            PrintWriter out = resp.getWriter();
                            RespBean respBean = RespBean.error("访问失败!");
                            if (authException instanceof InsufficientAuthenticationException) {
                                respBean.setMsg("请求失败,请联系管理员!");
                            }
                            out.write(new ObjectMapper().writeValueAsString(respBean));
                            out.flush();
                            out.close();
                        }
                );
        http.addFilterAt(new ConcurrentSessionFilter(sessionRegistry(), event -> {
            HttpServletResponse resp = event.getResponse();
            resp.setContentType("application/json;charset=utf-8");
            resp.setStatus(401);
            PrintWriter out = resp.getWriter();
            out.write(new ObjectMapper().writeValueAsString(RespBean.error("您已在另一台设备登录,本次登录已下线!")));
            out.flush();
            out.close();
        }), ConcurrentSessionFilter.class);
        http.addFilterAt(loginFilter(), UsernamePasswordAuthenticationFilter.class);
    }
}
前端
前端直接展示即可
<el-form-item prop="code">
  <el-input size="normal" type="text" v-model="loginForm.code" auto-complete="off"
            placeholder="点击图片更换验证码" @keydown.enter.native="submitLogin" style="width: 250px"></el-input>
  <img :src="vcUrl" @click="updateVerifyCode" alt="" style="cursor: pointer;">
</el-form-item>
methods:{
updateVerifyCode() {
this.vcUrl = '/verifyCode?time='+new Date();
}
}文件上传FastDFS
安装过程略,先说明一下安全的问题
现在,任何人都可以访问我们服务器上传文件,这肯定是不行的,这个问题好解决,加一个上传时候的令牌即可。
首先我们在服务端开启令牌校验:
vi /etc/fdfs/http.conf配置完成后,记得重启服务端:
./nginx -s stop
./nginx
接下来,在前端准备一个获取令牌的方法,如下:
@Test
public void getToken() throws Exception {
    int ts = (int) Instant.now().getEpochSecond();
    String token = ProtoCommon.getToken("M00/00/00/wKhbgF5aMteAWy0gAAJkI7-2yGk361.png", ts, "FastDFS1234567890");
    StringBuilder sb = new StringBuilder();
  	sb.append("http:172.16.211.4")
      .append("group1/M00/00/00/wKhbgF5aMteAWy0gAAJkI7-2yGk361.png")
    sb.append("?token=").append(token);
    sb.append("&ts=").append(ts);
    System.out.println(sb.toString());
}
这里,我们主要是根据 ProtoCommon.getToken 方法来获取令牌,注意这个方法的第一个参数是你要访问的文件 id,注意,这个地址里边不包含 group,千万别搞错了;第二个参数是时间戳,第三个参数是密钥,密钥要和服务端的配置一致。将生成的字符串拼接,追加到访问路径后面,如:http://192.168.91.128/group1/M00/00/00/wKhbgF5aMteAWy0gAAJkI7-2yGk361.png?token=7e329cc50307000283a3ad3592bb6d32&ts=1582975854。此时访问路径里边如果没有令牌,会访问失败。
个人中心
如何获取用户信息
在Spring Security中提供了Authentication,可以直接在Controller中直接注入就可以使用
@GetMapping("/hr/info")
public Hr getCurrentHr(Authentication authentication) {
    return ((Hr) authentication.getPrincipal());
}
如何修改用户信息
相当于重新构建一个Authentication实例放到Context中去
@PutMapping("/hr/info")
public RespBean updateHr(@RequestBody Hr hr, Authentication authentication) {
    if (hrService.updateHr(hr) == 1) {
        SecurityContextHolder.getContext().setAuthentication(new UsernamePasswordAuthenticationToken(hr, authentication.getCredentials(), authentication.getAuthorities()));
        return RespBean.ok("更新成功!");
    }
    return RespBean.error("更新失败!");
}
又分为修改用户的基础信息,不需要重新登录,修改密码后需要重新登录,先定义接口
@GetMapping("/hr/info")
public Hr getCurrentHr(Authentication authentication) {
    return ((Hr) authentication.getPrincipal());
}

@PutMapping("/hr/info")
public RespBean updateHr(@RequestBody Hr hr, Authentication authentication) {
    if (hrService.updateHr(hr) == 1) {
        SecurityContextHolder.getContext().setAuthentication(new UsernamePasswordAuthenticationToken(hr, authentication.getCredentials(), authentication.getAuthorities()));
        return RespBean.ok("更新成功!");
    }
    return RespBean.error("更新失败!");
}

@PutMapping("/hr/pass")
public RespBean updateHrPasswd(@RequestBody Map<String, Object> info) {
    String oldpass = (String) info.get("oldpass");
    String pass = (String) info.get("pass");
    Integer hrid = (Integer) info.get("hrid");
    if (hrService.updateHrPasswd(oldpass, pass, hrid)) {
        return RespBean.ok("更新成功!");
    }
    return RespBean.error("更新失败!");
}
Service
public boolean updateHrPasswd(String oldpass, String pass, Integer hrid) {
    Hr hr = hrMapper.selectByPrimaryKey(hrid);
    BCryptPasswordEncoder encoder = new BCryptPasswordEncoder();
    if (encoder.matches(oldpass, hr.getPassword())) {
        String encodePass = encoder.encode(pass);
        Integer result = hrMapper.updatePasswd(hrid, encodePass);
        if (result == 1) {
            return true;
        }
    }
    return false;
}
Mapper
<update id="updatePasswd">
  update hr set password = #{encodePass} where id=#{hrid};
</update>
上传头像(FastDFS)
开启FastDFS(Tracker Server、Storage Server、Nginx)
/usr/bin/fdfs_trackerd /etc/fdfs/tracker.conf start
/usr/bin/fdfs_storaged /etc/fdfs/storage.conf start
/usr/local/nginx/sbin/.nginx
添加依赖
<dependency>
    <groupId>net.oschina.zcx7878</groupId>
    <artifactId>fastdfs-client-java</artifactId>
    <version>1.27.0.0</version>
</dependency>
配置文件
## application.properties
fastdfs.nginx.host = http://172.16.211.4/

## fastdfs-client.properties

fastdfs.connect_timeout_in_seconds = 5
fastdfs.network_timeout_in_seconds = 30

fastdfs.charset = UTF-8

fastdfs.http_anti_steal_token = false
fastdfs.http_secret_key = lucifer1234567890
fastdfs.http_tracker_http_port = 80

fastdfs.tracker_servers = 172.16.211.4:22122

## Whether to open the connection pool, if not, create a new connection every time
fastdfs.connection_pool.enabled = true

## max_count_per_entry: max connection count per host:port , 0 is not limit
fastdfs.connection_pool.max_count_per_entry = 500

## connections whose the idle time exceeds this time will be closed, unit: second, default value is 3600
fastdfs.connection_pool.max_idle_time = 3600

## Maximum waiting time when the maximum number of connections is reached, unit: millisecond, default value is 1000
fastdfs.connection_pool.max_wait_time_in_ms = 1000
工具类
public class FastDFSUtils {
    private static StorageClient1 client1;

    static {
        try {
            ClientGlobal.initByProperties("fastdfs-client.properties");
            TrackerClient trackerClient = new TrackerClient();
            TrackerServer trackerServer = trackerClient.getConnection();
            client1 = new StorageClient1(trackerServer, null);
        } catch (IOException e) {
            e.printStackTrace();
        } catch (MyException e) {
            e.printStackTrace();
        }
    }

    public static String upload(MultipartFile file) {
        String oldName = file.getOriginalFilename();
        try {
            return client1.upload_file1(file.getBytes(), oldName.substring(oldName.lastIndexOf(".") + 1), null);
        } catch (IOException e) {
            e.printStackTrace();
        } catch (MyException e) {
            e.printStackTrace();
        }
        return null;
    }

}
Controller
@PostMapping("/hr/userface")
public RespBean updateHrUserface(MultipartFile file, Integer id,Authentication authentication) {
    String fileId = FastDFSUtils.upload(file);
    String url = nginxHost + fileId;
    if (hrService.updateUserface(url, id) == 1) {
        Hr hr = (Hr) authentication.getPrincipal();
        hr.setUserface(url);
        SecurityContextHolder.getContext().setAuthentication(new UsernamePasswordAuthenticationToken(hr, authentication.getCredentials(), authentication.getAuthorities()));
        return RespBean.ok("更新成功!", url);
    }
    return RespBean.error("更新失败!");
}
Service
public Integer updateUserface(String url, Integer id) {
    return hrMapper.updateUserface(url, id);
}
Mapper
<update id="updateUserface">
  update hr set userface = #{url} where id=#{id};
</update>
RabbitMQ保证邮箱发送的可靠性
消息发送
生成表记录消息发送的日志

生成对应实体类
public class MailSendLog {

    private String msgId;
    private Integer empId;
    //0 消息投递中   1 投递成功   2投递失败
    private Integer status;
    //RabbbitMQ相关
    private String routeKey;
    private String exchange;
    //发送失败重试次数
    private Integer count;
    //发送失败重试时间
    private Date tryTime;
    private Date createTime;
    private Date updateTime;
}
最开始使用的是SpringBoot提供的RabbitTemplate直接发送消息
@Autowired
RabbitTemplate rabbitTemplate;
这里自己配置RabbitConfig,不再使用系统提供的
public class RabbitConfig {

    public final static Logger logger = LoggerFactory.getLogger(RabbitConfig.class);

    @Autowired
    CachingConnectionFactory cachingConnectionFactory;

    @Autowired
    MailSendLogService mailSendLogService;

    @Bean
    RabbitTemplate rabbitTemplate() {
        RabbitTemplate rabbitTemplate = new RabbitTemplate(cachingConnectionFactory);
        rabbitTemplate.setConfirmCallback((data, ack, cause) -> {
            String msgId = data.getId();
            if (ack) {
                logger.info(msgId + ":消息发送成功");
                mailSendLogService.updateMailSendLogStatus(msgId, 1);//修改数据库中的记录,消息投递成功
            } else {
                logger.info(msgId + ":消息发送失败");
            }
        });
        rabbitTemplate.setReturnCallback((msg, repCode, repText, exchange, routingkey) -> {
            logger.info("消息发送失败");
        });
        return rabbitTemplate;
    }

    @Bean
    Queue mailQueue() {
        return new Queue(MailConstants.MAIL_QUEUE_NAME, true);
    }

    @Bean
    DirectExchange mailExchange() {
        return new DirectExchange(MailConstants.MAIL_EXCHANGE_NAME, true, false);
    }

    @Bean
    Binding mailBinding() {
        return BindingBuilder.bind(mailQueue()).to(mailExchange()).with(MailConstants.MAIL_ROUTING_KEY_NAME);
    }
}
定义的消息常量实体类
public class MailConstants {

    public static final Integer DELIVERING = 0;//消息投递中
    public static final Integer SUCCESS = 1;//消息投递成功
    public static final Integer FAILURE = 2;//消息投递失败
    public static final Integer MAX_TRY_COUNT = 3;//最大重试次数
    public static final Integer MSG_TIMEOUT = 1;//消息超时时间
    public static final String MAIL_QUEUE_NAME = "lucifer.mail.queue";
    public static final String MAIL_EXCHANGE_NAME = "lucifer.mail.exchange";
    public static final String MAIL_ROUTING_KEY_NAME = "lucifer.mail.routing.key";
}
对应Service
@Service
public class MailSendLogService {
    @Autowired
    MailSendLogMapper mailSendLogMapper;

    public Integer updateMailSendLogStatus(String msgId, Integer status) {
        return mailSendLogMapper.updateMailSendLogStatus(msgId, status);
    }
}
Mapper
<update id="updateMailSendLogStatus">
    update mail_send_log set status = #{status} where msgId=#{msgId};
</update>此时针对EmployeeService需要进行一定的改造,在添加员工发送邮件的时候,利用自己的配置来进行
public Integer addEmp(Employee employee) {

        Date beginContract = employee.getBeginContract();
        Date endContract = employee.getEndContract();
        double month = (Double.parseDouble(yearFormat.format(endContract)) - Double.parseDouble(yearFormat.format(beginContract))) * 12
                + (Double.parseDouble(monthFormat.format(endContract)) - Double.parseDouble(monthFormat.format(beginContract)));
        employee.setContractTerm(Double.parseDouble(decimalFormat.format(month / 12)));
        //邮件发送
        int result = employeeMapper.insertSelective(employee);
        if (result == 1) {
            Employee emp = employeeMapper.getEmployeeById(employee.getId());
            //生成消息的唯一id
            String msgId = UUID.randomUUID().toString();
            MailSendLog mailSendLog = new MailSendLog();
            mailSendLog.setMsgId(msgId);
            mailSendLog.setCreateTime(new Date());
            mailSendLog.setExchange(MailConstants.MAIL_EXCHANGE_NAME);
            mailSendLog.setRouteKey(MailConstants.MAIL_ROUTING_KEY_NAME);
            mailSendLog.setEmpId(emp.getId());
            mailSendLog.setTryTime(new Date(System.currentTimeMillis() + 1000 * 60 * MailConstants.MSG_TIMEOUT));
            mailSendLogService.insert(mailSendLog);
//            rabbitTemplate.convertAndSend("lucifer.mail.welcome", emp);
            rabbitTemplate.convertAndSend(MailConstants.MAIL_EXCHANGE_NAME, MailConstants.MAIL_ROUTING_KEY_NAME, emp, new CorrelationData(msgId));

        }
            return result;
    }
添加Service方法
public Integer insert(MailSendLog mailSendLog) {
    return mailSendLogMapper.insert(mailSendLog);
}
Mapper,数据库记录每个消息发送的状态
<insert id="insert" parameterType="org.lucifer.vbluciferpro.model.MailSendLog">
    insert into mail_send_log (msgId,empId,routeKey,exchange,tryTime,createTime) values (#{msgId},#{empId},#{routeKey},#{exchange},#{tryTime},#{createTime});
</insert>最后需要更改MailReceiver和MailserverApplication中的
@RabbitListener(queues = MailConstants.MAIL_QUEUE_NAME)

    @Bean
    Queue queue(){
        return new Queue(MailConstants.MAIL_QUEUE_NAME);
    }
定时任务
当消息发送失败的时候,需要检测是否需要定时重发,首先在Service里定义task
@Component
public class MailSendTask {

    @Autowired
    MailSendLogService mailSendLogService;
    @Autowired
    RabbitTemplate rabbitTemplate;
    @Autowired
    EmployeeService employeeService;
    //每隔10s执行一次
    @Scheduled(cron = "0/10 * * * * ?")
    public void mailResendTask() {
        List<MailSendLog> logs = mailSendLogService.getMailSendLogsByStatus();
        if (logs == null || logs.size() == 0) {
            return;
        }
        logs.forEach(mailSendLog->{
            if (mailSendLog.getCount() >= 3) {
                mailSendLogService.updateMailSendLogStatus(mailSendLog.getMsgId(), 2);//直接设置该条消息发送失败
            }else{
                mailSendLogService.updateCount(mailSendLog.getMsgId(), new Date());
                Employee emp = employeeService.getEmployeeById(mailSendLog.getEmpId());
                rabbitTemplate.convertAndSend(MailConstants.MAIL_EXCHANGE_NAME, MailConstants.MAIL_ROUTING_KEY_NAME, emp, new CorrelationData(mailSendLog.getMsgId()));
            }
        });
    }
}需要注意的是,需要在启动类上加上注解@EnableScheduling
添加对应Service方法
public List<MailSendLog> getMailSendLogsByStatus() {
    return mailSendLogMapper.getMailSendLogsByStatus();
}

public Integer updateCount(String msgId, Date date) {
    return mailSendLogMapper.updateCount(msgId,date);
}
Mapper
<select id="getMailSendLogsByStatus" resultType="org.lucifer.vbluciferpro.model.MailSendLog">
# 尝试的时间小于当前时间,需要重新处理
select * from mail_send_log where status=0 and tryTime < sysdate()
</select>
<update id="updateCount">
update mail_send_log set count=count+1,updateTime=#{date} where msgId=#{msgId};
</update>在配置文件中配置回调
#开启confirms回调
#spring.rabbitmq.publisher-confirms=true
#开启returnedMessage回调
#spring.rabbitmq.publisher-returns=true

#新版springboot需要这样配置
spring.rabbitmq.publisher-confirm-type=correlated
spring.rabbitmq.publisher-confirm在springboot2.2.0.RELEASE版本之前是amqp正式支持的属性,用来配置消息发送到交换器之后是否触发回调方法,在2.2.0及之后使用spring.rabbitmq.publisher-confirm-type属性配置代替,用来配置更多的确认类型;
其中:
- NONE值是禁用发布确认模式,是默认值
- CORRELATED值是发布消息成功到交换器后会触发回调方法
- SIMPLE值经测试有两种效果,其一效果和CORRELATED值一样会触发回调方法,其二在发布消息成功后使用rabbitTemplate调用waitForConfirms或waitForConfirmsOrDie方法等待broker节点返回发送结果,根据返回结果来判定下一步的逻辑,要注意的点是waitForConfirmsOrDie方法如果返回false则会关闭channel,则接下来无法发送消息到broker;
消息消费
利用Redis,当有多个相同的消息发送的时候,只被消费一次,不产生重复消费,因为每个消息有唯一id,每次把id存到redis中去,然后查这个消息是否被消费过,如果被消费过,就不再重复消费
首先在mail模块添加依赖
<dependency>
    <groupId>org.springframework.boot</groupId>
    <artifactId>spring-boot-starter-data-redis</artifactId>
</dependency>
配置redis
#开启手动确认
spring.rabbitmq.listener.simple.acknowledge-mode=manual

#redis
spring.redis.host=172.16.211.4
spring.redis.port=6379
spring.redis.database=0
注意,redis需要开启远程访问
每次需要手动确认消息,更改消息接收类
主要是利用channel.basicAck和channel.basicNack来确认是否被消费过
@Component
public class MailReceiver {

    public static final Logger logger = LoggerFactory.getLogger(MailReceiver.class);

    @Autowired
    JavaMailSender javaMailSender;
    @Autowired
    MailProperties mailProperties;
    @Autowired
    TemplateEngine templateEngine;
    @Autowired
    StringRedisTemplate redisTemplate;

    @RabbitListener(queues =  MailConstants.MAIL_QUEUE_NAME)
    public void handler(Message message, Channel channel) throws IOException {
        //利用redis完成消息消费
        Employee employee = (Employee) message.getPayload();
        MessageHeaders headers = message.getHeaders();
        Long tag = (Long) headers.get(AmqpHeaders.DELIVERY_TAG);
        String msgId = (String) headers.get("spring_returned_message_correlation");
        if (redisTemplate.opsForHash().entries("mail_log").containsKey(msgId)) {
            //redis 中包含该 key,说明该消息已经被消费过
            logger.info(msgId + ":消息已经被消费");
            channel.basicAck(tag, false);//确认消息已消费
            return;
        }
        //收到消息,发送邮件
        MimeMessage msg = javaMailSender.createMimeMessage();
        MimeMessageHelper helper = new MimeMessageHelper(msg);


        try {
            helper.setTo(employee.getEmail());
            helper.setFrom(mailProperties.getUsername());
            helper.setSubject("入职欢迎!");
            helper.setSentDate(new Date());
            Context context = new Context();
            context.setVariable("name", employee.getName());
            context.setVariable("posName", employee.getPosition().getName());
            context.setVariable("joblevelName", employee.getJobLevel().getName());
            context.setVariable("departmentName", employee.getDepartment().getName());
            //对应mail.html
            String mail = templateEngine.process("mail", context);
            helper.setText(mail, true);
            javaMailSender.send(msg);
            redisTemplate.opsForHash().put("mail_log", msgId, "lucifer");
            channel.basicAck(tag, false);
            logger.info(msgId + ":邮件发送成功");
        } catch (MessagingException e) {
            channel.basicNack(tag, false, true);
            e.printStackTrace();
            //发送失败,返回日志
            logger.error("邮件发送失败:" + e.getMessage());
        }
    }
}
Spring Cache缓存菜单
在Spring Boot中,使用Redis缓存,既可以使用RedisTemplate自己来实现,也可以使用使用这种方式,这种方式是Spring Cache提供的统一接口,实现既可以是Redis,也可以是Ehcache或者其他支持这种规范的缓存框架。从这个角度来说,Spring Cache和Redis、Ehcache的关系就像JDBC与各种数据库驱动的关系。
在web模块中引入依赖
<dependency>
    <groupId>org.springframework.boot</groupId>
    <artifactId>spring-boot-starter-cache</artifactId>
</dependency>
<dependency>
    <groupId>org.springframework.boot</groupId>
    <artifactId>spring-boot-starter-data-redis</artifactId>
</dependency>
<dependency>
    <groupId>org.springframework.boot</groupId>
    <artifactId>spring-boot-starter-web</artifactId>
</dependency>
配置文件
#开启redis+cache缓存
spring.redis.host=172.16.211.4
spring.redis.port=6379
spring.redis.database=0

spring.cache.cache-names=menus_cache
启动类
@SpringBootApplication
@EnableCaching
@MapperScan(basePackages="org.lucifer.vbluciferpro.mapper")
@EnableScheduling
public class LuciferproWebApplication {
EnableCaching注解里
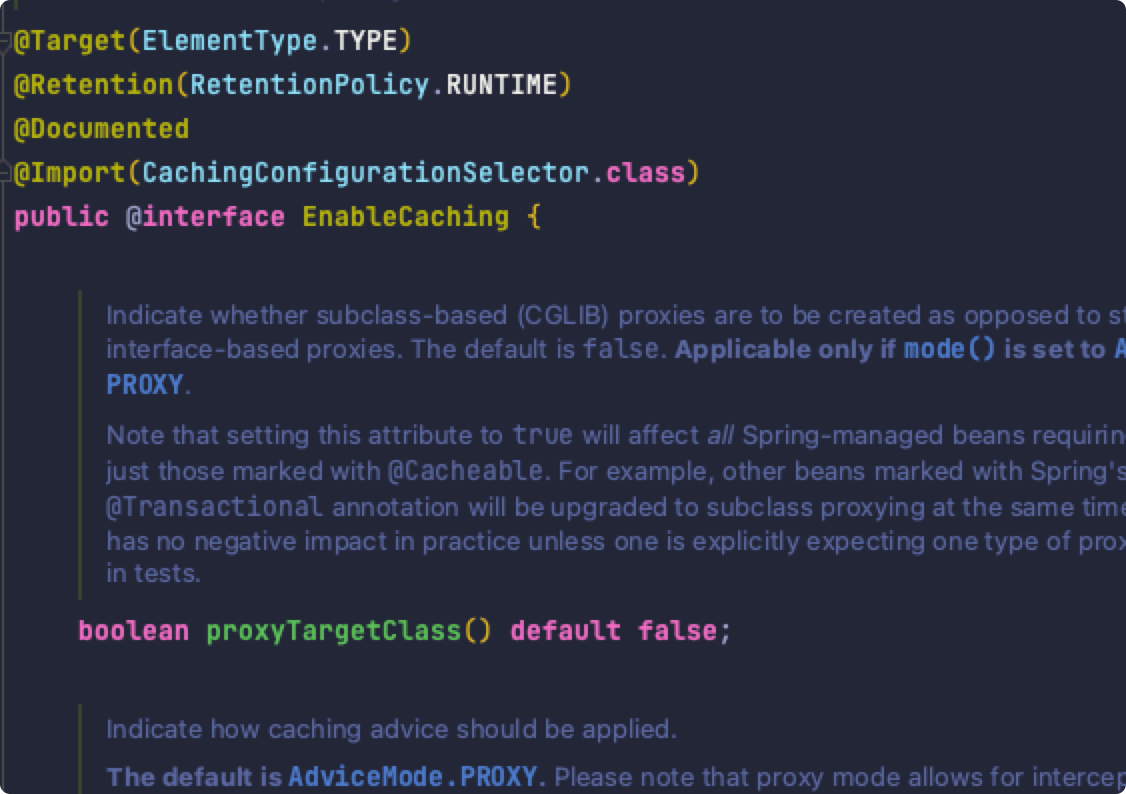
默认使用JDK代理,如果设为true,将使用cglaib
引入Service
@Service
@CacheConfig(cacheNames = "menus_cache")
public class MenuService {

  @Cacheable
  public List<Menu> getAllMenusWithRole() {
    return menuMapper.getAllMenusWithRole();
  }

}本博客所有文章除特别声明外,均采用 CC BY-SA 4.0 协议 ,转载请注明出处!
