Spring
Spring
第一章、Spring工厂
1. 引言
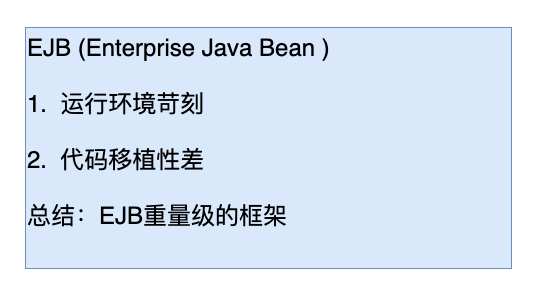
1.1 EJB存在的问题
1.2 什么是Spring
Spring是一个轻量级的JavaEE解决方案,整合众多优秀的设计模式
轻量级
- 对于运行环境是没有额外要求的
- 开源 tomcat resion jetty
收费 weblogic websphere
- 开源 tomcat resion jetty
- 代码移植性高
- 不需要实现额外接口
JavaEE的解决方案
整合设计模式
- 工厂
- 代理
- 模板
- 策略
1.3 设计模式
广义概念
面向对象设计中,解决特定问题的经典代码
狭义概念
GOF4人帮定义的23种设计模式:工厂、适配器、装饰器、门面、代理、模板…
1.4 工厂设计模式
1.4.1 什么是工厂设计模式
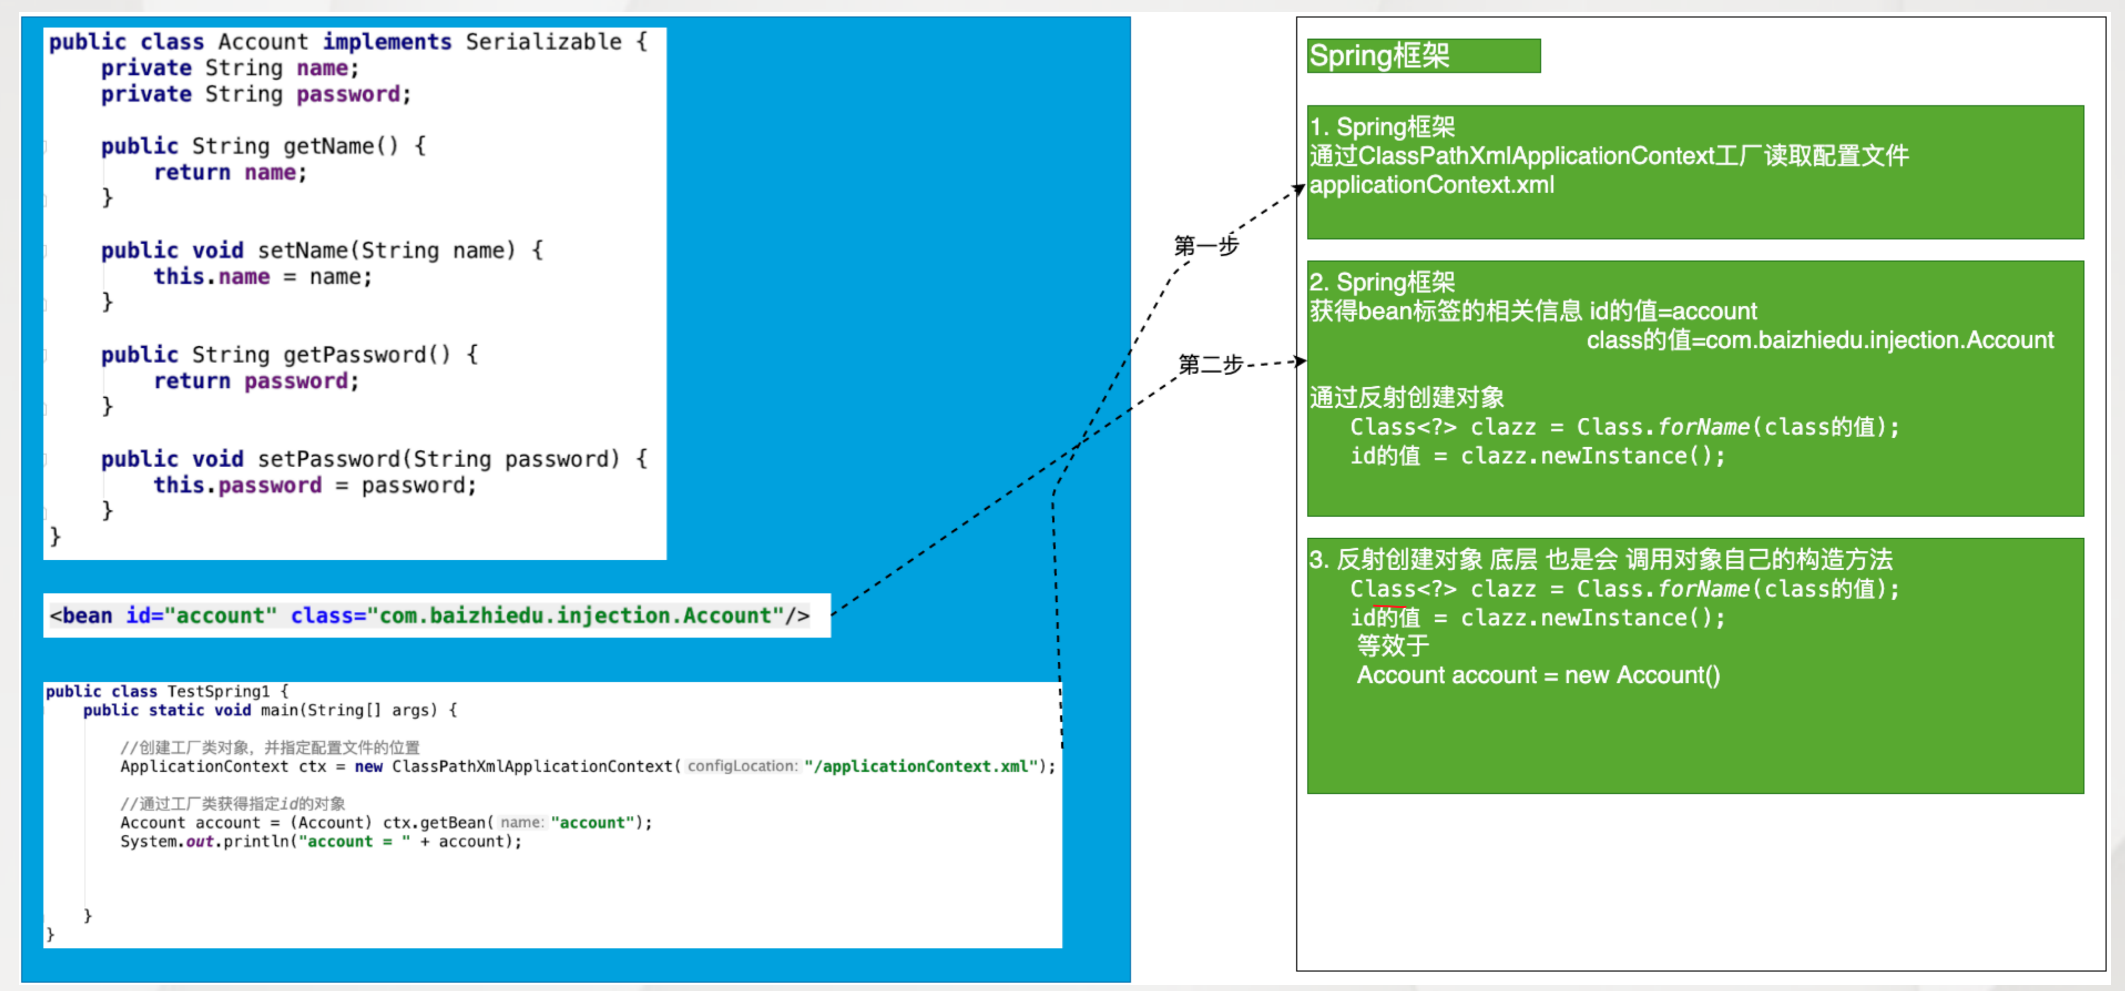
概念:通过工厂类,创建对象
User user = new User();
UserDAO userDAO = new UserDAOImpl();
好处:解耦合
耦合:指定是代码间的强关联关系,一方的改变会影响到另一方
问题:不利于代码维护
简单:把接口的实现类,硬编码在程序中
UserService userService = new UserServiceImpl();
1.4.2 简单工厂的设计
public class BeanFactory {
/* 对象的创建方式:
		1. 直接调用构造方法 创建对象  UserService userService = new UserServiceImpl();
		2. 通过反射的形式 创建对象 解耦合
		//com.baizhiedu.basic.UserServiceImpl,类名改变也会改变
 		Class clazz = Class.forName("com.baizhiedu.basic.UserServiceImpl");
    UserService userService = (UserService)clazz.newInstance();*/
	public static UserService getUserService() {

    UserService userService = null;
    try {
		//com.baizhiedu.basic.UserServiceImpl,类名改变也会改变
 		Class clazz = Class.forName("com.baizhiedu.basic.UserServiceImpl");
    UserService userService = (UserService)clazz.newInstance();
    } catch (ClassNotFoundException e) {
        e.printStackTrace();
    } catch (InstantiationException e) {
        e.printStackTrace();
    } catch (IllegalAccessException e) {
        e.printStackTrace();
    }
    return userService;
	}
}通过反射的形式创建对象来解耦合,但com.baizhiedu.basic.UserServiceImpl改变Class.forName("com.baizhiedu.basic.UserServiceImpl")也会改变,并没有完全解耦,可以利用Properties文件来进行管理,配置文件applicationContext.properties
# Properties 集合 存储 Properties文件的内容
# 特殊Map key=String value=String
# Properties [userService = com.baizhiedu.xxx.UserServiceImpl]
# Properties.getProperty("userService")

userService = com.baizhiedu.basic.UserServiceImpl
userDAO = com.baizhiedu.basic.UserDAOImpl
下面利用Properties来调用
public class BeanFactory {
//创建对象
private static Properties env = new Properties();
static{
try {
//第一步 获得IO输入流
InputStream inputStream = BeanFactory.class.getResourceAsStream("/applicationContext.properties");
//第二步 文件内容 封装 Properties集合中 key = userService value = com.baizhixx.UserServiceImpl
env.load(inputStream);
//关闭流
inputStream.close();
} catch (IOException e) {
e.printStackTrace();
}
}
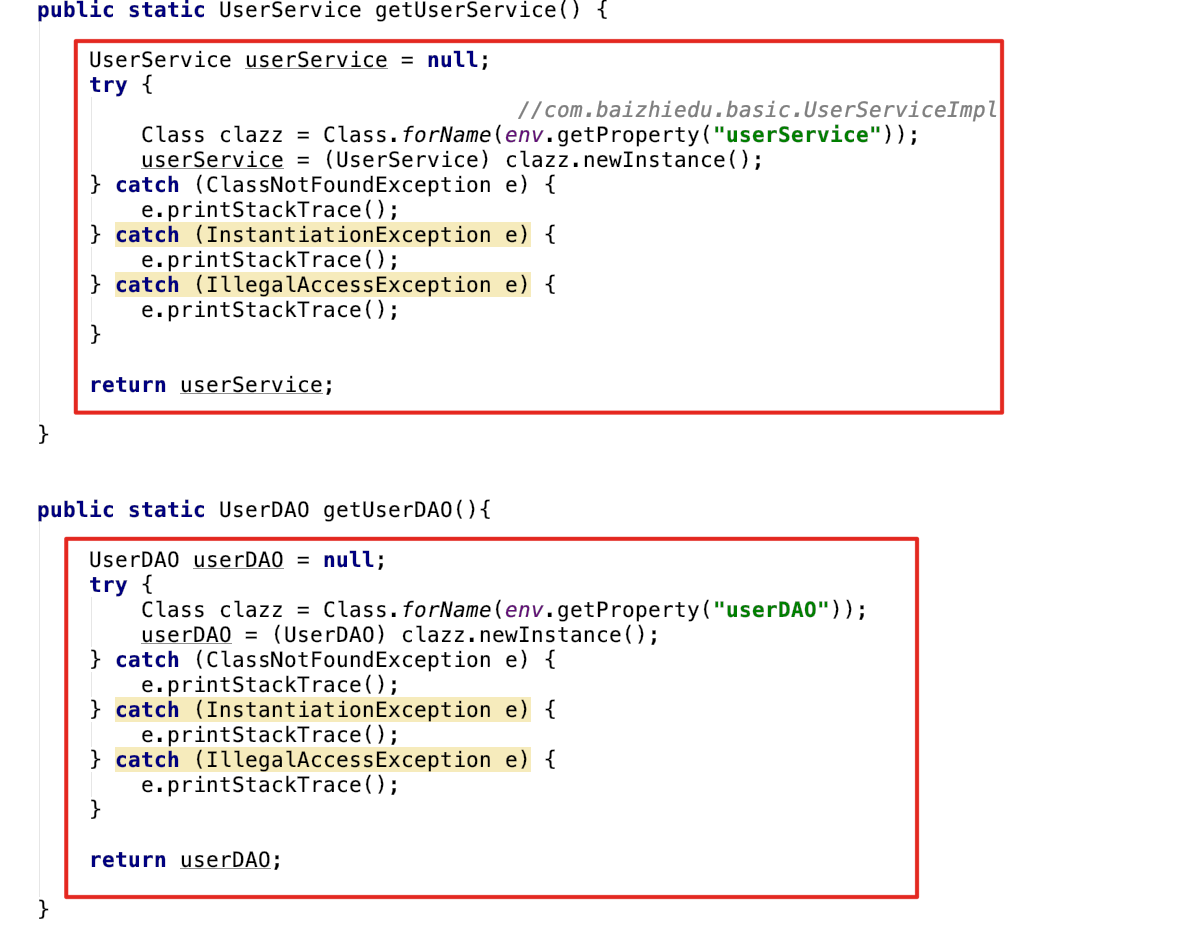
public static UserService getUserService() {
UserService userService = null;
try {
//利用getProperty调用applicationContext.properties中的userService
Class clazz = Class.forName(env.getProperty("userService"));
userService = (UserService) clazz.newInstance();
} catch (ClassNotFoundException e) {
e.printStackTrace();
} catch (InstantiationException e) {
e.printStackTrace();
} catch (IllegalAccessException e) {
e.printStackTrace();
}
return userService;
}
}
public static UserDAO getUserDAO(){
UserDAO userDAO = null;
try {
//同理
Class clazz = Class.forName(env.getProperty("userDAO"));
userDAO = (UserDAO) clazz.newInstance();
} catch (ClassNotFoundException e) {
e.printStackTrace();
} catch (InstantiationException e) {
e.printStackTrace();
} catch (IllegalAccessException e) {
e.printStackTrace();
}
return userDAO;
}
}1.4.3 通用工厂的设计
- 简单工厂会存在大量的代码冗余
通用工厂的代码
//创建一切想要的对象
public class BeanFactory{
  	//传参
    public static Object getBean(String key){
         Object ret = null;
         try {
           		//传入参数key,不再手写
             Class clazz = Class.forName(env.getProperty(key));
             ret = clazz.newInstance();
         } catch (Exception e) {
            e.printStackTrace();
         }
         return ret;
     }
}
1.4.4 通用工厂的使用方式
- 定义类型 (类)
- 通过配置文件的配置告知工厂
applicationContext.properties
key = value - 通过工厂获得类的对象
Object ret = BeanFactory.getBean("key")
1.5 总结
Spring本质
工厂 ApplicationContext (applicationContext.xml)
2. 第一个Spring程序
2.1 软件版本
- JDK1.8+
- Maven3.5+
- IDEA2018+
- SpringFramework 5.1.4
2.2 环境搭建
<!-- https://mvnrepository.com/artifact/org.springframework/spring-context -->
<dependency>
  <groupId>org.springframework</groupId>
  <artifactId>spring-context</artifactId>
  <version>5.1.4.RELEASE</version>
</dependency>
Spring的配置文件
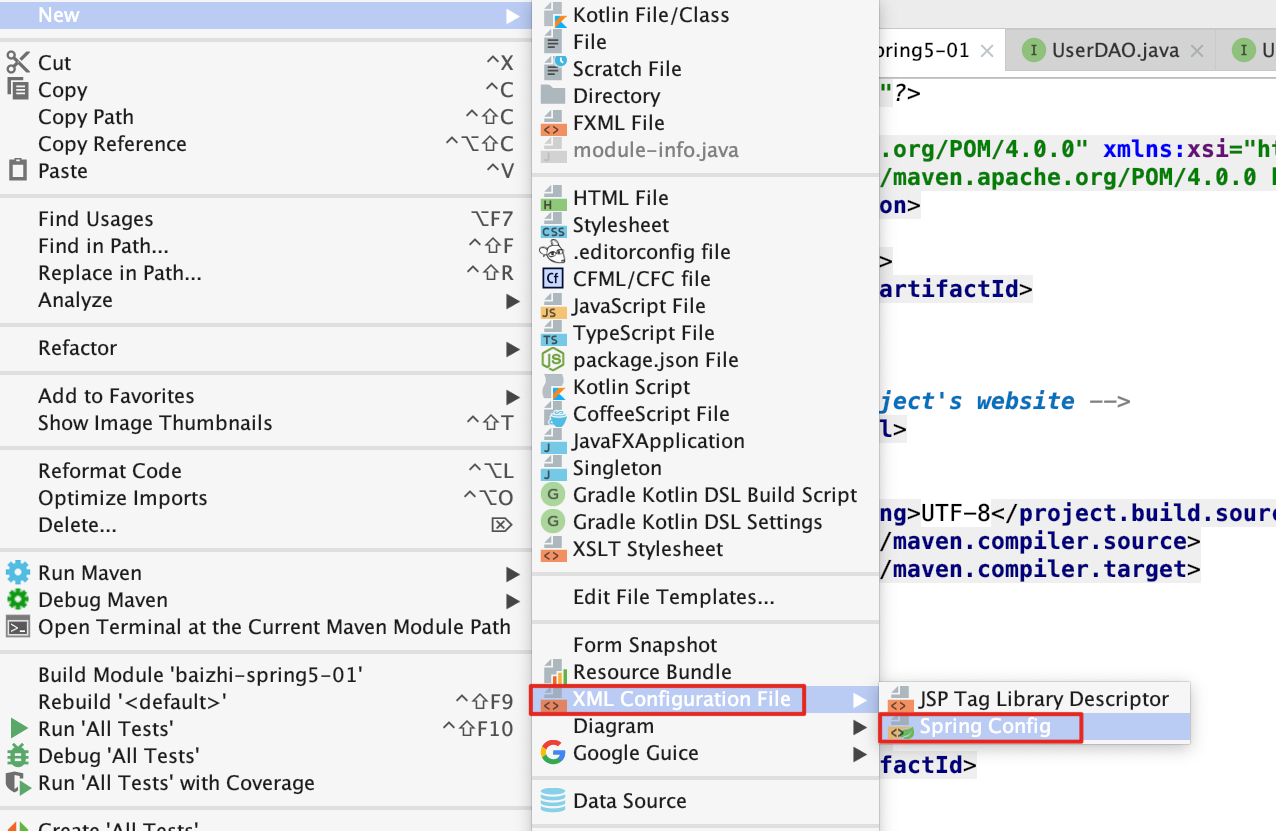
- 配置文件的放置位置:任意位置
- 配置文件的命名
- 建议:
applicationContext.xml
- 建议:
日后应用Spring框架时,需要进行配置文件路径的设置
2.3 Spring的核心API
ApplicationContext
- 作用:Spring提供的ApplicationContext这个工厂,用于对象的创建
- 好处:解耦合
ApplicationContext接口类型
- 接口:屏蔽实现的差异
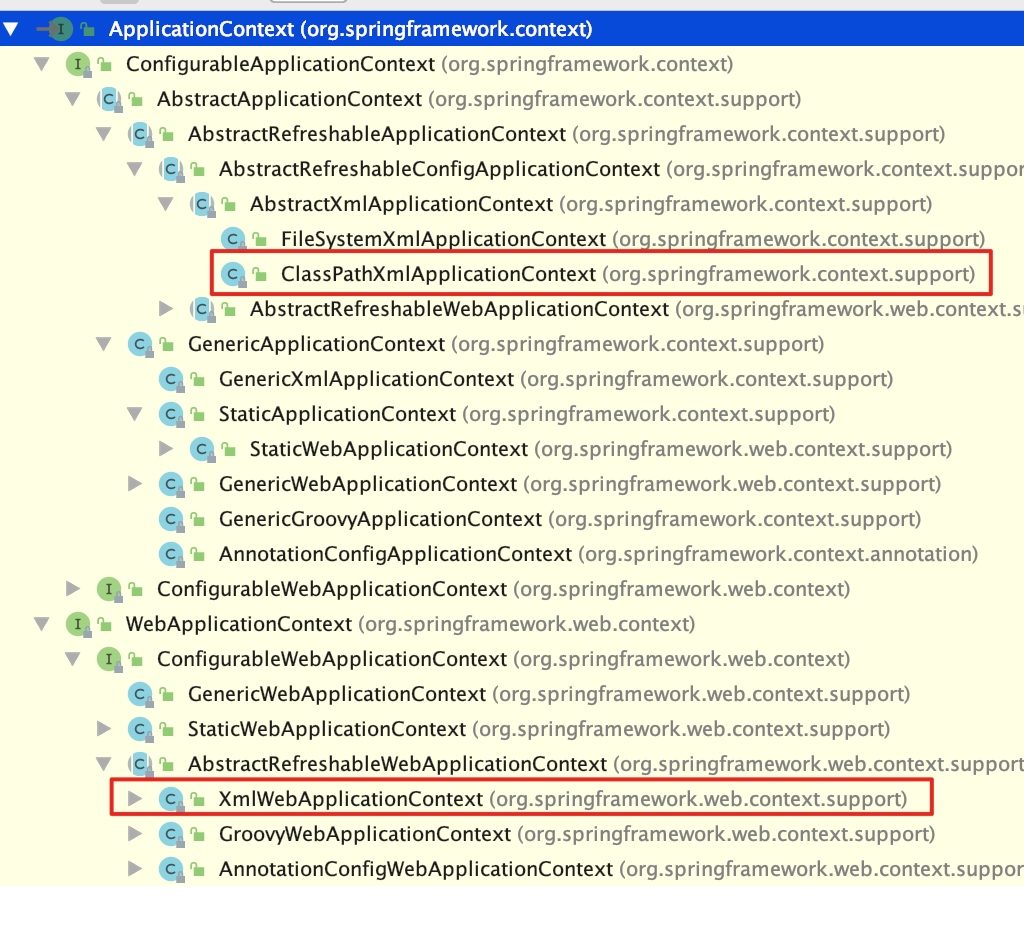
- 非web环境 :
ClassPathXmlApplicationContext (main junit) - web环境 :
XmlWebApplicationContext
重量级资源
- ApplicationContext工厂的对象占用大量内存
- 不会频繁的创建对象 : 一个应用只会创建一个工厂对象
- ApplicationContext工厂:一定是线程安全的(多线程并发访问)
2.4 程序开发
创建类型,配置文件的配置 applicationContext.xml
<bean id="person" class="com.baizhiedu.basic.Person"/> 通过工厂类,获得对象ApplicationContext与ClassPathXmlApplicationContext
ApplicationContext ctx = new ClassPathXmlApplicationContext("/applicationContext.xml");
Person person = (Person)ctx.getBean("person");
2.5 细节分析
名词解释
Spring工厂创建的对象,叫做bean或者组件(componet)
Spring工厂的相关的方法
//通过这种方式获得对象,就不需要强制类型转换
Person person = ctx.getBean("person", Person.class);
System.out.println("person = " + person);


//当前Spring的配置文件中 只能有一个<bean class是Person类型
Person person = ctx.getBean(Person.class);
System.out.println("person = " + person);


//获取的是 Spring工厂配置文件中所有bean标签的id值  person person1
String[] beanDefinitionNames = ctx.getBeanDefinitionNames();
for (String beanDefinitionName : beanDefinitionNames) {
  System.out.println("beanDefinitionName = " + beanDefinitionName);
}


//根据类型获得Spring配置文件中对应的id值
String[] beanNamesForType = ctx.getBeanNamesForType(Person.class);
for (String id : beanNamesForType) {
  System.out.println("id = " + id);
}


//用于判断是否存在指定id值得bean
if (ctx.containsBeanDefinition("a")) {
  System.out.println("true = " + true);
}else{
  System.out.println("false = " + false);
}


//用于判断是否存在指定id值得bean
if (ctx.containsBean("person")) {
  System.out.println("true = " + true);
}else{
  System.out.println("false = " + false);
}
配置文件中需要注意的细节
# 1. 只配置class属性
<bean  class="com.baizhiedu.basic.Person"/>
1. 上述这种配置 有id值com.baizhiedu.basic.Person#0

2. 如果这个bean只需要使用一次,那么就可以省略id值
	 如果这个bean会使用多次,或者被其他bean引用则需要设置id值

# 2. name属性
作用:用于在Spring的配置文件中,为bean对象定义别名(小名)
相同:
   1. ctx.getBean("id|name")-->object

   2. <bean id="" class=""
      等效
      <bean name="" class=""
区别:
   1. 别名可以定义多个,但是id属性只能有一个值

   2. XML的id属性的值,以前命名要求:必须以字母开头,字母 数字 下划线 连字符 不能以特殊字符开头 如/person
      name属性的值,命名没有要求 如/person
      name属性会应用在特殊命名的场景下
      XML发展到了今天:ID属性的限制,不存在 可以使用/person

   3. 代码
//用于判断是否存在指定id值得bean,不能判断name值
if (ctx.containsBeanDefinition("person")) {
System.out.println("true = " + true);
}else{
System.out.println("false = " + false);
}
//用于判断是否存在指定id值得bean,也可以判断name值
if (ctx.containsBean("p")) {
System.out.println("true = " + true);
}else{
System.out.println("false = " + false);
}2.6 Spring工厂的底层实现原理(简易版)
Spring工厂是可以调用对象私有的构造方法创建对象
2.7 思考
问题:未来在开发过程中,是不是所有的对象,都会交给Spring工厂来创建呢?
回答:理论上 是的,但是有特例 :实体对象(entity)是不会交给Spring创建,它是由持久层框架进行创建
3. Spring5.x与日志框架的整合
Spring与日志框架进行整合,日志框架就可以在控制台中,输出Spring框架运行过程中的一些重要的信息。
好处:便于了解Spring框架的运行过程,利于程序的调试
默认
Spring1.2.3早期都是于commons-logging.jar
Spring5.x默认整合的日志框架 logback log4j2
Spring5.x整合log4j
- 引入
log4j jar包 - 引入
log4.properties配置文件
pom
<dependency>
  <groupId>org.slf4j</groupId>
  <artifactId>slf4j-log4j12</artifactId>
  <version>1.7.25</version>
</dependency>

<dependency>
  <groupId>log4j</groupId>
  <artifactId>log4j</artifactId>
  <version>1.2.17</version>
</dependency>
log4j.properties
# resources文件夹根目录下
### 配置根
log4j.rootLogger = debug,console
### 日志输出到控制台显示
log4j.appender.console=org.apache.log4j.ConsoleAppender
log4j.appender.console.Target=System.out
log4j.appender.console.layout=org.apache.log4j.PatternLayout
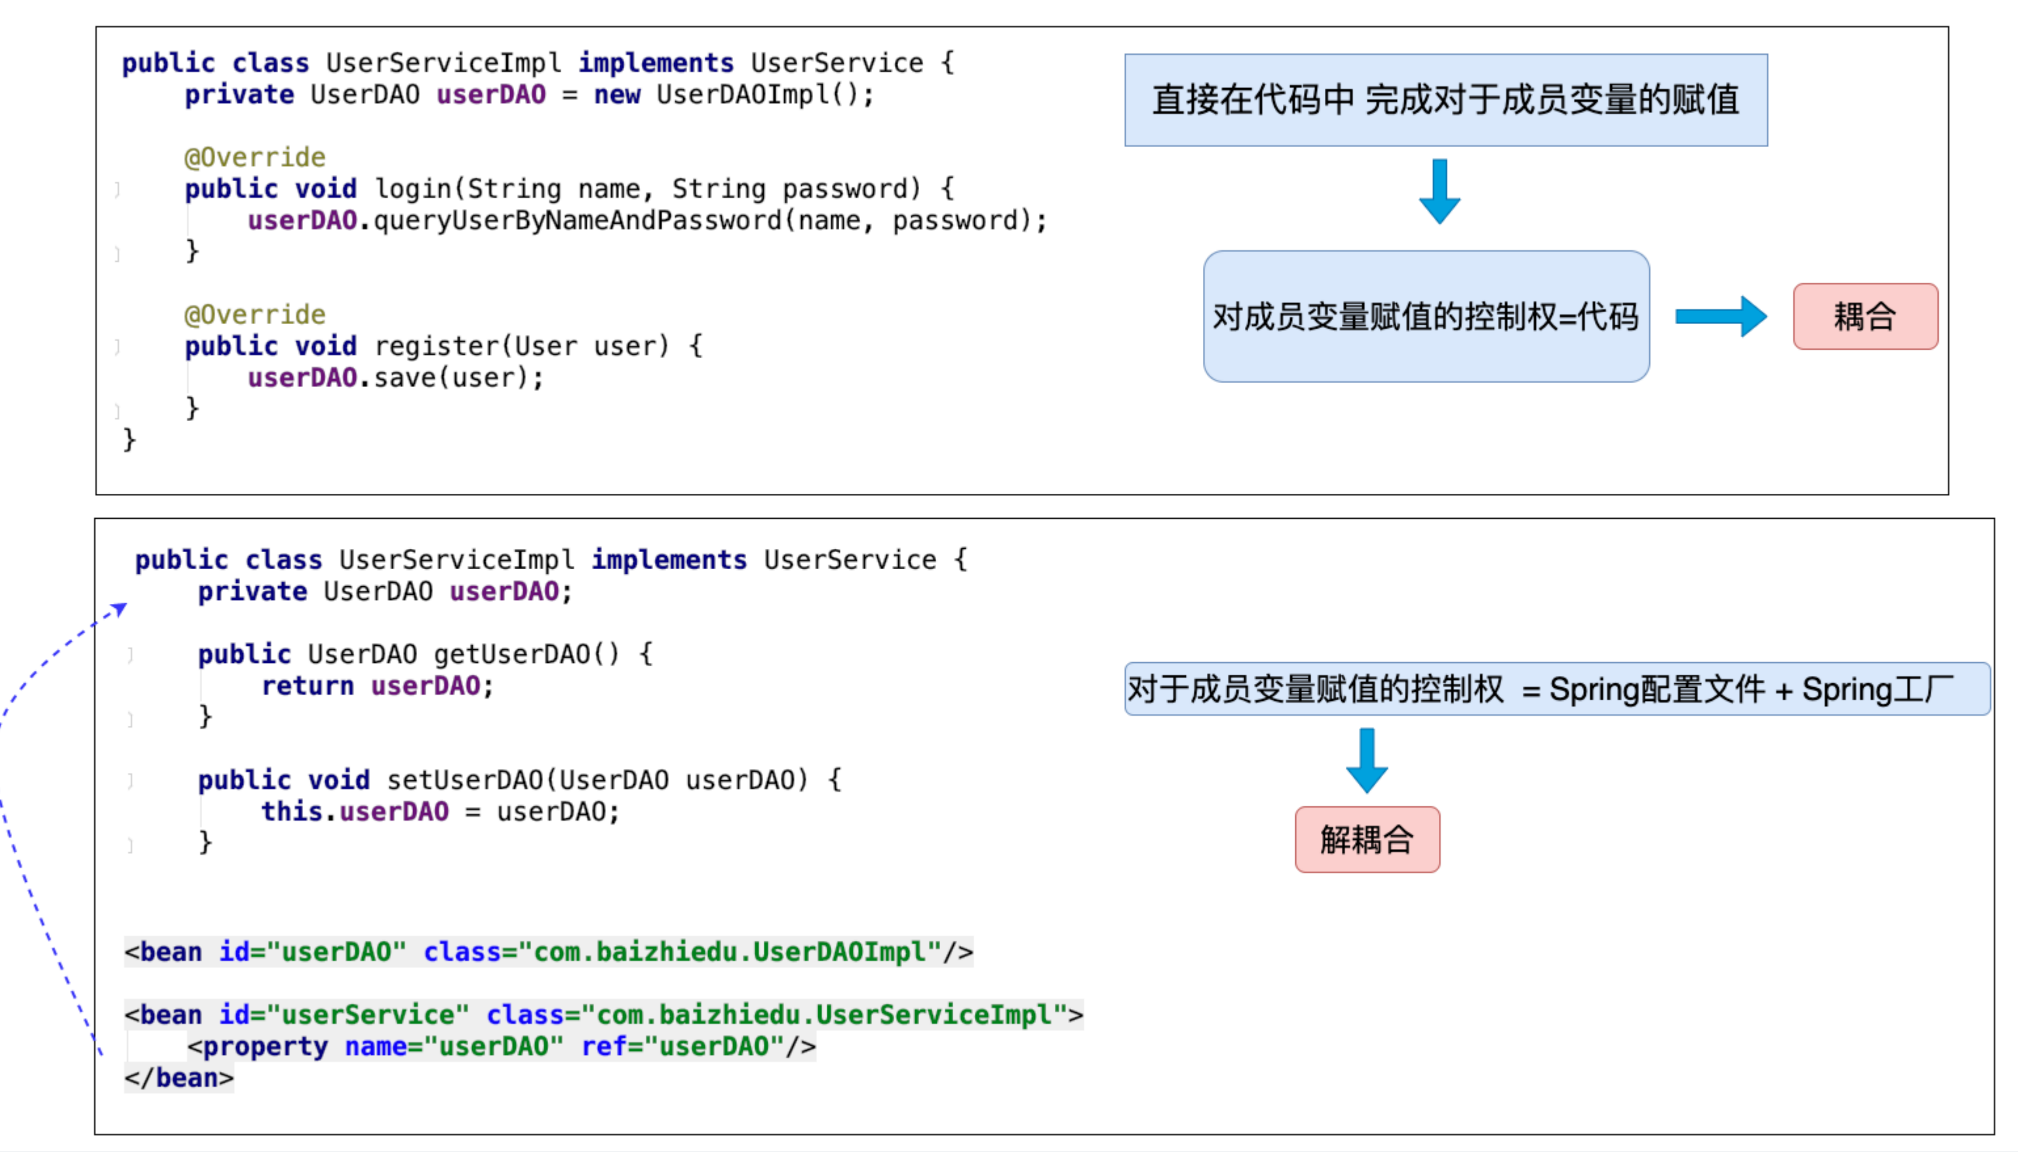
log4j.appender.console.layout.ConversionPattern=%d{yyyy-MM-dd HH:mm:ss} %-5p %c{1}:%L - %m%n4. 注入(Injection)
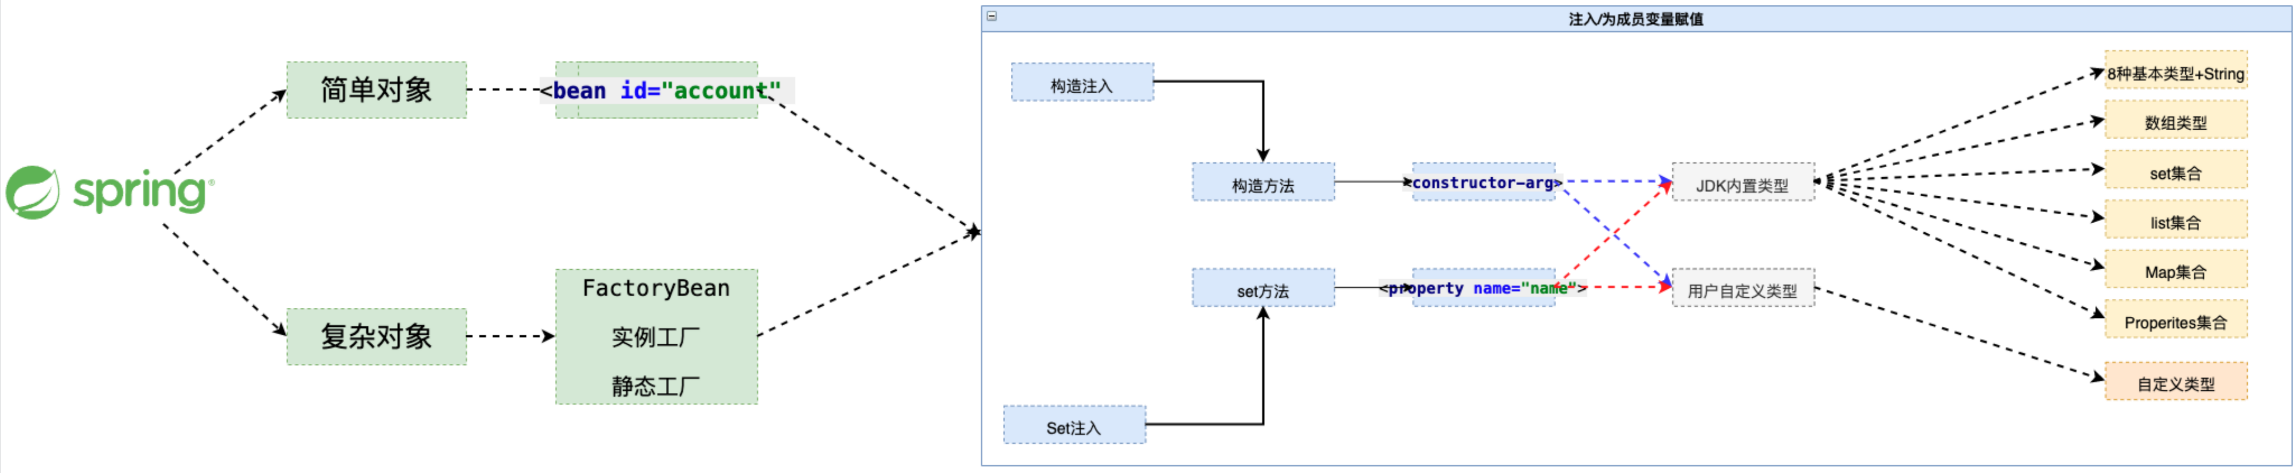
4.1 什么是注入
通过Spring工厂及配置文件,为所创建对象的成员变量赋值
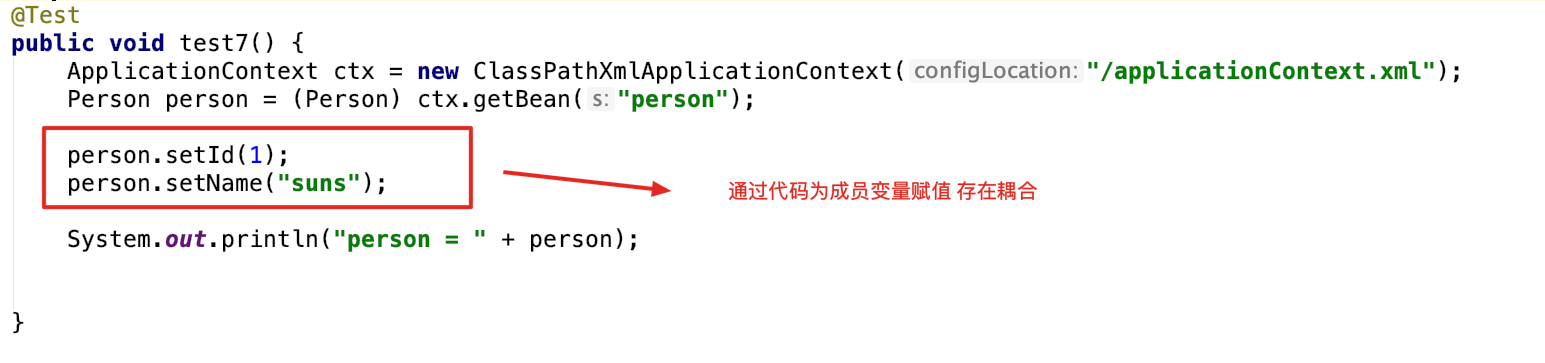
4.1.1 为什么需要注入
通过编码的方式,为成员变量进行赋值,存在耦合
4.1.2 如何进行注入[开发步骤]
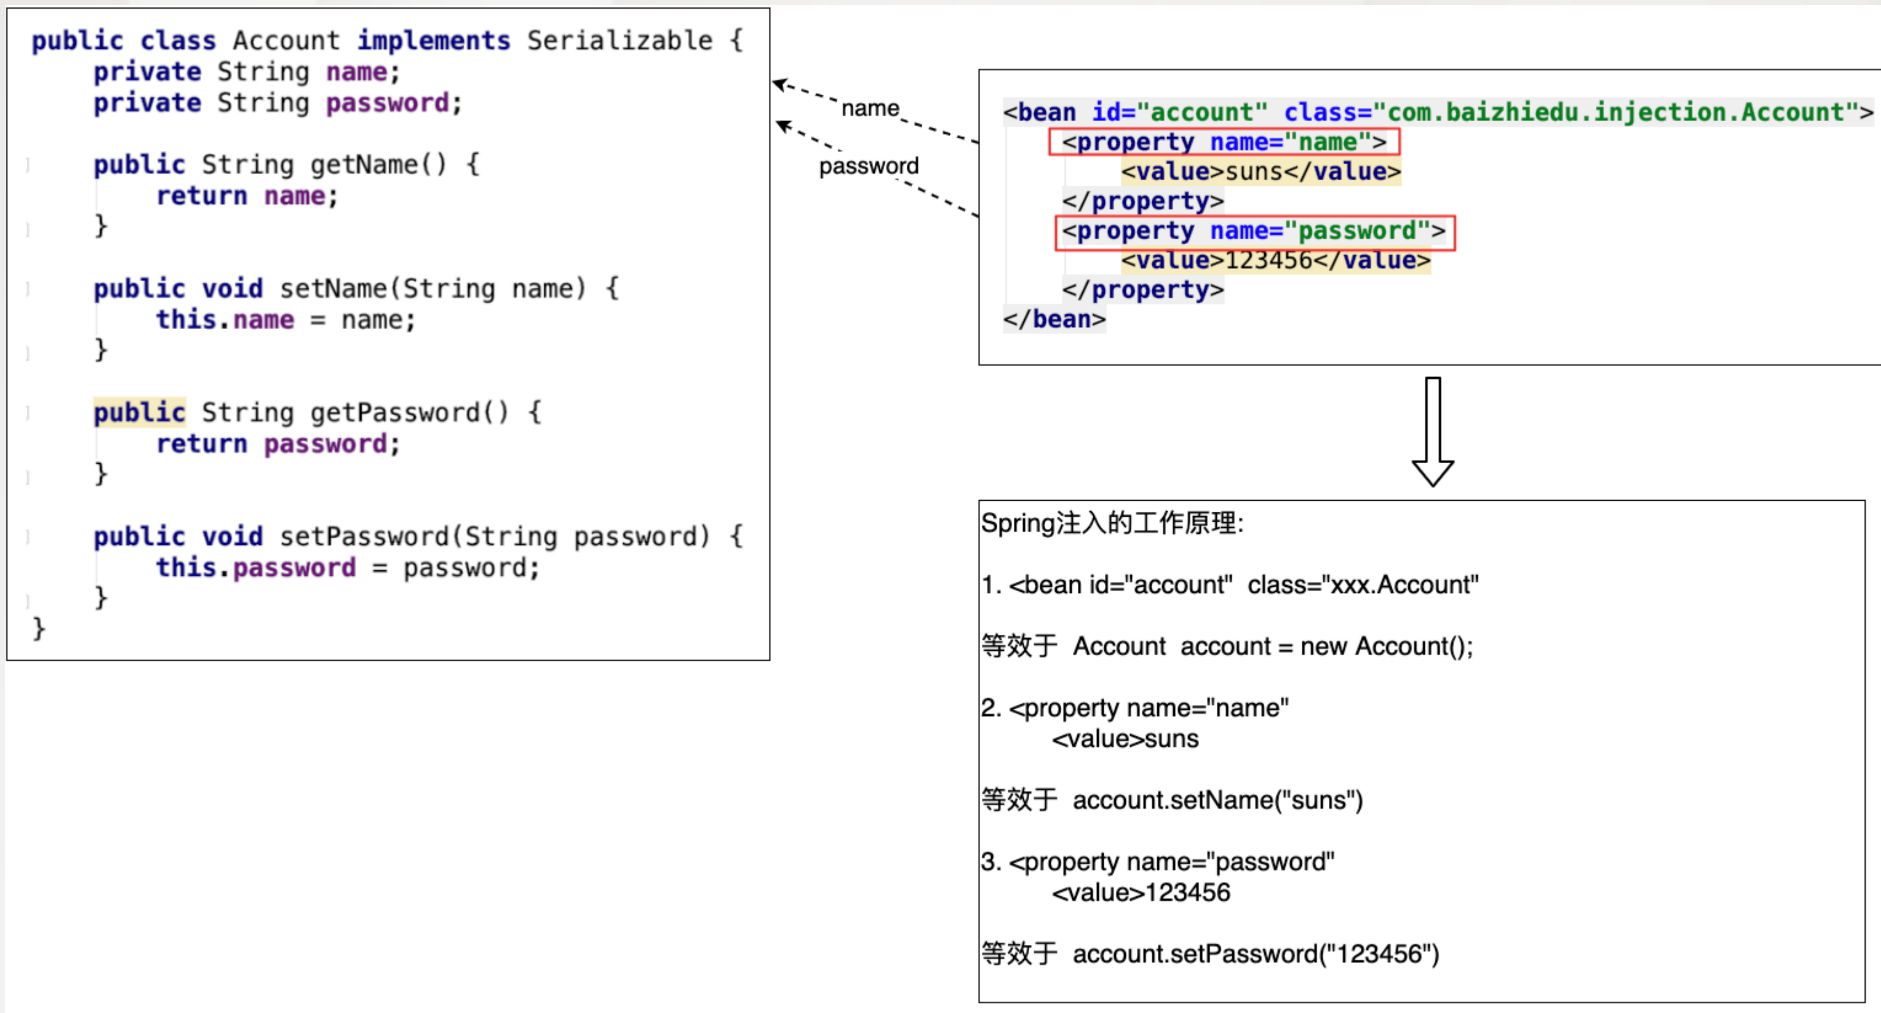
类的成员变量提供set get方法
配置spring的配置文件
 <bean id="person" class="com.baizhiedu.basic.Person">
   <property name="id">
     <value>10</value>
   </property>
   <property name="name">
     <value>xiaojr</value>
   </property>
</bean>通过注入,达到解耦合的目的
4.2 Spring注入的原理分析(简易版)
Spring通过底层调用对象属性对应的set方法,完成成员变量的赋值,这种方式我们也称之为set注入
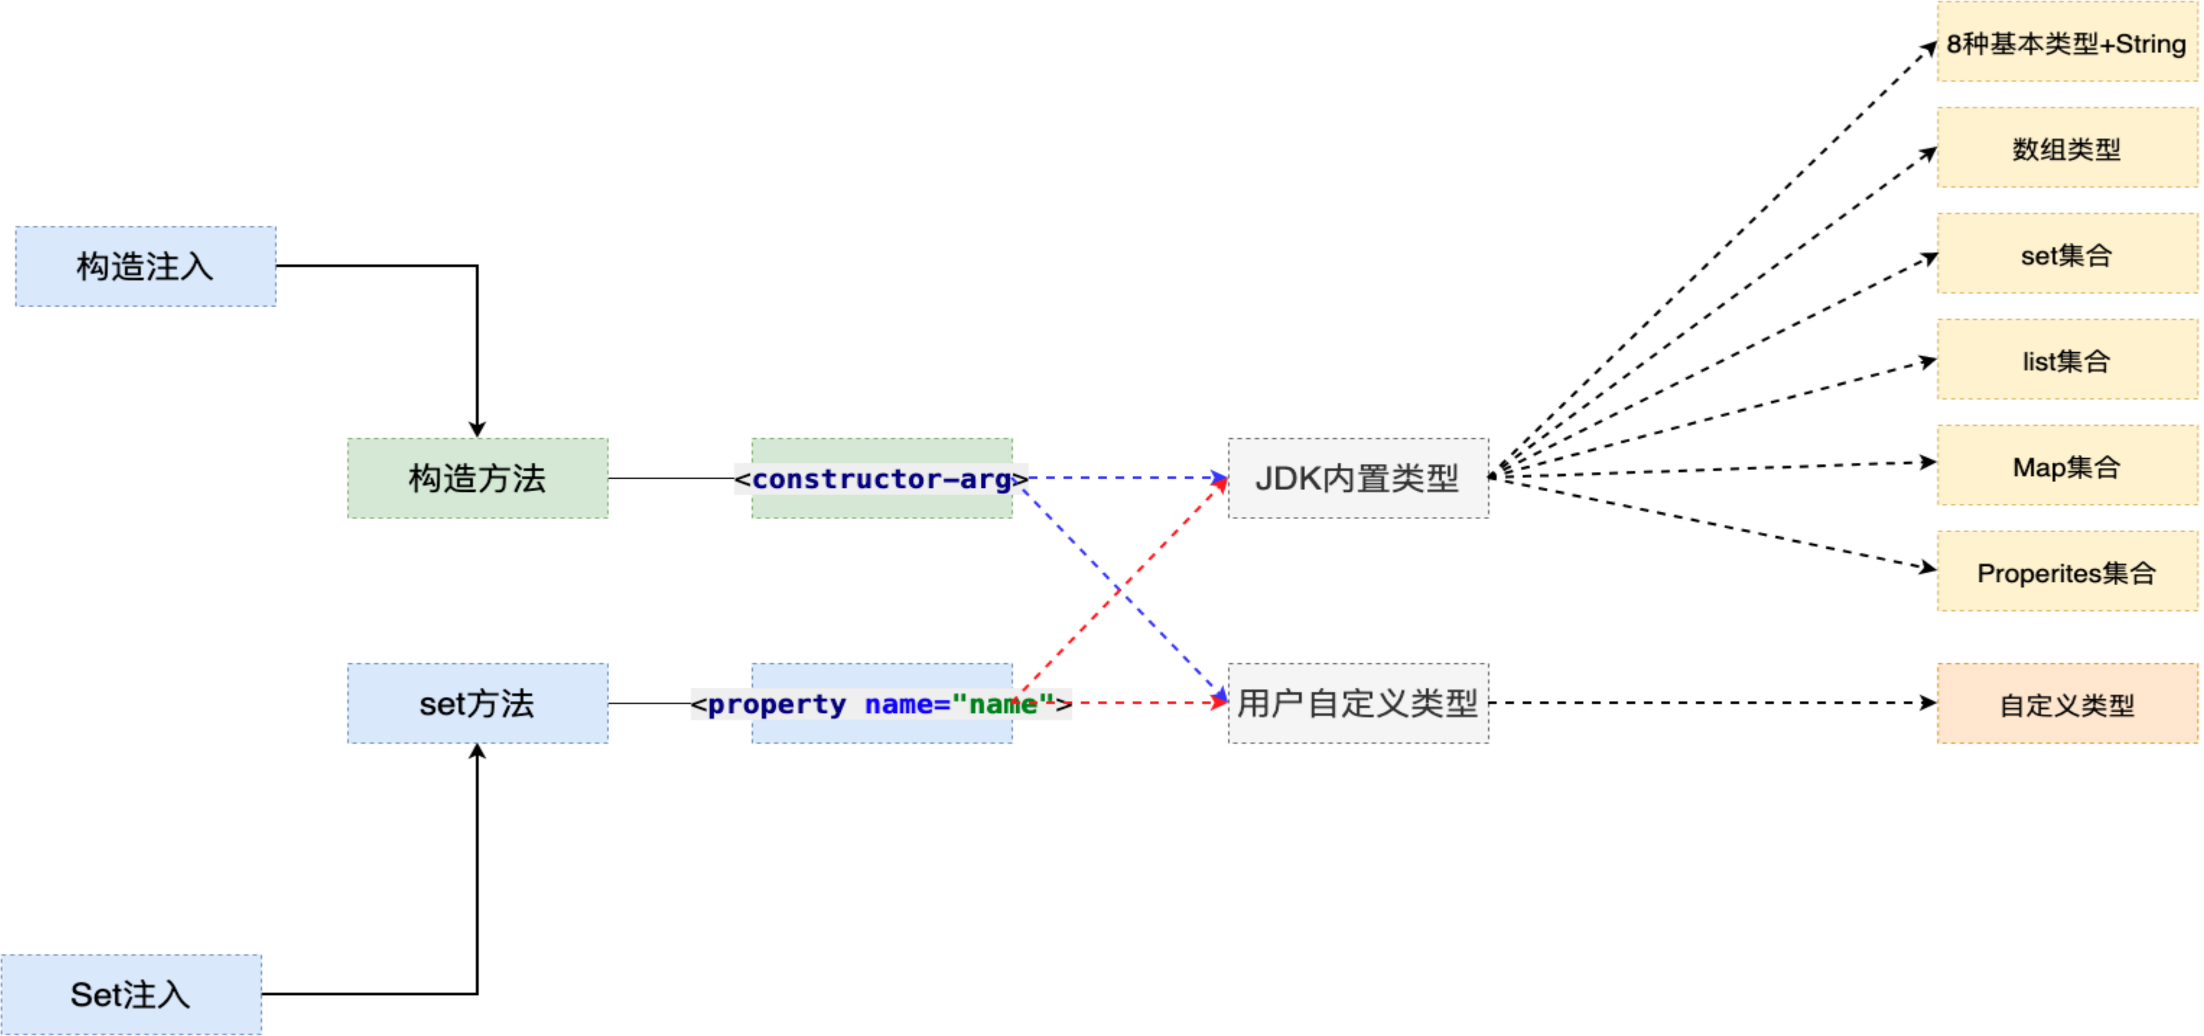
5. Set注入详解
针对于不同类型的成员变量,在<property>标签,需要嵌套其他标签
<property>
    xxxxx
</property>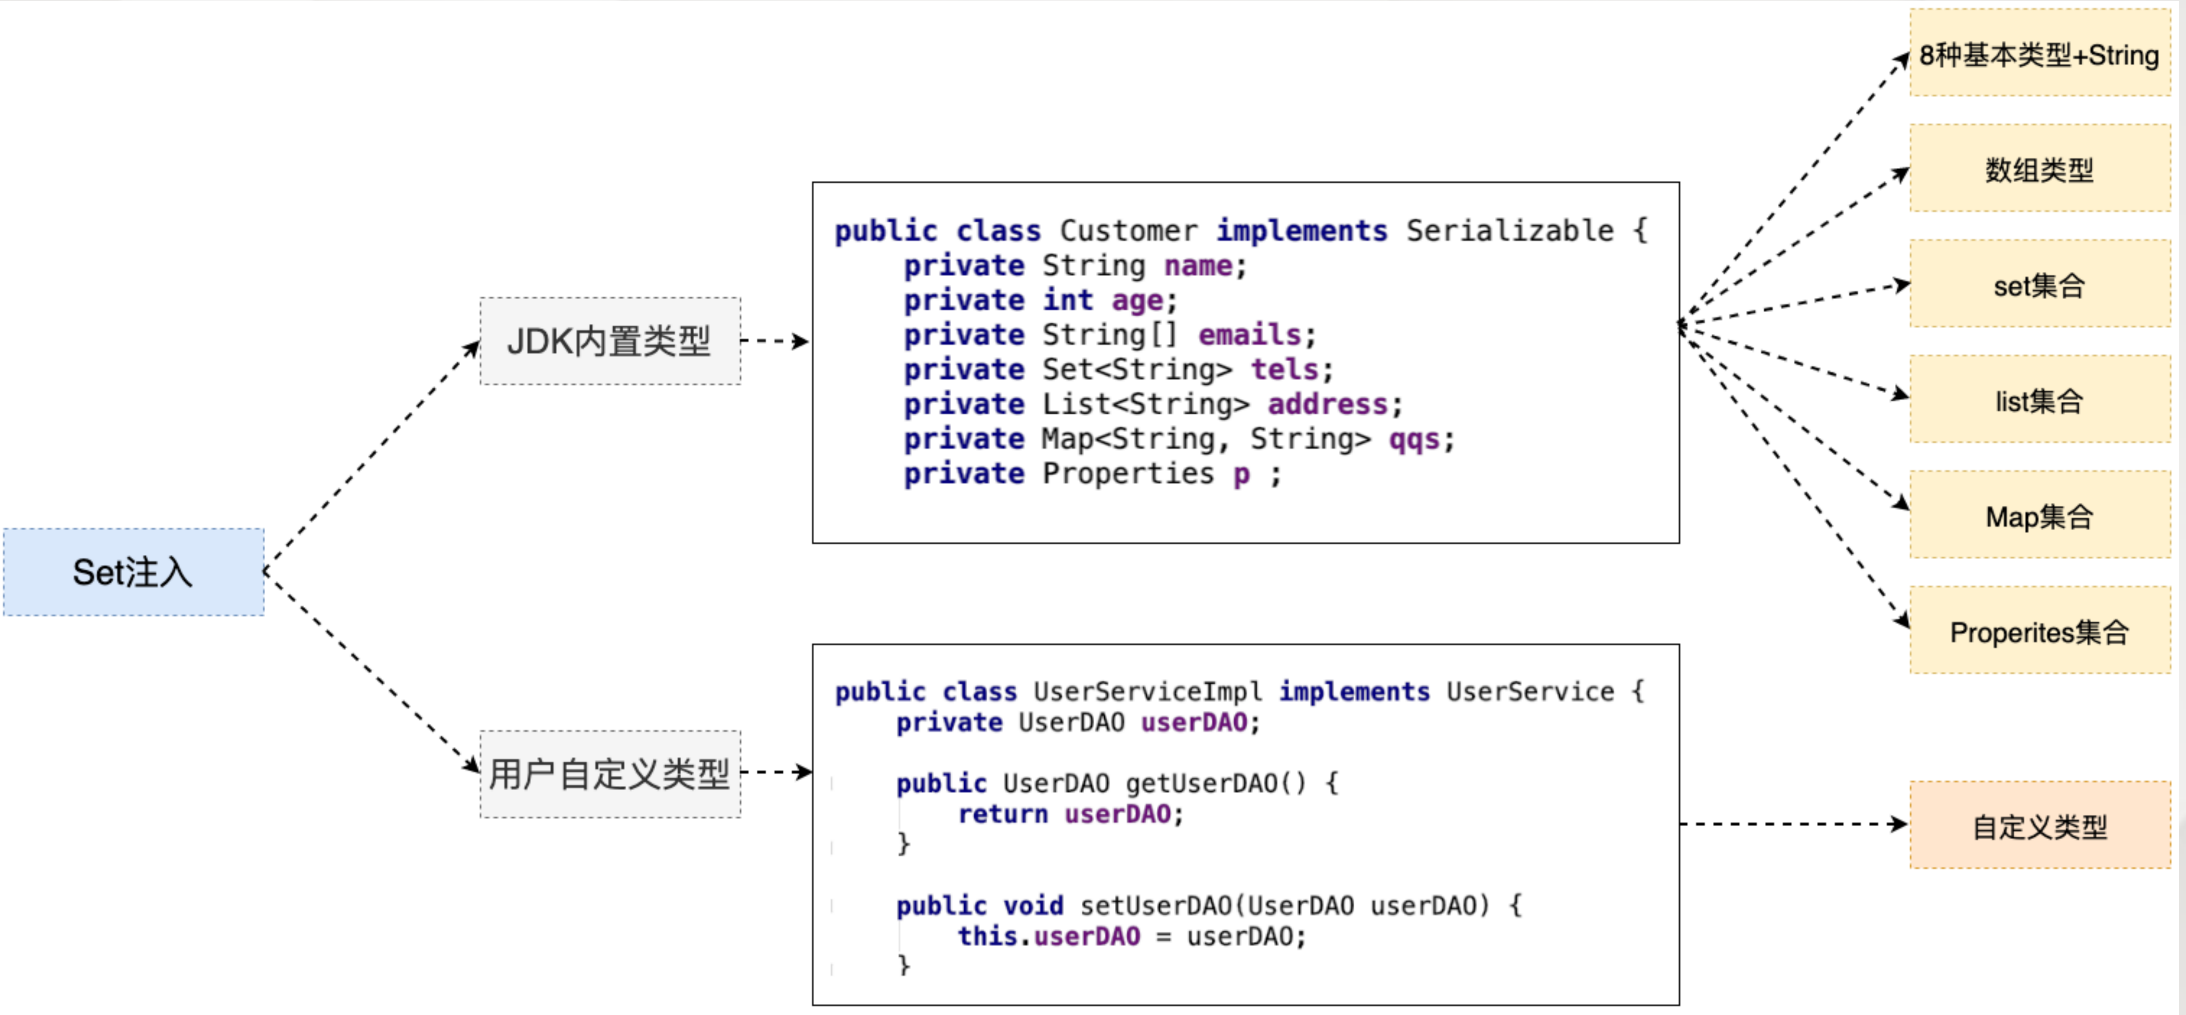
5.1 JDK内置类型
在<property>标签里添加
5.1.1 String+8种基本类型
<value>suns</value>5.1.2 数组
<list>
  <value>suns@zparkhr.com.cn</value>
  <value>liucy@zparkhr.com.cn</value>
  <value>chenyn@zparkhr.com.cn</value>
</list>
5.1.3 Set集合
<set>
   <value>11111</value>
   <value>112222</value>
</set>

# Set如果不加范性,可以存任何的标签
<set>
   <ref bean
   <set
</set>
5.1.4 List集合
<list>
   <value>11111</value>
   <value>2222</value>
</list>

# 同理于set
<list>
   <ref bean
   <set
</list>
5.1.5 Map集合
注意: map -- entry  -- key有特定的标签  <key></key>
                       值根据对应类型选择对应类型的标签
<map>
  <entry>
    <key><value>suns</value></key>
    <value>3434334343</value>
  </entry>
  <entry>
    <key><value>chenyn</value></key>
    <ref bean
  </entry>
</map>
5.1.6 Properites
Properties类型 特殊的Map key=String value=String
<props>
  <prop key="key1">value1</prop>
  <prop key="key2">value2</prop>
</props>
5.1.7 复杂的JDK类型 (Date)
需要程序员自定义类型转换器,处理
5.2 用户自定义类型
5.2.1 第一种方式
为成员变量提供set get方法
配置文件中进行注入(赋值)
<bean id="userService" class="xxxx.UserServiceImpl">
   <property name="userDAO">
       <bean class="xxx.UserDAOImpl"/>
  </property>
</bean>
5.2.2 第二种方式
第一种赋值方式存在的问题
- 配置文件代码冗余
- 被注入的对象
<bean class="xxx.UserDAOImpl"/>,多次创建,浪费内存资源
为成员变量提供set get方法
配置文件中进行配置
<bean id="userDAO" class="xxx.UserDAOImpl"/>

<bean id="userService" class="xxx.UserServiceImpl">
   <property name="userDAO">
        <ref bean="userDAO"/>
  </property>
</bean>

#Spring4.x 废除了 <ref local=""/> 基本等效 <ref bean=""/>
5.3 Set注入的简化写法
5.3.1 基于属性简化
JDK类型注入
<property name="name">
   <value>suns</value>
</property>
替换为
<property name="name" value="suns"/>
注意:value属性 只能简化 8种基本类型+String 注入标签

用户自定义类型
<property name="userDAO">
   <ref bean="userDAO"/>
</property>
替换为
<property name="userDAO" ref="userDAO"/>
5.3.2 基于p命名空间简化
JDK类型注入
<bean id="person" class="xxxx.Person">
  <property name="name">
     <value>suns</value>
  </property>
    <property name="id">
     <value>123</value>
  </property>
</bean>
替换为
<bean id="person" class="xxx.Person" p:name="suns" p:id="123"/>
注意:value属性 只能简化 8种基本类型+String 注入标签

用户自定义类型
<bean id="userService" class="xx.UserServiceImpl">
  <property name="userDAO">
    <ref bean="userDAO"/>
   </property>
</bean>
替换为
<bean id="userService" class="xxx.UserServiceImpl" p:userDAO-ref="userDAO"/>
6 构造注入
- 注入:通过Spring的配置文件,为成员变量赋值
- Set注入:Spring调用Set方法 通过配置文件 为成员变量赋值
- 构造注入:Spring调用构造方法 通过配置文件 为成员变量赋值
6.1 开发步骤
提供有参构造方法
public class Customer implements Serializable {
    private String name;
    private int age;

    public Customer(String name, int age) {
        this.name = name;
        this.age = age;
    }
}
Spring的配置文件
<bean id="customer" class="com.baizhiedu.basic.constructer.Customer">
 	有两个参数,需要两个构造标签
  <constructor-arg>
    <value>suns</value>
  </constructor-arg>

  <constructor-arg>
    <value>102</value>
  </constructor-arg>
</bean>
6.2 构造方法重载
6.2.1 参数个数不同时
通过控制<constructor-arg>标签的数量进行区分
6.2.2 构造参数个数相同时
通过在标签引入 type属性 进行类型的区分 <constructor-arg type="">
6.3 注入的总结
未来的实战中,应用set注入还是构造注入?
答案:set注入更多
1. 构造注入麻烦 (重载)
2. Spring框架底层 大量应用了 set注入
7. 反转控制与依赖注入
7.1 反转(转移)控制(IOC Inverse of Control)
- 控制:对于成员变量赋值的控制权
- 反转控制:把对于成员变量赋值的控制权,从代码中反转(转移)到Spring工厂和配置文件中完成
- 好处:解耦合
- 底层实现:工厂设计模式
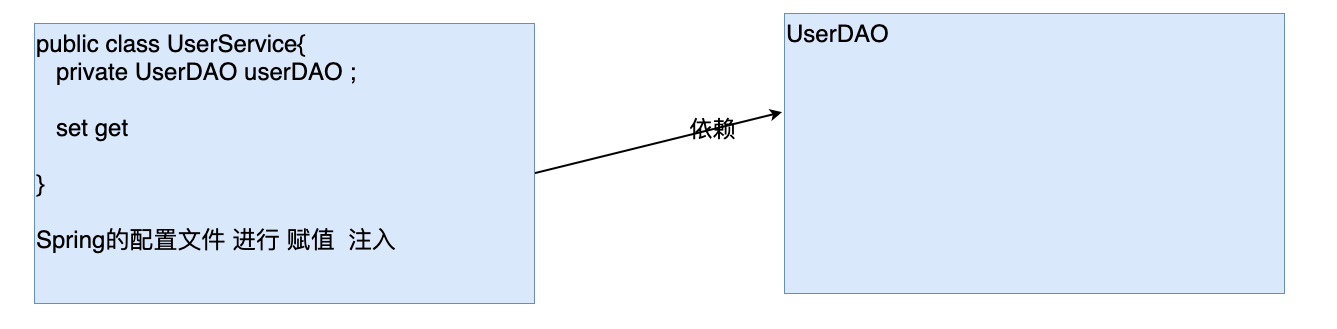
7.2 依赖注入 (Dependency Injection DI)
注入:通过Spring的工厂及配置文件,为对象(bean,组件)的成员变量赋值
依赖注入:当一个类需要另一个类时,就意味着依赖,一旦出现依赖,就可以把另一个类作为本类的成员变量,最终通过Spring配置文件进行注入(赋值)
- 好处:解耦合
8. Spring工厂创建复杂对象
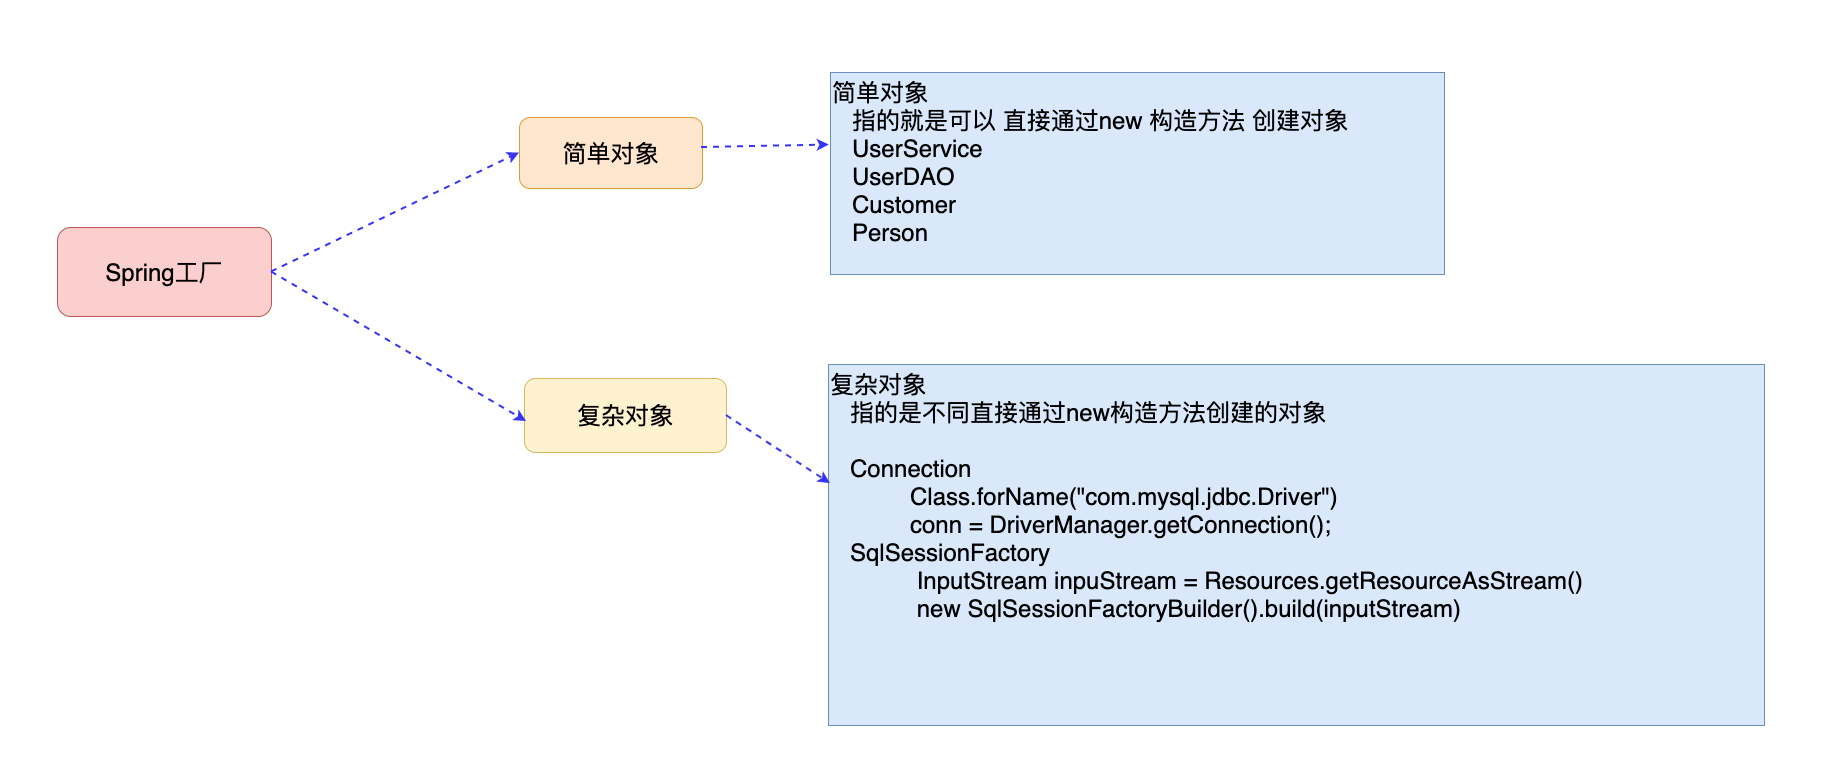
8.1 什么是复杂对象
复杂对象:指的就是不能直接通过new构造方法创建的对象
- Connection
- SqlSessionFactory
8.2 Spring工厂创建复杂对象的3种方式
8.2.1 FactoryBean接口
开发步骤
实现FactoryBean接口
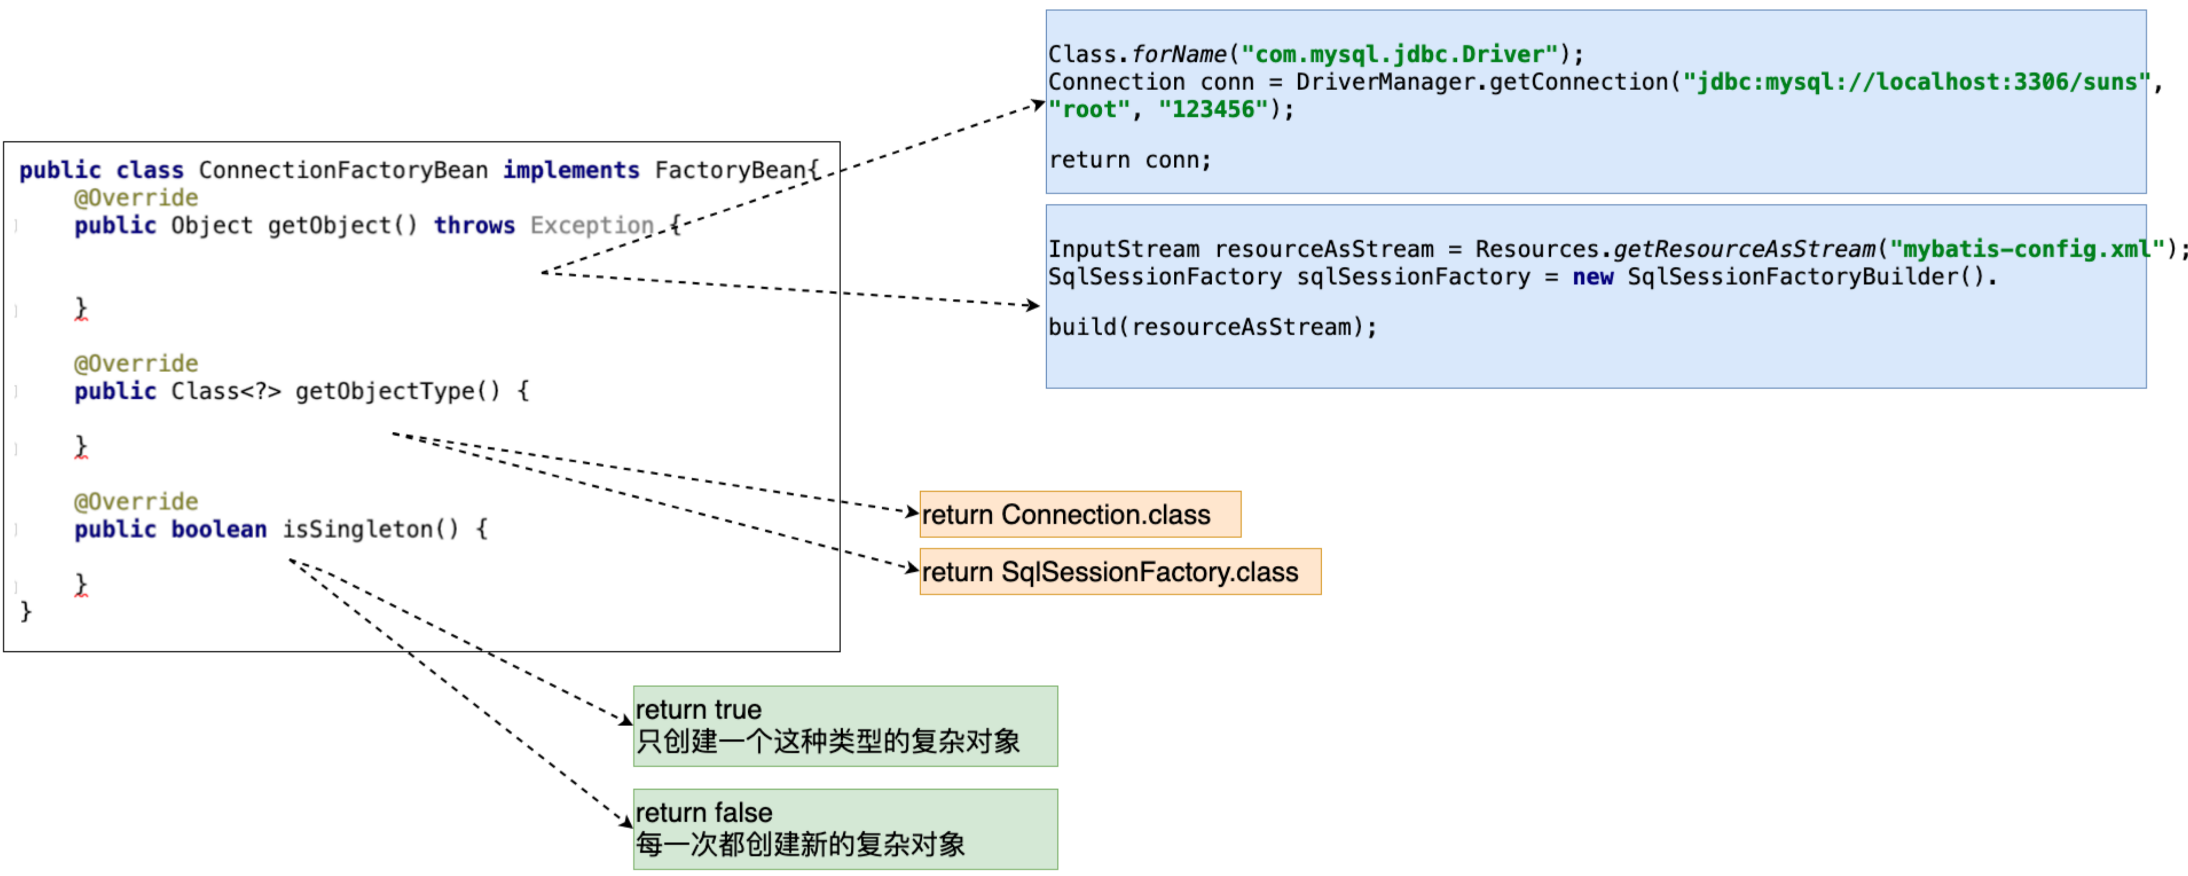
Spring配置文件的配置
如果Class中指定的类型是
FactoryBean接口的实现类,那么通过id值获得的是这个类所创建的复杂对象Connection<bean id="conn" class="com.baizhiedu.factorybean.ConnectionFactoryBean"/>细节
如果就想获得
FactoryBean类型的对象ctx.getBean("&conn")获得就是ConnectionFactoryBean对象isSingleton方法 返回 true 只会创建一个复杂对象- 返回 false 每一次都会创建新的对象 问题:根据这个对象的特点 ,决定是返回
true (SqlSessionFactory)还是false (Connection) - 如果是连接对象
Connection,需要返回false,因为会出现并发问题
- 返回 false 每一次都会创建新的对象 问题:根据这个对象的特点 ,决定是返回
mysql高版本连接创建时,需要制定SSL证书,解决问题的方式
url = "jdbc:mysql://localhost:3306/suns?useSSL=false"依赖注入的体会(DI)
把
ConnectionFactoryBean中依赖的4个字符串信息 ,进行配置文件的注入
好处:解耦合<bean id="conn" class="com.baizhiedu.factorybean.ConnectionFactoryBean"> <property name="driverClassName" value="com.mysql.jdbc.Driver"/> <property name="url" value="jdbc:mysql://localhost:3306/suns?useSSL=false"/> <property name="username" value="root"/> <property name="password" value="123456"/> </bean>
FactoryBean的实现原理[简易版]
接口回调
- 为什么Spring规定
FactoryBean接口 实现 并且getObject()? ctx.getBean("conn")获得是复杂对象Connection而没有获得ConnectionFactoryBean(&)
Spring内部运行流程
- 通过conn获得
ConnectionFactoryBean类的对象 ,进而通过instanceof判断出是FactoryBean接口的实现类 - Spring按照规定
getObject() ---> Connection - 返回
Connection
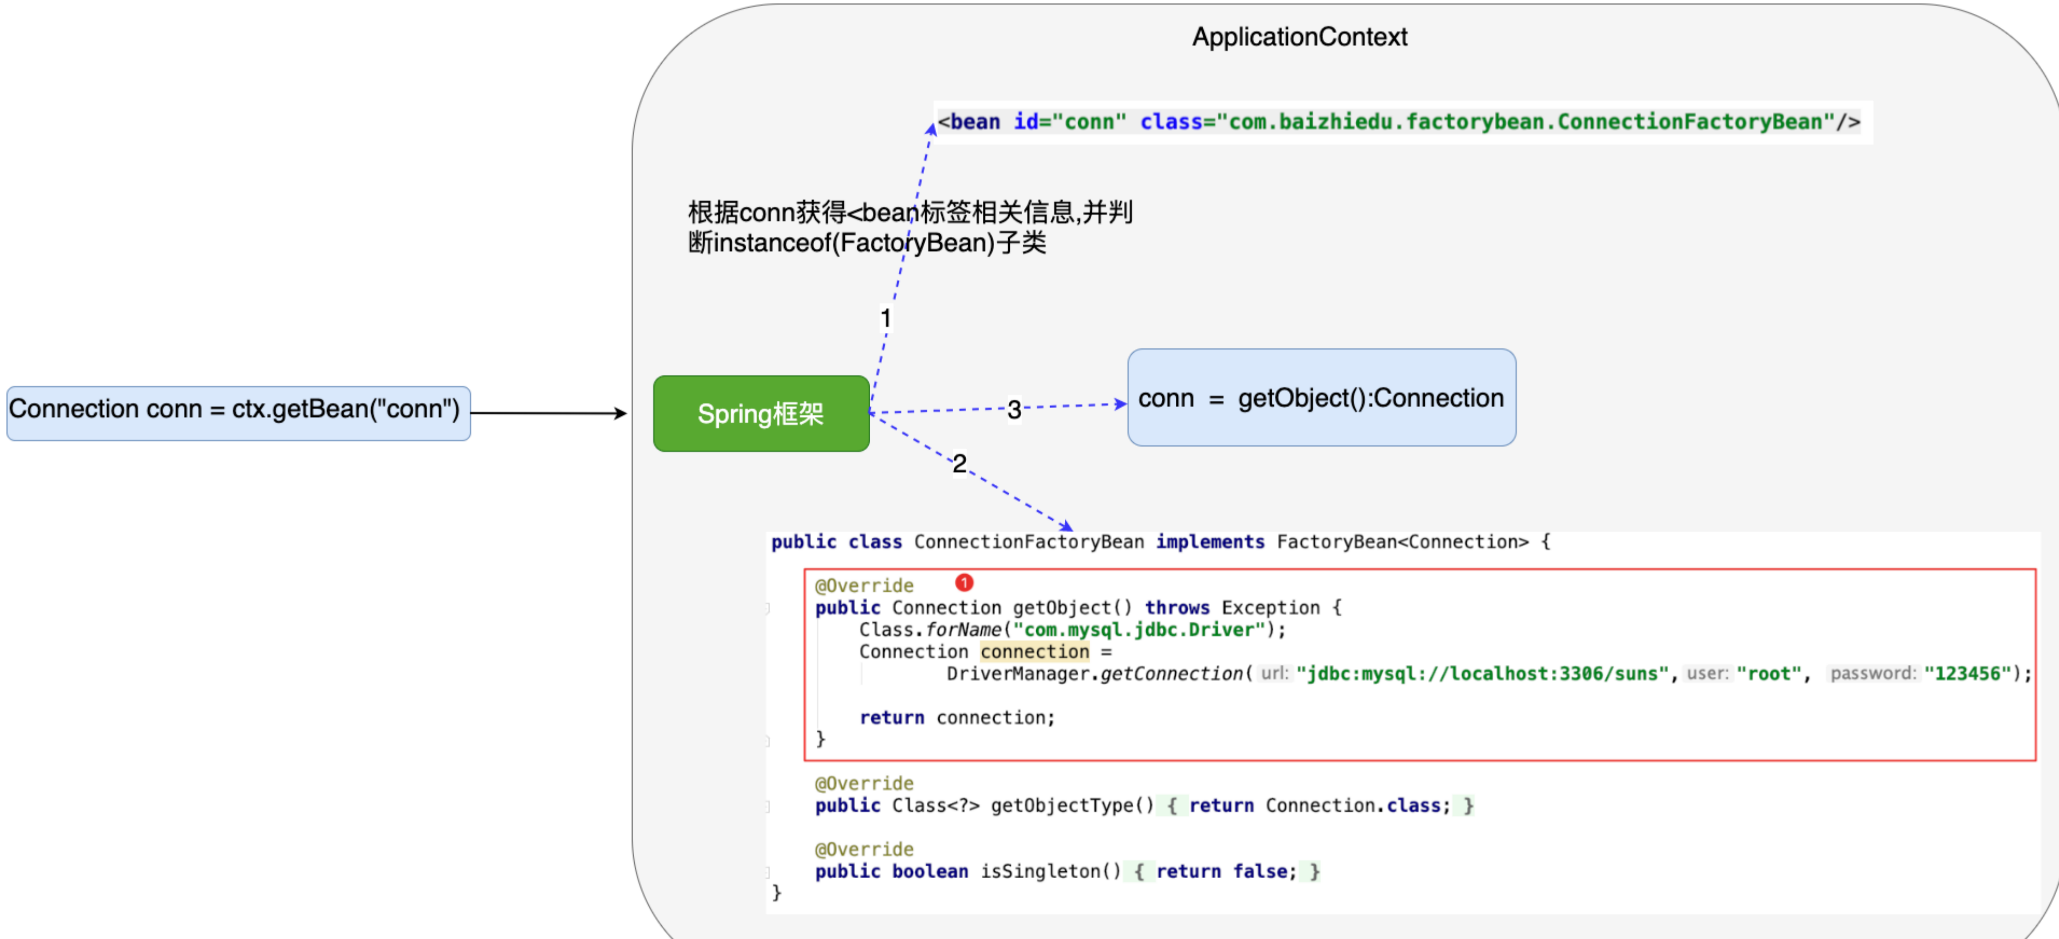
FactoryBean总结
Spring中用于创建复杂对象的一种方式,也是Spring原生提供的,后续讲解Spring整合其他框架,大量应用FactoryBean
8.2.2 实例工厂
- 避免Spring框架的侵入,如果以后用其他框架,会被Spring框架所束缚
- 整合遗留系统
开发步骤
遗留的ConnectionFactory类
public class ConnectionFactory {
    public Connection getConnection() {
        Connection conn = null;
        try {
            Class.forName("com.mysql.jdbc.Driver");
            conn = DriverManager.getConnection("jdbc:mysql://localhost:3306/spring?useSSL=false", "root", "1234");
        } catch (ClassNotFoundException | SQLException e) {
            e.printStackTrace();
        }
        return conn;
    }
}
直接用配置文件整合
<bean id="connFactory" class="com.baizhiedu.factorybean.ConnectionFactory"></bean>

<bean id="conn"  factory-bean="connFactory" factory-method="getConnection"/>
8.2.3 静态工厂
原先是
ConnectionFactory cf = new ConnectionFactory();
cf.getConnection();
静态工厂是
staticFactoryBean.getConnection();开发步骤
public class StaticFactoryBean {
	// 静态方法
    public static Connection getConnection() {
        Connection conn = null;
        try {
            Class.forName("com.mysql.jdbc.Driver");
            conn = DriverManager.getConnection("jdbc:mysql://localhost:3306/spring?useSSL=false", "root", "1234");
        } catch (ClassNotFoundException | SQLException e) {
            e.printStackTrace();
        }
        return conn;
    }
}
配置文件
<bean id="conn" class="com.baizhiedu.factorybean.StaticConnectionFactory" factory-method="getConnection"/>8.3 Spring工厂创建对象的总结
9. 控制Spring工厂创建对象的次数
9.1 如何控制简单对象的创建次数
<bean id="account" scope="singleton|prototype" class="xxxx.Account"/>

<sigleton:只会创建一次简单对象默认值>默认
<prototype:每一次都会创建新的对象>
9.2 如何控制复杂对象的创建次数
FactoryBean{
   isSingleton(){
      return true  只会创建一次
      return false 每一次都会创建新的
   }
}
如没有isSingleton方法 还是通过scope属性 进行对象创建次数的控制
9.3 为什么要控制对象的创建次数?
好处:节省不别要的内存浪费
什么样的对象只创建一次?
- SqlSessionFactory
- DAO
- Service
什么样的对象 每一次都要创建新的?
- Connection
- SqlSession | Session
- Struts2 Action
第二章、Spring工厂高级特性
1、对象的生命周期
1.1 什么是对象的生命周期
指的是一个对象创建、存活、消亡的一个完整过程
1.2 为什么要学习对象的生命周期
由Spring负责对象的创建、存活、销毁,了解生命周期,有利于我们使用好Spring为我们创建的对象
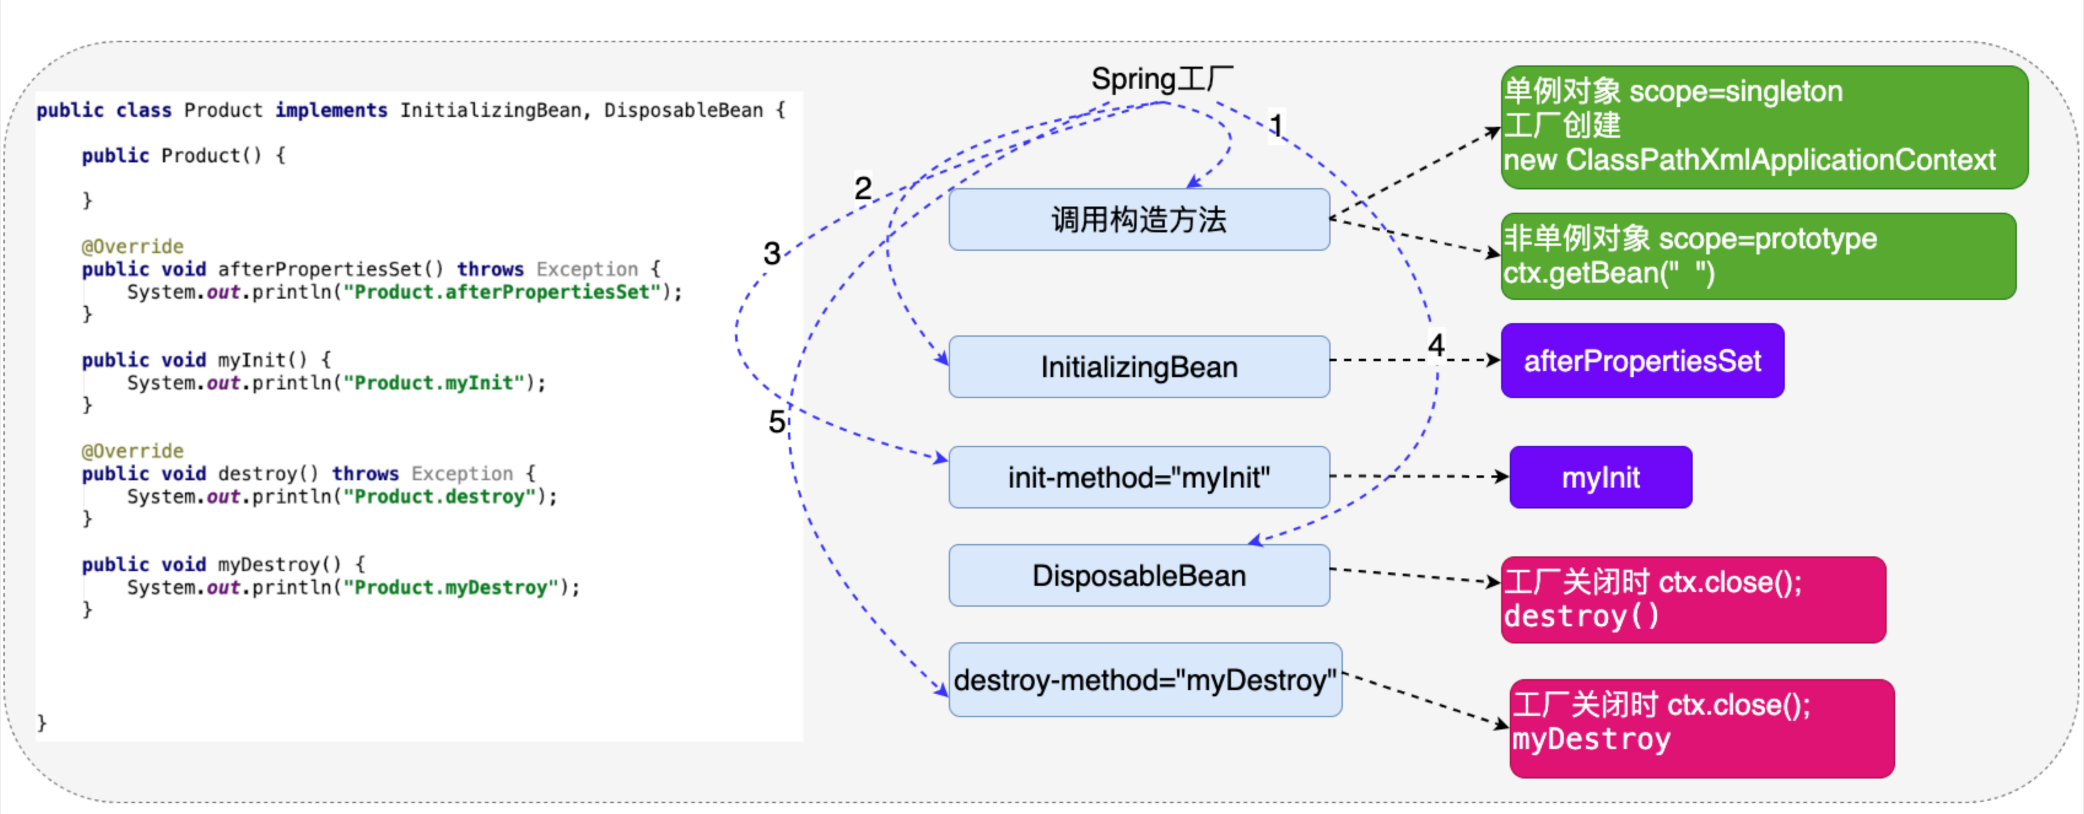
1.3 生命周期的3个阶段
创建阶段
Spring工厂何时创建对象
scope=”singleton”
- Spring工厂创建的同时,对象的创建
注意:设置scope=singleton 这种情况下 也需要在获取对象的同时,创建对象,加上标签
<bean lazy-init="true"/>
scope=”prototype”
- Spring工厂会在获取对象的同时,创建对象
ctx.getBean("")
初始化阶段
Spring工厂在创建完对象后,调用对象的初始化方法,完成对应的初始化操作
- 初始化方法提供:程序员根据需求,提供初始化方法,最终完成初始化操作
- 初始化方法调用:Spring工厂进行调用
InitializingBean接口
//程序员根据需求,实现的方法,完成初始化操作
implements InitializingBean

@Override
public void afterProperitesSet(){

}
对象中提供一个普通的方法
public void myInit(){

}

<bean id="product" class="xxx.Product" init-method="myInit"/>
细节分析
如果一个对象即实现InitializingBean 同时又提供的 普通的初始化方法 顺序
- InitializingBean
- 普通初始化方法
注入一定发生在初始化操作的前面
什么叫做初始化操作
资源的初始化:数据库 IO 网络 …..
销毁阶段
Spring销毁对象前,会调用对象的销毁方法,完成销毁操作
- Spring什么时候销毁所创建的对象?
ctx.close(); - 销毁方法:程序员根据自己的需求,定义销毁方法,完成销毁操作
调用:Spring工厂完成调用
DisposableBean
public void destroy()throws Exception{

}
定义一个普通的销毁方法
public void myDestroy()throws Exception{

}
<bean id="" class="" init-method="" destroy-method="myDestroy"/>
细节分析
销毁方法的操作只适用于
scope="singleton"什么叫做销毁操作
主要指的就是 资源的释放操作 io.close() connection.close();
2. 配置文件参数化
把Spring配置文件中需要经常修改的字符串信息,转移到一个更小的配置文件中
- Spring的配置文件中存在需要经常修改的字符串?
存在 以数据库连接相关的参数 代表 - 经常变化字符串,在Spring的配置文件中,直接修改
不利于项目维护(修改) - 转移到一个小的配置文件(.properties)
利于维护(修改)
配置文件参数化:利于Spring配置文件的维护(修改)
配置文件参数的开发步骤
提供一个小的配置文件(.properities)
名字:随便
放置位置:随便

jdbc.driverClassName = com.mysql.jdbc.Driver
jdbc.url = jdbc:mysql://localhost:3306/suns?useSSL=false
jdbc.username = root
jdbc.password = 123456
Spring的配置文件与小配置文件进行整合
applicationContext.xml
<context:property-placeholder location="classpath:/db.properties"/>在Spring配置文件中通过${key}获取小配置文件中对应的值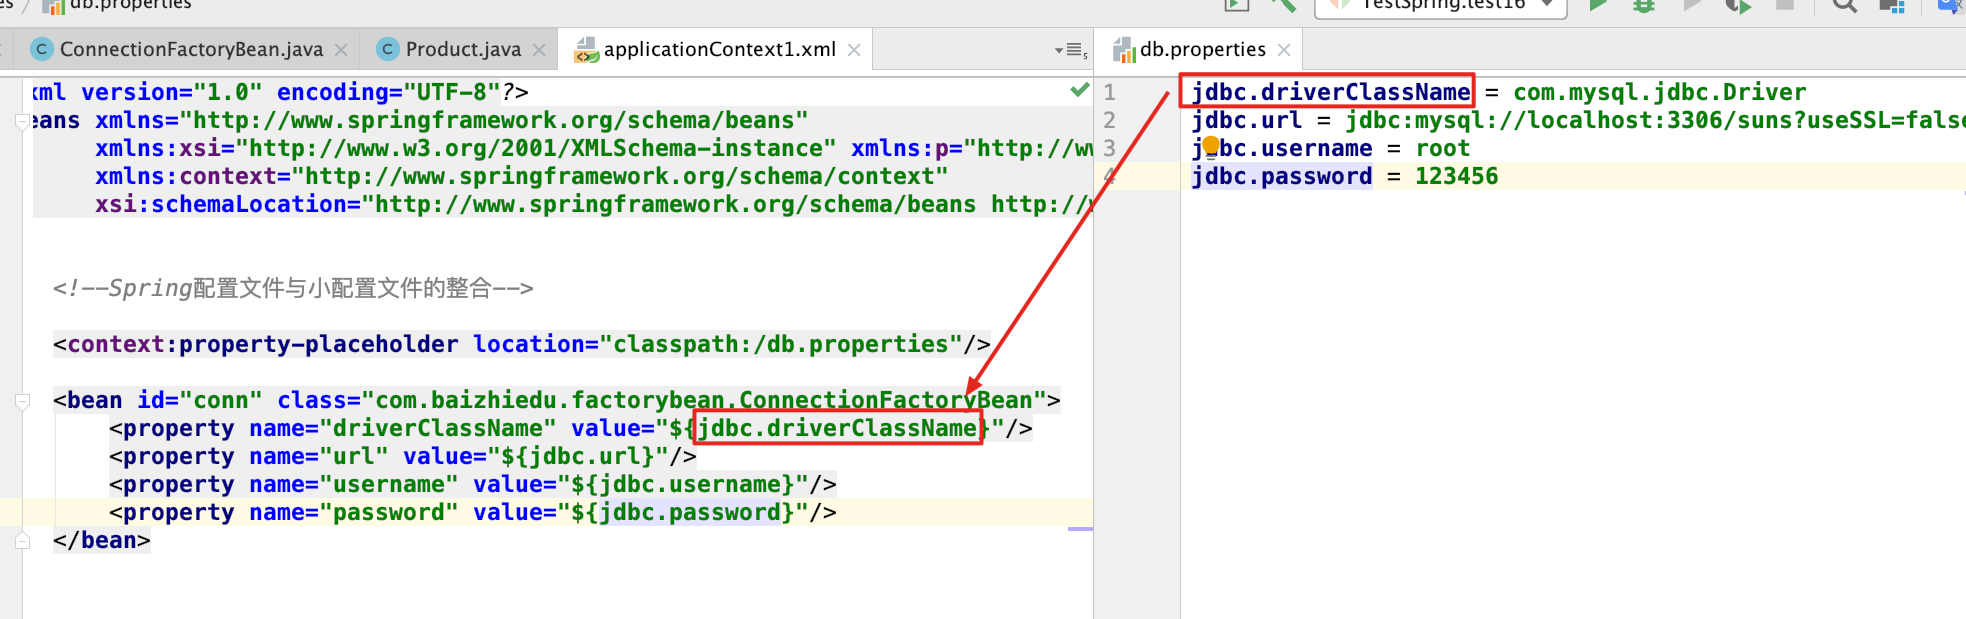
3. 自定义类型转换器
3.1 类型转换器
作用:Spring通过类型转换器把配置文件中字符串类型的数据,转换成了对象中成员变量对应类型的数据,进而完成了注入
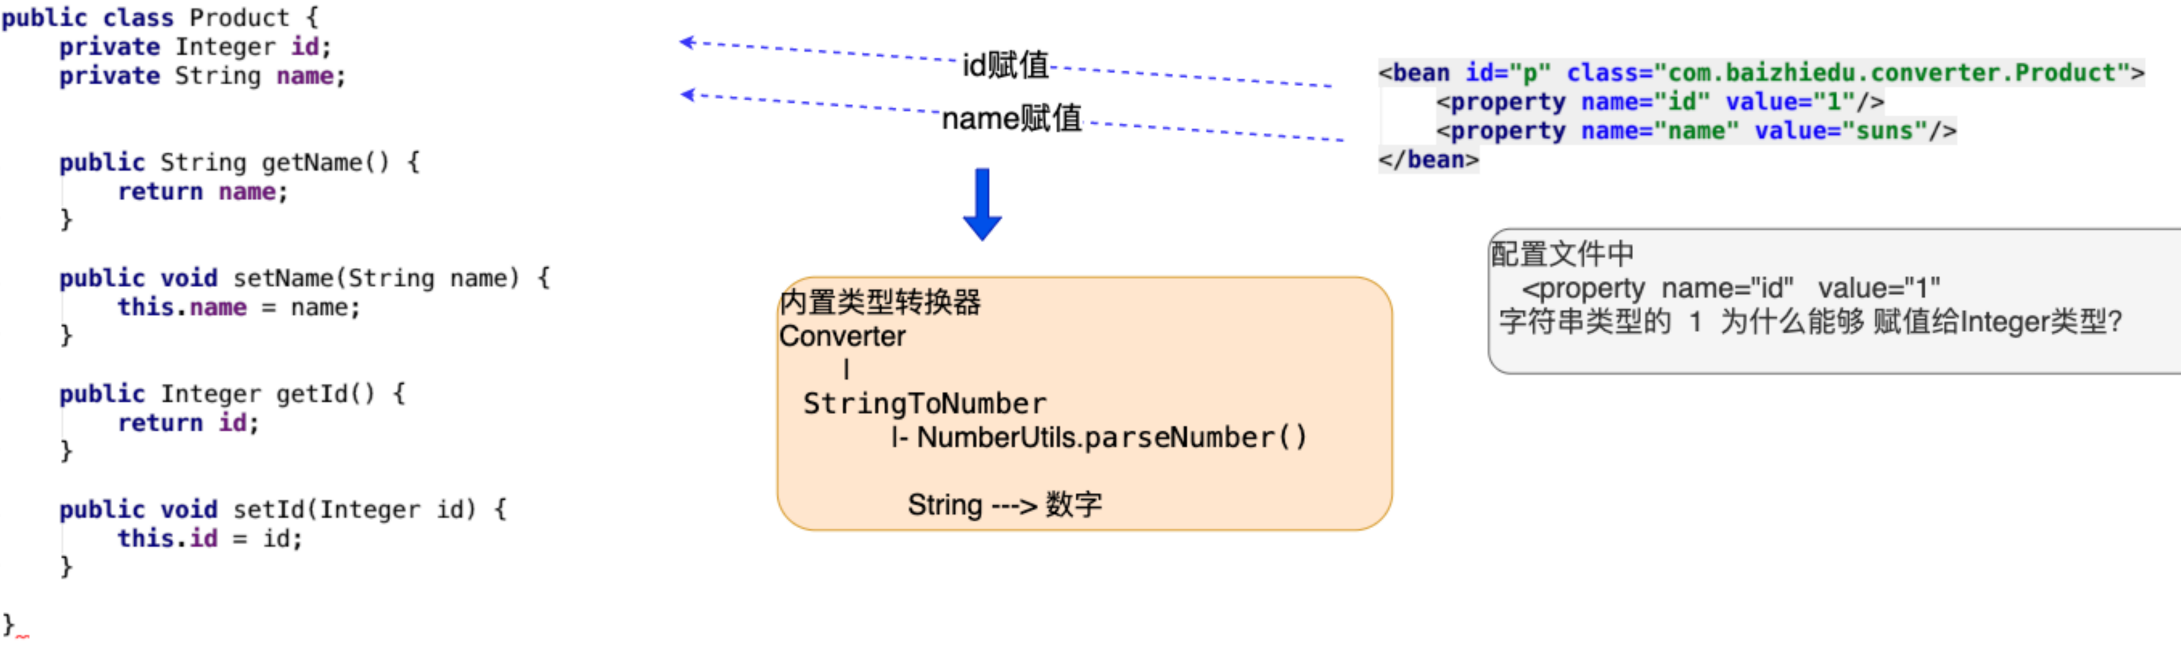
3.2 自定义类型转换器
原因:当Spring内部没有提供特定类型转换器时,而程序员在应用的过程中还需要使用,那么就需要程序员自己定义类型转换器
类 implements Converter接口
public class MyDateConverter implements Converter<String, Date> {
   /*
       convert方法作用:String --->  Date
                      SimpleDateFormat sdf = new SimpleDateFormat();
                      sdf.parset(String) ---> Date
       param:source 代表的是配置文件中 日期字符串 <value>2020-10-11</value>

       return : 当把转换好的Date作为convert方法的返回值后,Spring自动的为birthday属性进行注入(赋值)

     */

  @Override
  public Date convert(String source) {

    Date date = null;
    try {
      SimpleDateFormat sdf = new SimpleDateFormat("yyyy-MM-dd");
      date = sdf.parse(source);
    } catch (ParseException e) {
      e.printStackTrace();
    }
    return date;
  }
}
在Spring的配置文件中进行配置
- MyDateConverter对象创建出来
<bean id="myDateConverter" class="xxxx.MyDateConverter"/>类型转换器的注册
目的:告知Spring框架,我们所创建的MyDateConverter是一个类型转换器
<!--用于注册类型转换器-->
<bean id="conversionService" class="org.springframework.context.support.ConversionServiceFactoryBean">
  <property name="converters">
    <set>
      <ref bean="myDateConverter"/>
    </set>
  </property>
</bean>
3.3 细节
MyDateConverter中的日期的格式,通过依赖注入的方式,由配置文件完成赋值
public class MyDateConverter implements Converter<String, Date> {
    private String pattern;

    public String getPattern() {
        return pattern;
    }

    public void setPattern(String pattern) {
        this.pattern = pattern;
    }

    /*
       convert方法作用:String --->  Date
                      SimpleDateFormat sdf = new SimpleDateFormat();
                      sdf.parset(String) ---> Date
       param:source 代表的是配置文件中 日期字符串 <value>2020-10-11</value>

       return : 当把转换好的Date作为convert方法的返回值后,Spring自动的为birthday属性进行注入(赋值)

     */

    @Override
    public Date convert(String source) {

        Date date = null;
        try {
            SimpleDateFormat sdf = new SimpleDateFormat(pattern);
            date = sdf.parse(source);
        } catch (ParseException e) {
            e.printStackTrace();
        }
        return date;
    }
}
<!--Spring创建MyDateConverter类型对象-->
<bean id="myDateConverter" class="com.baizhiedu.converter.MyDateConverter">
<property name="pattern" value="yyyy-MM-dd"/>
</bean>ConversionSeviceFactoryBean 定义 id属性 值必须 conversionService
Spring框架内置日期类型的转换器
日期格式:2020/05/01 (不支持 :2020-05-01)4. 后置处理Bean
BeanPostProcessor作用:对Spring工厂所创建的对象,进行再加工
AOP底层实现:
注意:BeanPostProcessor接口
          xxxx(){

          }
后置处理Bean的运行原理分析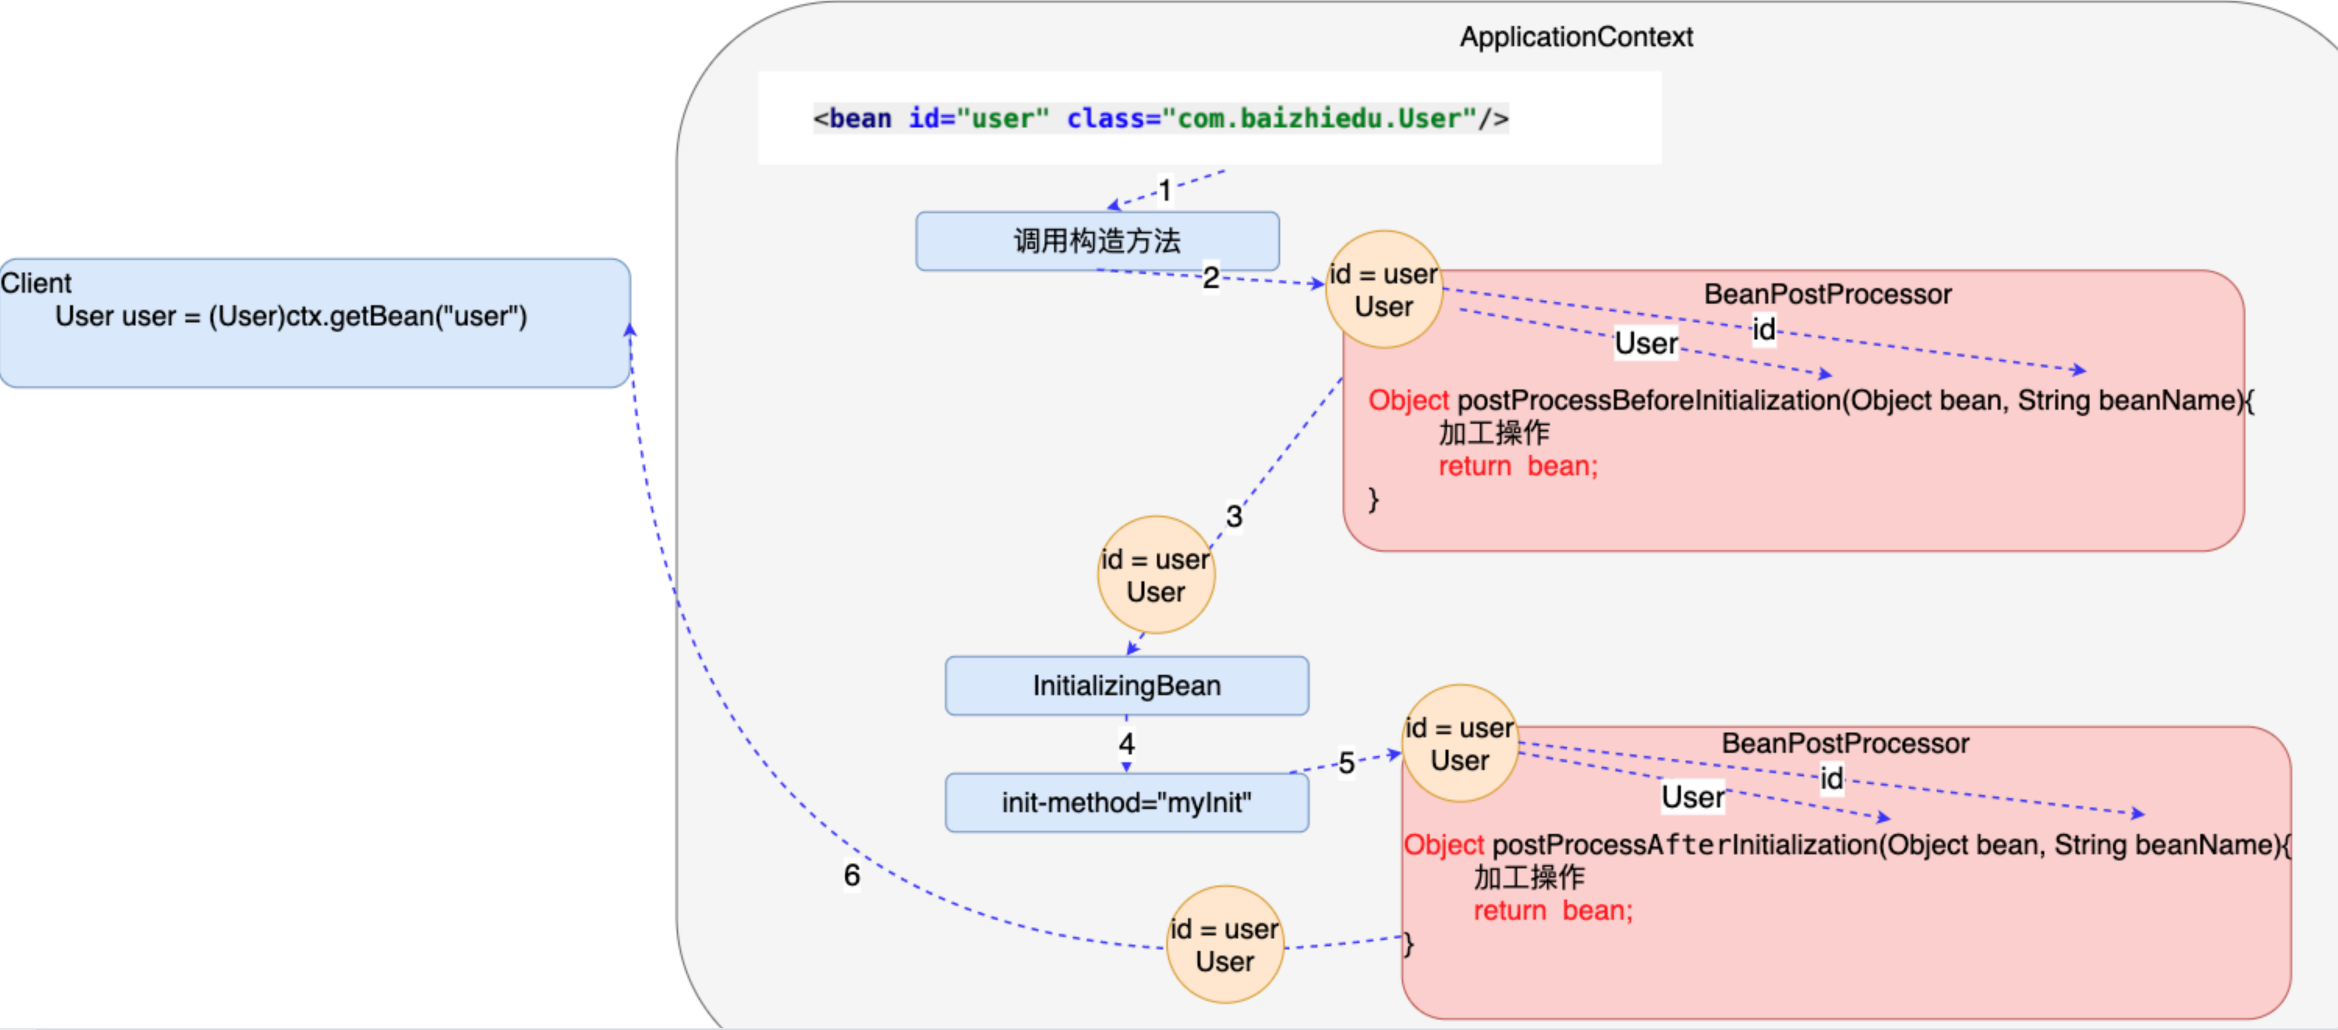
程序员实现BeanPostProcessor规定接口中的方法:
Object postProcessBeforeInitiallization(Object bean String beanName)
作用:Spring创建完对象,并进行注入后,可以运行Before方法进行加工
获得Spring创建好的对象 :通过方法的参数
最终通过返回值交给Spring框架Object postProcessAfterInitiallization(Object bean String beanName)
作用:Spring执行完对象的初始化操作后,可以运行After方法进行加工
获得Spring创建好的对象 :通过方法的参数
最终通过返回值交给Spring框架
实战中:
- 很少处理Spring的初始化操作:没有必要区分Before After。只需要实现其中的一个After方法即可
注意:`postProcessBeforeInitiallization` `return bean`对象
BeanPostProcessor的开发步骤
- 类 实现 BeanPostProcessor接口
public class MyBeanPostProcessor implements BeanPostProcessor {

    @Override
    public Object postProcessBeforeInitialization(Object bean, String beanName) throws BeansException {
        return bean;
    }

    @Override
    public Object postProcessAfterInitialization(Object bean, String beanName) throws BeansException {

        Categroy categroy = (Categroy) bean;
        categroy.setName("xiaowb");


        return categroy;
    }
}- Spring的配置文件中进行配置
<bean id="myBeanPostProcessor" class="xxx.MyBeanPostProcessor"/>- BeanPostProcessor细节
BeanPostProcessor会对Spring工厂中所有创建的对象进行加工,如果工厂创建了多个不同的对象,要注意区别传入的对象:
@Override
public Object postProcessAfterInitialization(Object bean, String beanName) throws BeansException {
    if (bean instanceof  Category) {
        Category category = (Category) bean;
        category.setName("xwb");
        return category;
    }
    return bean;
}
第三章、Spring AOP
1. 静态代理设计模式
1.1 为什么需要代理设计模式
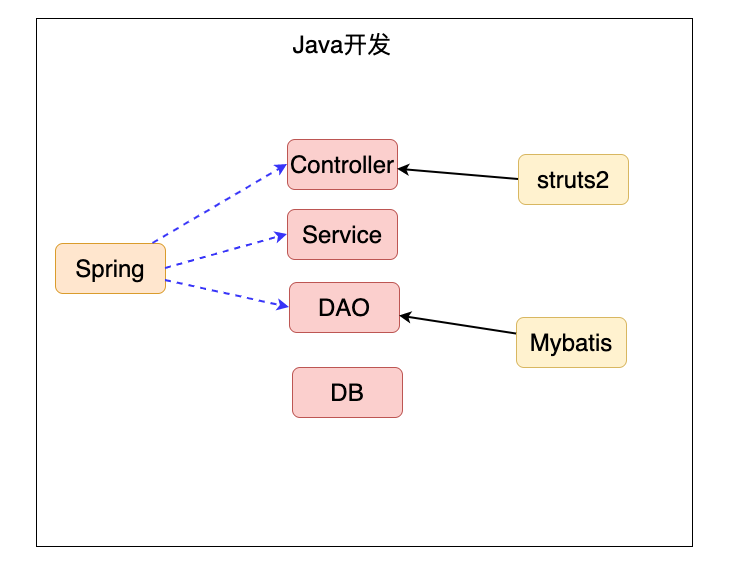
在JavaEE分层开发开发中,那个层次对于我们来讲最重要?
DAO ---> Service --> Controller

JavaEE分层开发中,最为重要的是Service层
Service 层中包含了哪些代码?
- 核心功能(代码量较多):业务运算,DAO 调用
- 额外功能(附加功能,不属于业务,可有可无,代码量小):事务、日志、性能 …
额外功能书写在 Service 层好不好?
- Service 层的调用者的角度(Controller):需要在 Service 层书写额外功能
- 软件设计者:Service 层不需要额外功能
拿现实生活中的例子来做对比,解决方案是 引入一个代理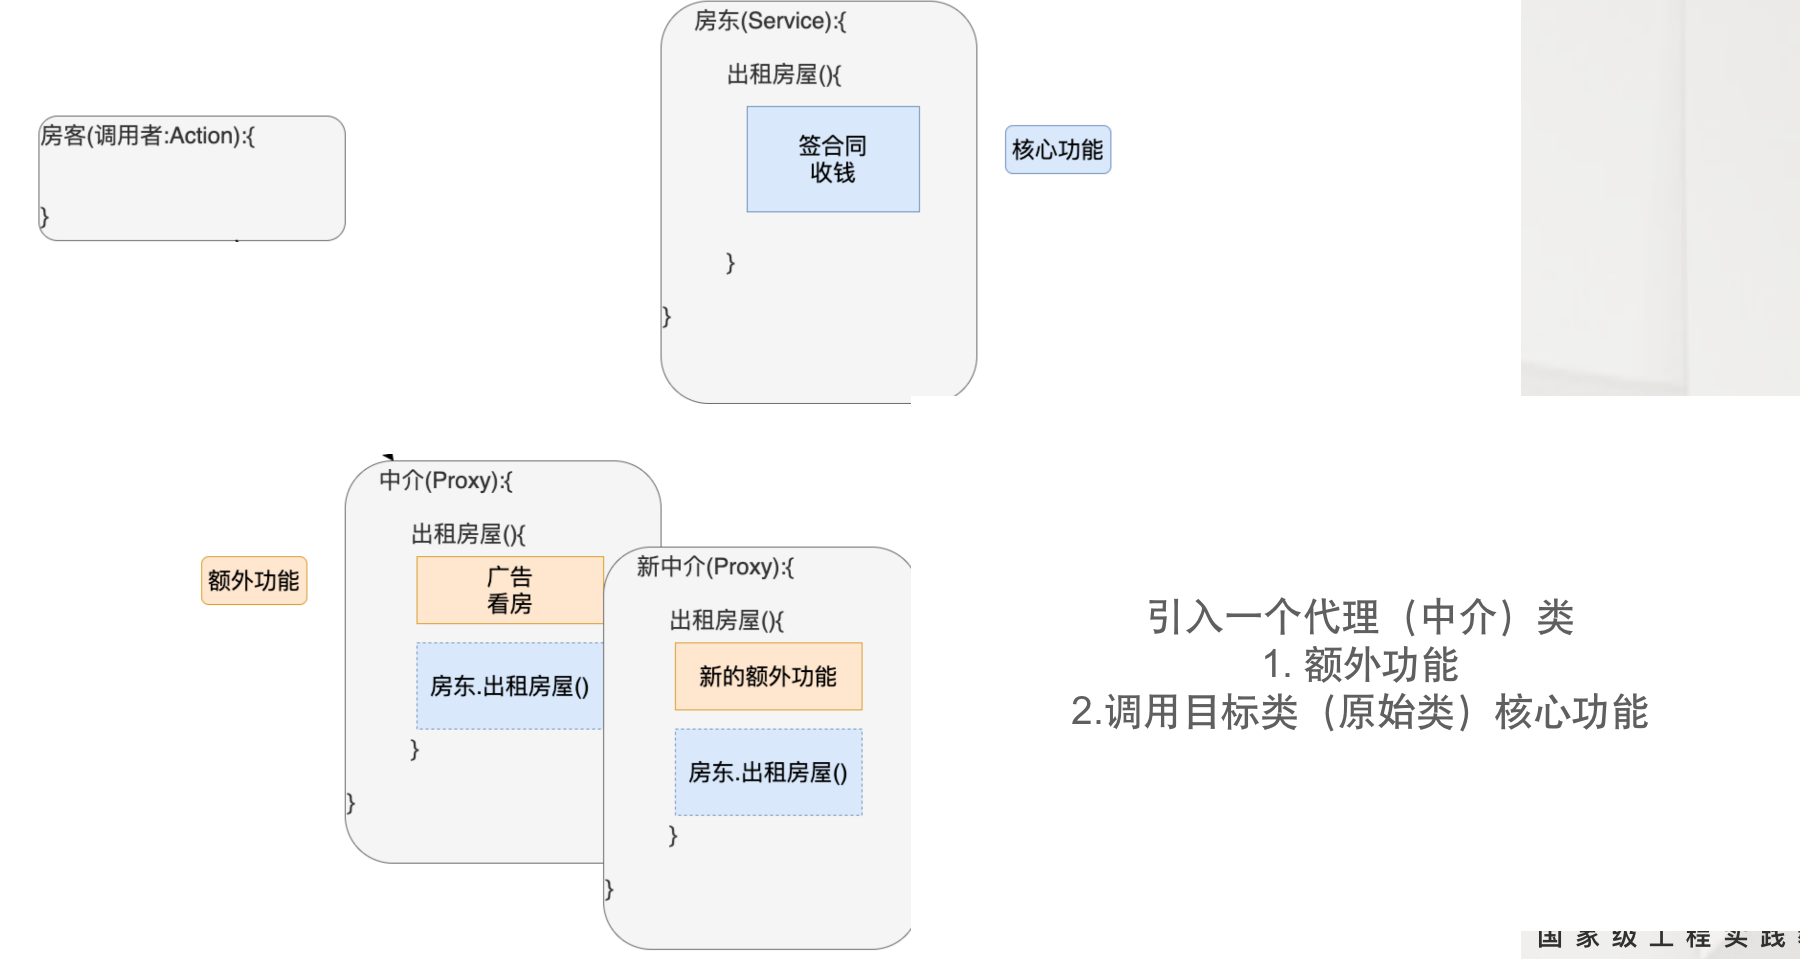
1.2 代理设计模式
1.2.1 概念
通过代理类,为原始类(目标)增加额外的功能
好处:利于原始类(目标)的维护
1.2.2 名词解释
目标类 / 原始类:指的是 业务类 (核心功能 –> 业务运算、DAO调用)
目标方法 / 原始方法:目标类(原始类)中的方法就是目标方法(原始方法)
额外功能 / 附加功能:日志、事务、性能 …
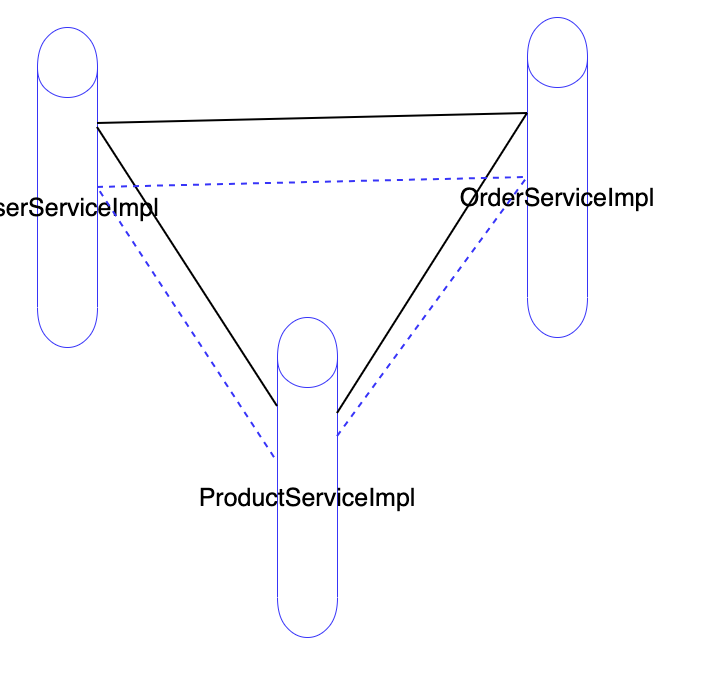
1.2.3 代理开发的核心要素
代理类 = 目标类(原始类) + 额外功能 + 原始类(目标类)实现相同的接口
房东 ---> public interface UserService{
m1
m2
}
UserServiceImpl implements UserService{
m1 ---> 业务运算 DAO调用
m2
}
中介 --- 代理类:要实现目标类相同的接口
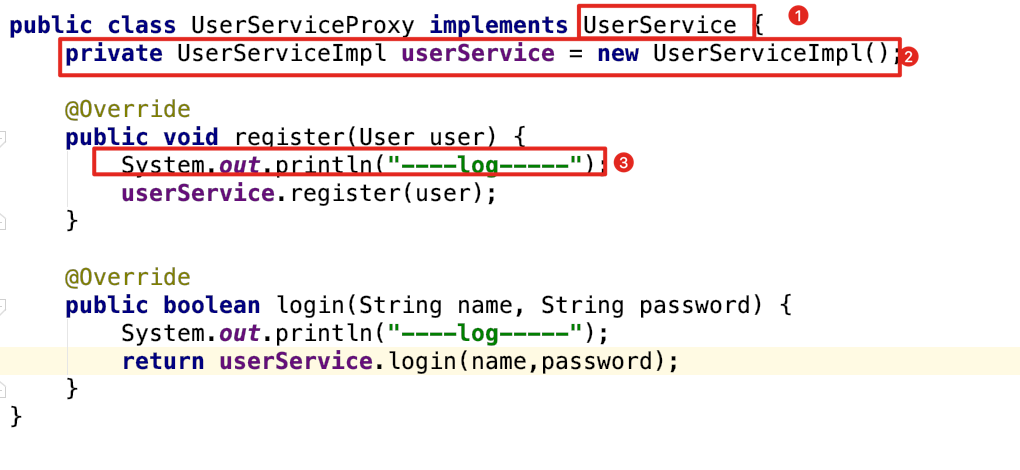
UserServiceProxy implements UserService
m1
m21.2.4 编码
静态代理:为每一个原始类,手工编写一个代理类 (.java .class)
public class User {}

public interface UserService {
	void register(User user);
	boolean login(String name, String password);
}

public class UserServiceImpl implements UserService {
    @Override
    public void register(User user) {
        System.out.println("UserServiceImpl.register 业务运算 + DAO");
    }

    @Override
    public boolean login(String name, String password) {
        System.out.println("UserServiceImpl.login 业务运算 + DAO");
        return true;
    }
}
代理类中必须有原始类
1.2.5 静态代理存在的问题
- 静态类文件数量过多,不利于项目管理
UserServiceImpl、UserServiceProxyOrderServiceImpl、OrderServiceProxy
… - 额外功能维护性差:在代理类中修改额外功能较为麻烦
2. Spring的动态代理开发
2.1 Spring动态代理的概念
概念:通过代理类为原始类(目标类)增加额外功能
好处:利于原始类(目标类)的维护
2.2 搭建开发环境
<dependency>
  <groupId>org.springframework</groupId>
  <artifactId>spring-aop</artifactId>
  <version>5.1.14.RELEASE</version>
</dependency>
<dependency>
  <groupId>org.aspectj</groupId>
  <artifactId>aspectjrt</artifactId>
  <version>1.8.9</version>
</dependency>
<dependency>
  <groupId>org.aspectj</groupId>
  <artifactId>aspectjweaver</artifactId>
  <version>1.8.13</version>
</dependency>
2.3 Spring动态代理的开发步骤
- 创建原始对象(目标对象)
public interface UserService {
    void register(User user);
    boolean login(String name, String password);
}
public class UserServiceImpl implements UserService {
@Override
public void register(User user) {
System.out.println("UserServiceImpl.register 业务运算 + DAO");
}
@Override
public boolean login(String name, String password) {
System.out.println("UserServiceImpl.login 业务运算 + DAO");
return true;
}
}<bean id="userService" class="com.baizhiedu.proxy.UserServiceImpl"/>- 额外功能
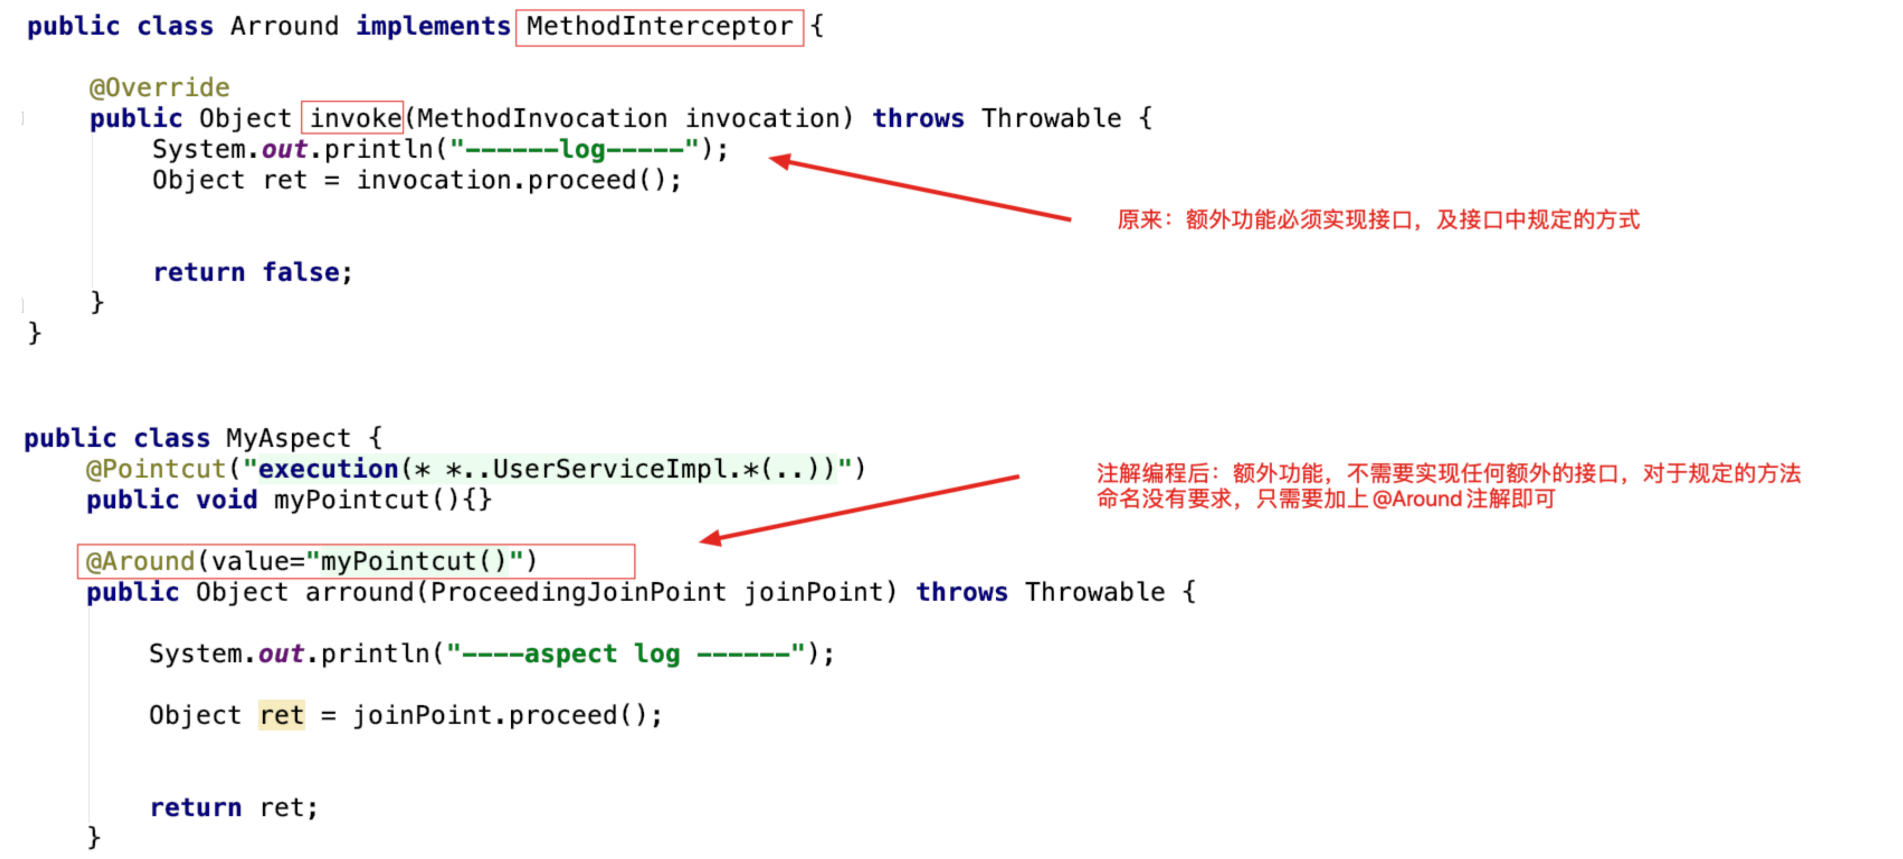
MethodBeforeAdvice接口
额外的功能书写在接口的实现中,运行在原始方法执行之前运行额外功能
public class Before implements MethodBeforeAdvice {
    /**
     * 作用: 把需要运行在原始方法执行之前运行的额外功能, 书写在 before 方法中
     */
    @Override
    public void before(Method method, Object[] objects, Object o) throws Throwable {
        System.out.println("---method before advice log---");
    }
}<bean id="before" class="com.baizhiedu.dynamic.Before"/>- 定义切入点
切入点:额外功能加入的位置
目的:由程序员根据自己的需要,决定额外功能加入给那个原始方法register、login
<!-- 简单的测试:所有方法都做为切入点,都加入额外的功能 -->
<aop:config>
  <aop:pointcut id="pc" expression="execution(* *(..))"/>
</aop:config>- 组装 (2 3整合)
<beans xmlns="http://www.springframework.org/schema/beans"
       xmlns:xsi="http://www.w3.org/2001/XMLSchema-instance"
       xmlns:aop="http://www.springframework.org/schema/aop"
       xsi:schemaLocation="http://www.springframework.org/schema/beans
                           http://www.springframework.org/schema/beans/spring-beans.xsd
                           http://www.springframework.org/schema/aop
                           https://www.springframework.org/schema/aop/spring-aop.xsd">

	<bean id="userService" class="com.yusael.aop.UserServiceImpl"/>
    <!-- 额外功能 -->
    <bean id="before" class="com.yusael.aop.Before"/>
    <!--切入点:额外功能的加入-->
    <!--⽬的:由程序员根据⾃⼰的需要,决定额外功能加入给哪个原始方法(register、login)-->
   <!-- 简单的测试:所有方法都做为切入点,都加入额外的功能-->
    <aop:config>
        <aop:pointcut id="pc" expression="execution(* * (..))"/>
        <!--表达的含义: 所有的方法 都加入before的额外功能-->
        <aop:advisor advice-ref="before" pointcut-ref="pc"/>
    </aop:config>
</beans>- 调用
目的:获得 Spring 工厂创建的动态代理对象,并进行调用
注意:
- Spring 的工厂通过原始对象的 id 值获得的是代理对象
- 获得代理对象后,可以通过声明接口类型,进行对象的存储
目的:获得Spring工厂创建的动态代理对象,并进行调用
  ApplicationContext ctx = new ClassPathXmlApplicationContext("/applicationContext.xml");
注意:
  1. Spring的工厂通过原始对象的id值获得的是代理对象
  2. 获得代理对象后,可以通过声明接口类型,进行对象的存储
  UserService userService=(UserService)ctx.getBean("userService");
	userService.login("");
	userService.register()
2.4 动态代理细节分析
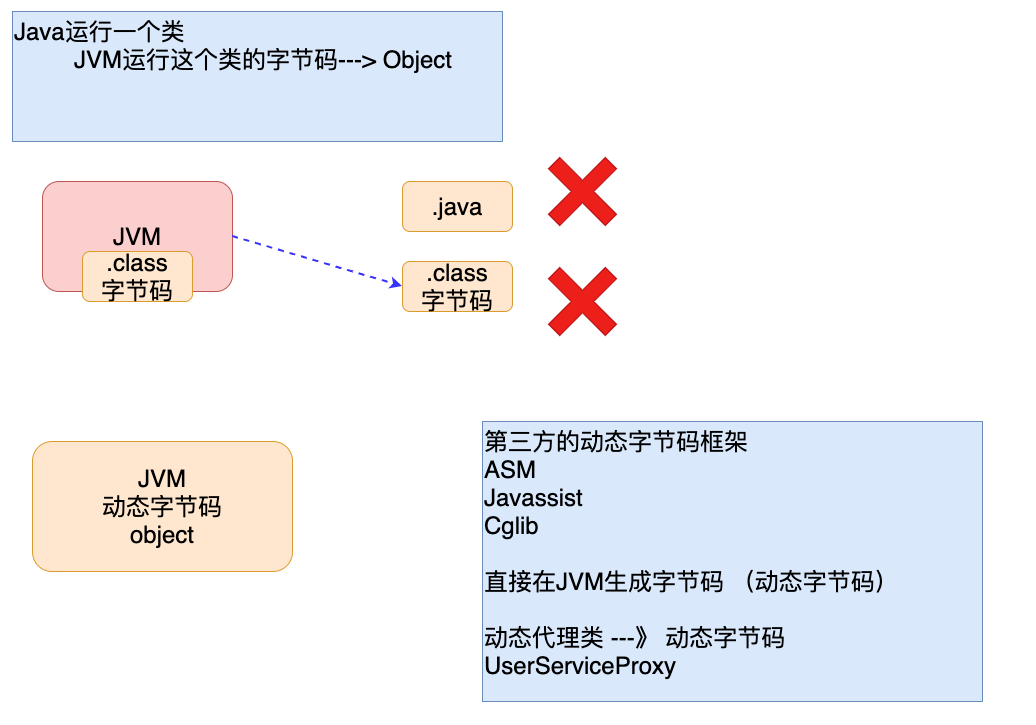
- Spring创建的动态代理类在哪里?
Spring框架在运行时,通过动态字节码技术,在JVM创建的,运行在JVM内部,等程序结束后,会和JVM一起消失
什么叫动态字节码技术:通过第三方动态字节码框架,在JVM中创建对应类的字节码,进而创建对象,当虚拟机结束,动态字节码跟着消失
结论:动态代理不需要定义类文件,都是JVM运行过程中动态创建的,所以不会造成静态代理,类文件数量过多,影响项目管理的问题
- 动态代理编程简化代理的开发
在额外功能不改变的前提下,创建其他目标类(原始类)的代理对象时,只需要指定原始(目标)对象即可
- 动态代理额外功能的维护性大大增强
3. Spring动态代理详解
3.1 额外功能的详解
MethodBeforeAdvice分析
public class Before implements MethodBeforeAdvice {
    /**
     * 作用: 把需要运行在原始方法执行之前运行的额外功能, 书写在 before 方法中
     *
     * Method: 额外功能所增加给的那个原始方法
     *                          login
     *                          register
     *                          --------
     *                          showOrder
     *
     * Object[]:  额外功能所增加给的那个原始方法的参数
     *                          String name,String password
     *                          User
     *                          --------
     *
     * Object: 额外功能所增加给的那个原始对象
     *                          UserServiceImpl
     *                          ---------------
     *                          OrderServiceImpl
     */
    @Override
    public void before(Method method, Object[] objects, Object o) throws Throwable {
        System.out.println("---new method before advice log---");
    }
}
MethodInterceptor(方法拦截器)
methodinterceptor接口:额外功能可以根据需要运行在原始方法执行 前、后、前后
- 参数:
MethodInvocation:额外功能所增加给的那个原始方法 (login, register) - 返回值:
Object:原始方法的返回值 (没有就返回 null) invocation.proceed():原始方法运行
额外功能运行在原始方法 之前
public class Around implements MethodInterceptor {
    @Override
    public Object invoke(MethodInvocation methodInvocation) throws Throwable {
        System.out.println("---额外功能运行在原始方法执行之前---");
        Object ret = methodInvocation.proceed(); // 原始方法运行, 获取原始方法的返回值
        return ret;
    }
}
额外功能运行在原始方法执行 之后
public class Around implements MethodInterceptor {
    @Override
    public Object invoke(MethodInvocation methodInvocation) throws Throwable {
        Object ret = methodInvocation.proceed(); // 原始方法运行, 获取原始方法的返回值
        System.out.println("---额外功能运行在原始方法执行之后---");
        return ret;
    }
}
额外功能运行在原始方法执行 之前,之后
//常用于事务
public class Around implements MethodInterceptor {
    @Override
    public Object invoke(MethodInvocation methodInvocation) throws Throwable {
    	System.out.println("---额外功能运行在原始方法执行之前---");
        Object ret = methodInvocation.proceed(); // 原始方法运行, 获取原始方法的返回值
        System.out.println("---额外功能运行在原始方法执行之后---");
        return ret;
    }
}
额外功能运行在原始方法抛出异常的时候
public class Around implements MethodInterceptor {
    @Override
    public Object invoke(MethodInvocation methodInvocation) throws Throwable {
        Object ret = null;
        try {
            ret = methodInvocation.proceed(); // 原始方法运行, 获取原始方法的返回值
        } catch (Throwable throwable) {
            System.out.println("---额外功能运行在原始方法抛异常的时候---");
        }
        return ret;
    }
}
MethodInterceptor影响原始方法的返回值
public class Around implements MethodInterceptor { @Override public Object invoke(MethodInvocation methodInvocation) throws Throwable { System.out.println("---log---"); Object ret = methodInvocation.proceed(); //原始方法返回为true,这里设为false会影响 return false; } }- 参数:
3.2 切入点详解
切入点决定额外功能加入位置(方法)
<!--execution(* * (..)) 匹配了所有方法-->
<aop:pointcut id="pc" expression="execution(* * (..))"/>execution():切入点函数* *(..):切入点表达式
3.2.1 切入点表达式
方法切入点表达式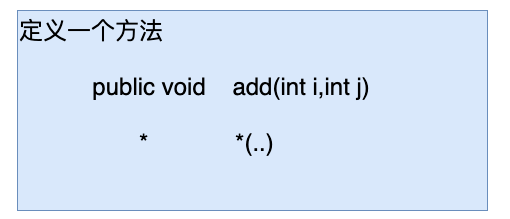
* * (..)    --> 所有方法

*  --->  修饰符 返回值
*  --->  方法名
() --->  参数表
.. --->  对于参数没有要求 (参数有没有,参数有⼏个都行,参数是什么类型的都行)
定义login方法作为切入点
<!-- 定义login作为切入点 -->
<aop:pointcut id="pc" expression="execution(* login (..))"/>

<!-- 定义register作为切入点 -->
<aop:pointcut id="pc" expression="execution(* register (..))"/>
定义login方法且login方法有两个字符串类型的参数 作为切入点
<aop:pointcut id="pc" expression="execution(* login (String,String))"/>

<!-- ⾮ java.lang java.lang 包中的类型, 必须要写全限定名 -->
<aop:pointcut id="pc" expression="execution(* register (com.yusael.proxy.User))"/>

<!--  ..可以和具体的参数类型连用 -->
<aop:pointcut id="pc" expression="execution(* login(String, ..))"/>
<!-- === login(String), login(String,String), login(String,com.baizhi.edu.proxy.User) -->
上诉表达式的切入点不够精准
精准方法切入点限定
修饰符 返回值 包.类.方法(参数) *
<aop:pointcut id="pc" expression="execution(* com.yusael.proxy.UserServiceImpl.login(..))"/>

<aop:pointcut id="pc" expression="execution(* com.yusael.proxy.UserServiceImpl.login(String, String))"/>
类切入点
指定 **特定类作为切入点(额外功能加入的位置)**,这个类中的所有方法,都会加上对应的额外功能
语法1
# 类中所有的方法加入了额外功能
<aop:pointcut id="pc" expression="execution(* com.yusael.proxy.UserServiceImpl.*(..))"/>
语法2
# 忽略包
1. 类只存在一级包
<aop:pointcut id="pc" expression="execution(* *.UserServiceImpl.*(..))"/>
2. 类存在多级包
<aop:pointcut id="pc" expression="execution(* *..UserServiceImpl.*(..))"/>
包切入点表达式(实战用的多)
指定包作为额外功能加入的位置,自然包中的所有类及其方法都会加入额外的功能
语法1
# 切入点包中的所有类,必须在proxy中,不能在proxy包的⼦包中
<aop:pointcut id="pc" expression="execution(* com.yusael.proxy.*.*(..))"/>
语法2
# 切入点当前包及其⼦包都生效
<aop:pointcut id="pc" expression="execution(* com.yusael.proxy..*.*(..))"/>
3.2.2 切入点函数
切入点函数:用于执行切入点表达式
- execution
execution 是最为重要的切入点函数,功能最全;可以执行执行 方法切入点表达式、类切入点表达式、包切入点表达式
弊端:execution 执⾏切入点表达式 ,书写麻烦
execution(* com.yusael.proxy..*.*(..))注意:其他的 切入点函数 简化的是 execution 的书写复杂度,功能上完全⼀致
- args
args 作用:主要用于 函数(方法) 参数的匹配
切入点:方法参数必须得是 2 个字符串类型的参数

# 使用 execution
<aop:pointcut id="pc" expression="execution(* *(String, String))"/>

# 使用 args
<aop:pointcut id="pc" expression="args(String, String)"/>- within
within 作用:主要用于进行 类、包切入点表达式 的匹配
切入点: UserServiceImpl 这个类

# 使用 execution
<aop:pointcut id="pc" expression="expression(* *..UserServiceImpl.*(..))"/>

# 使用 within
<aop:pointcut id="pc" expression="within(*..UserServiceImpl)"/>

切入点: com.yusael.proxy 这个包

# 使用 execution
<aop:pointcut id="pc" expression="execution(* com.yusael.proxy..*.*(..)"/>

# 使用 within
<aop:pointcut id="pc" expression="within(com.yusael.proxy..*)"/>- @annotation
作用:为具有特殊注解的 方法 加入额外功能。
例如我们自定义了一个注解:Log
@Target(ElementType.METHOD)
@Retention(RetentionPolicy.RUNTIME)
public @interface Log {
}
然后我们要为使用了 Log 注解的方法加入额外功能
<aop:pointcut id="pc" expression="@annotation(com.yusael.Log)"/>切入点函数的逻辑运算
指的是 整合多个切入点函数一起配合工作,进而完成更为复杂的需求
and与操作
案例: 方法名叫 login 同时 参数是 2个字符串
# execution
<aop:pointcut id="pc" expression="execution(* login(String, String))"/>
# execution and args
<aop:pointcut id="pc" expression="execution(* login(..)) and args(String, String))"/>
or或操作
案例: 方法名叫 register 或 login 的⽅法作为切⼊点
<aop:pointcut id="pc" expression="execution(* login(..)) or execution(* register(..))"/>
4. AOP编程
4.1 AOP概念
POP (Producer Oriented Programing)
- 面向过程(方法、函数)编程 —— C
- 以过程为基本单位的程序开发,通过过程间的彼此协同,相互调用,完成程序的构建
OOP (Object Oritened Programing)
- 面向对象编程 —— Java
- 以对象为基本单位的程序开发,通过对象间的彼此协同,相互调用,完成程序的构建
AOP (Aspect Oriented Programing)
- 面向切面编程 = Spring动态代理开发
- 以切面为基本单位的程序开发,通过切面间的彼此协同,相互调用,完成程序的构建
- 切面 = 切入点 + 额外功能
- 本质就是 Spring 的动态代理开发,通过代理类为原始类增加额外功能
- 好处:利于原始类的维护
- 注意:AOP 编程不可能取代 OOP,AOP 是 OOP 编程的补充
4.2 AOP编程的开发步骤
- 原始对象
- 额外功能 (
MethodInterceptor) - 切入点
- 组装切面 (额外功能+切入点)
4.3 切面的名词解释
切面 = 切入点 + 额外功能 几何学
面 = 点 + 相同的性质
由各个类具有的相同额外功能,构成了一个切面
不同的额外功能,构成了多个切面
5. AOP的底层实现原理
5.1 核心问题
- AOP 如何创建动态代理类?
动态字节码技术 - Spring 工厂如何加工创建代理对象?
通过原始对象的 id 值,获得的是代理对象
5.2 动态代理类的创建(重点)
5.2.1 JDK的动态代理
Proxy.newProxyInstance方法参数详解
类加载器
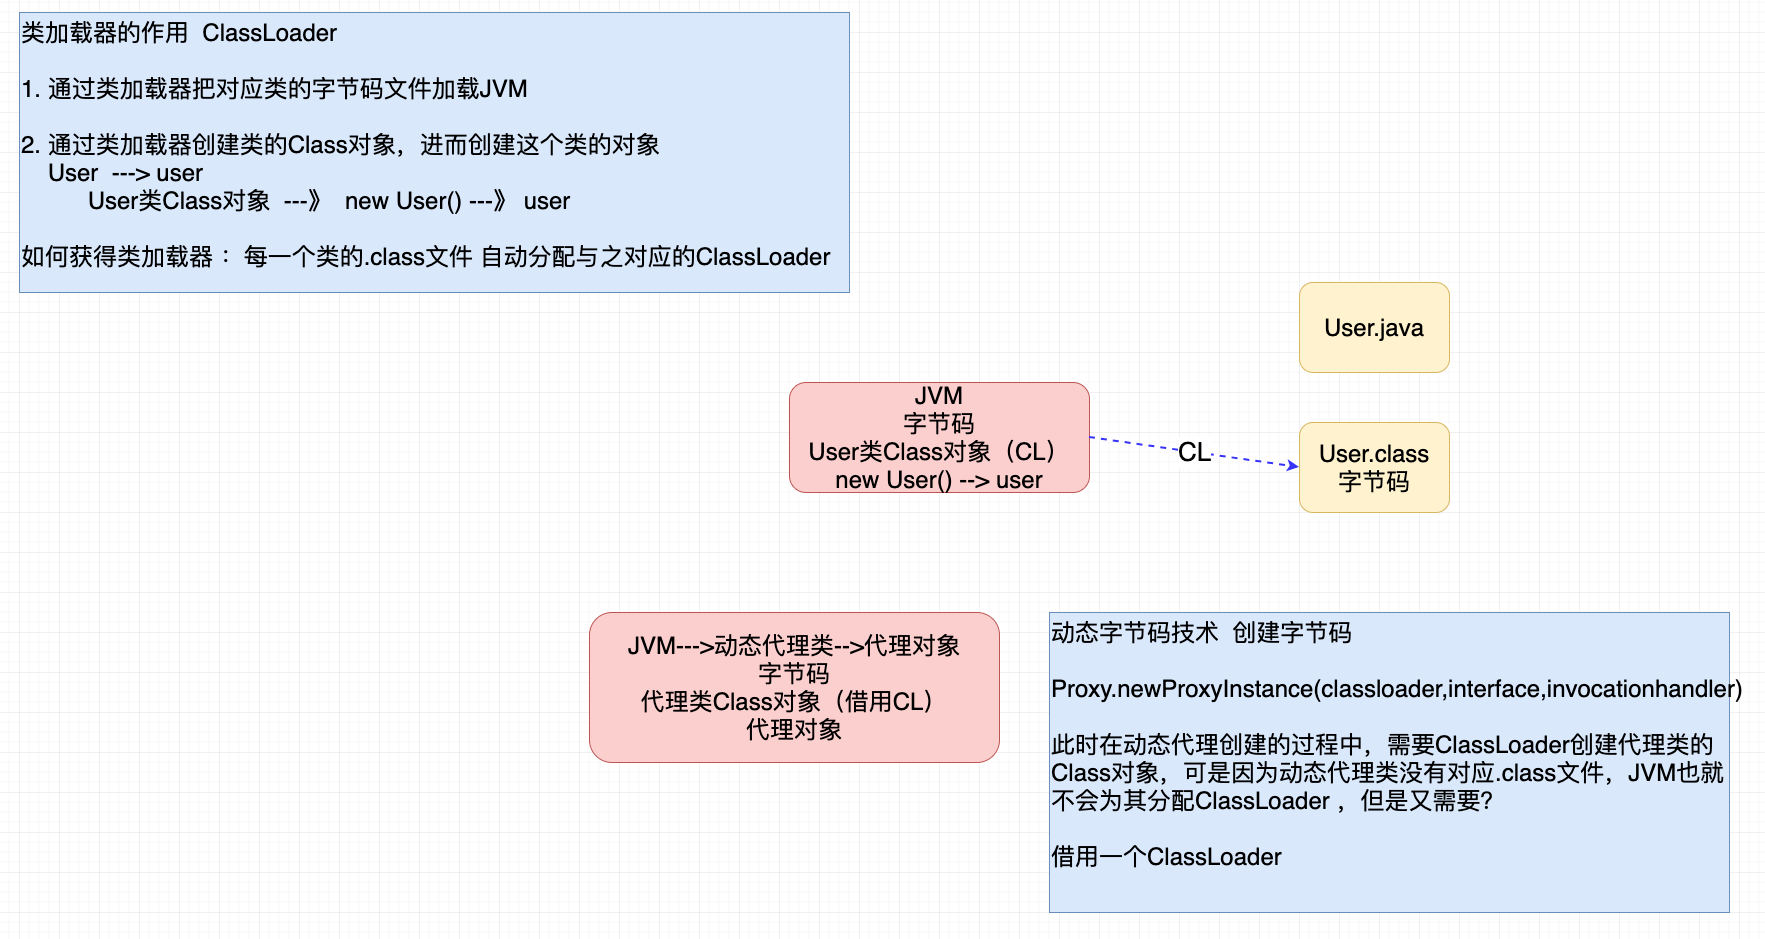
编码
public class TestJDKProxy {
    /**
     1. 借⽤类加载器  TestJDKProxy 或 UserServiceImpl 都可以
     2. JDK8.x 前必须加 final
     final UserService userService = new UserServiceImpl();
     */
    public static void main(String[] args) {
        // 1. 创建原始对象
        UserService userService = new UserServiceImpl();

        // 2. JDK 动态代理
        InvocationHandler handler = new InvocationHandler() {
            @Override
            public Object invoke(Object proxy, Method method, Object[] args) throws Throwable {
                System.out.println("---- proxy log ----");
                // 原始方法运行
                Object ret = method.invoke(userService, args);
                return ret;
            }
        };
        //借用ClassLoader
        UserService userServiceProxy = (UserService) Proxy.
                newProxyInstance(TestJDKProxy.class.getClassLoader(),
                                userService.getClass().getInterfaces(),
                                handler);
        userServiceProxy.login("luci", "123456");

        userServiceProxy.register(new User());
    }
}
5.2.2 CGlib的动态代理
CGlib创建动态代理的原理:父子继承关系创建代理对象,原始类作为父类,代理类作为子类,这样既可以保证2者方法一致,同时在代理类中提供新的实现(额外功能+原始方法)
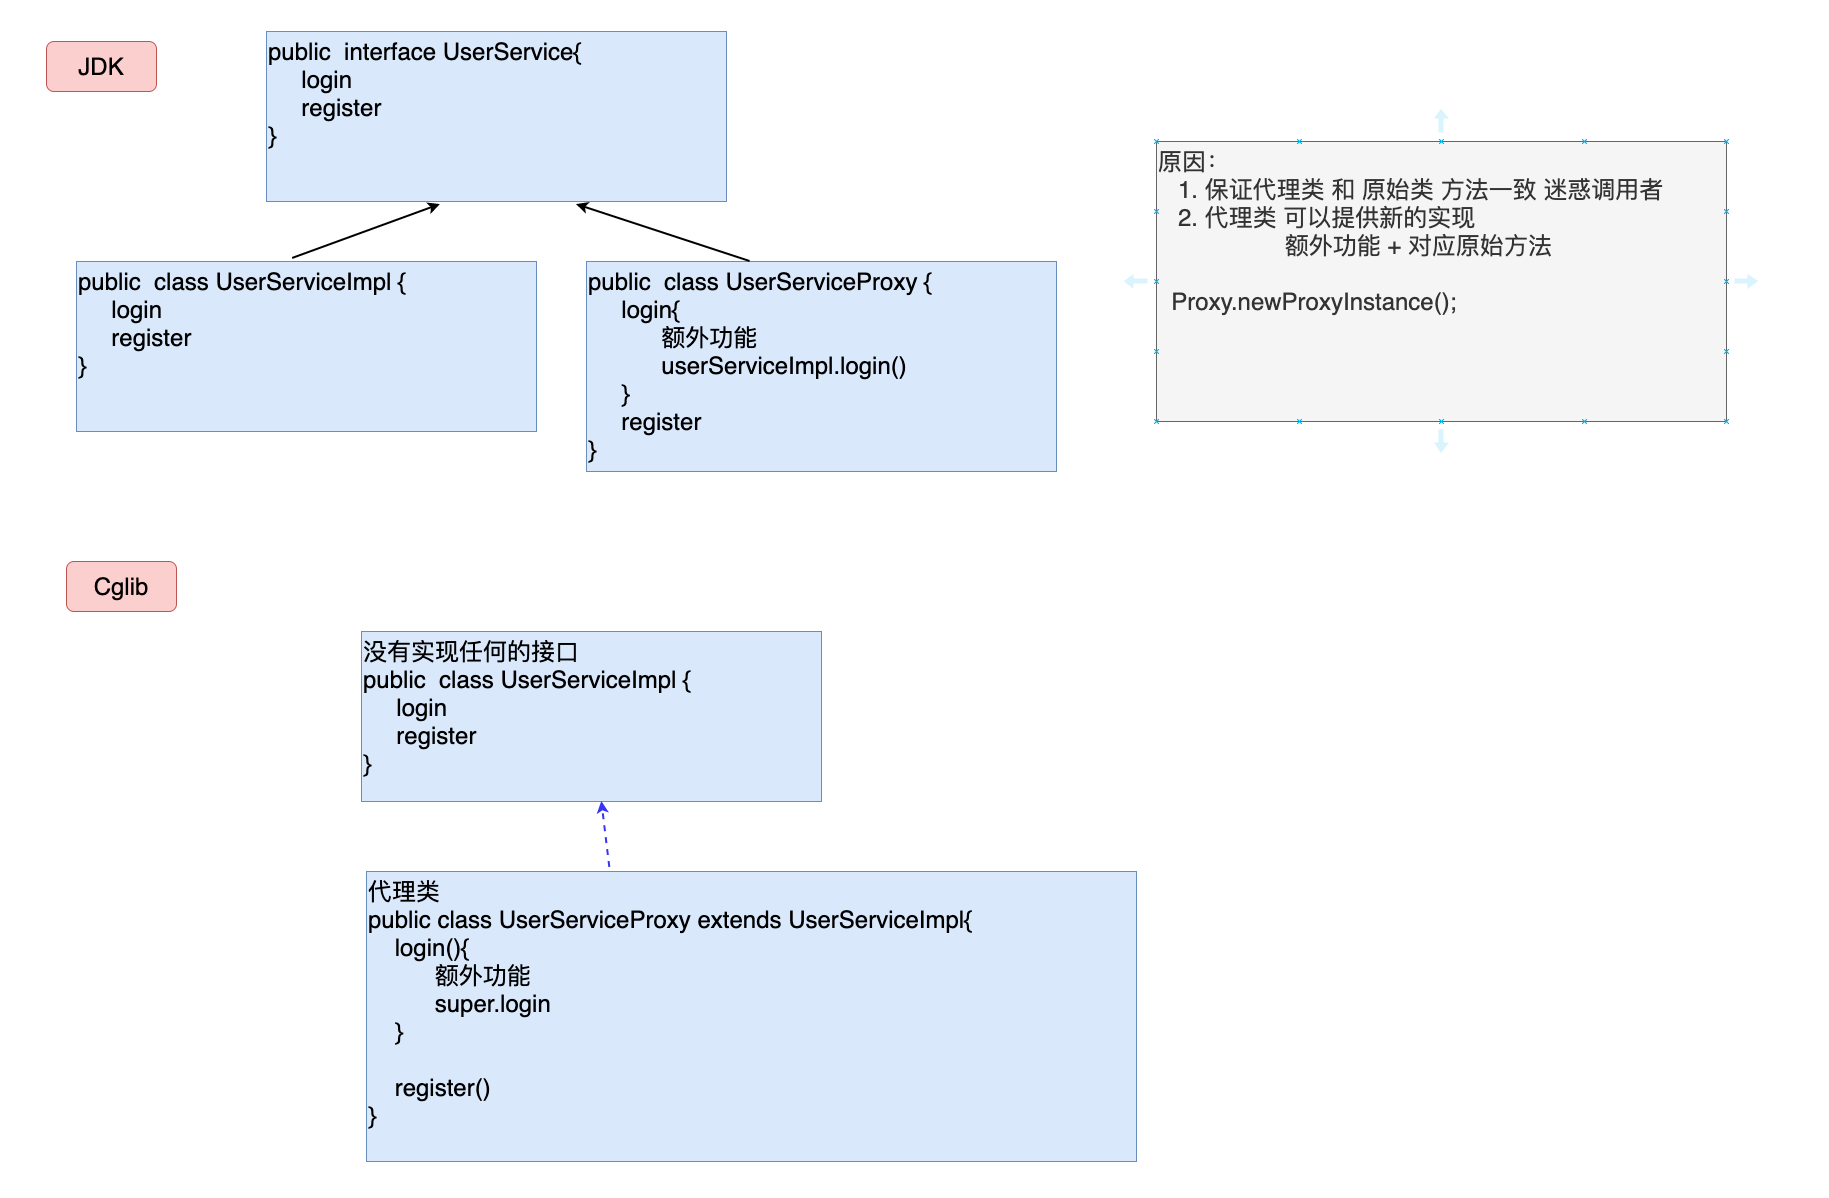
CGlib编码
public class TestCglib {
    public static void main(String[] args) {
        // 1. 创建原始对象
        UserService userService = new UserService();

        /*
         2. 通过 cglib 方式创建动态代理对象
         对比 jdk 动态代理 ---> Proxy.newProxyInstance(classLoader, interface, invocationHandler);

         Enhancer.setClassLoader()
         Enhancer.setSuperClass()
         Enhancer.setCallBack() ---> MethodInterceptor(cglib)
         Enhancer.createProxy() ---> 创建代理对象
         */
        Enhancer enhancer = new Enhancer();

        enhancer.setClassLoader(TestCglib.class.getClassLoader());
        enhancer.setSuperclass(userService.getClass());

        MethodInterceptor interceptor = new MethodInterceptor() {
            @Override
            public Object intercept(Object o, Method method, Object[] args, MethodProxy methodProxy) throws Throwable {
                System.out.println("--- cglib log ----");
                Object ret = method.invoke(userService, args); // 执行原始方法
                return ret;
            }
        };
				//额外功能
        enhancer.setCallback(interceptor);
      	//创建代理
        UserService userServiceProxy = (UserService) enhancer.create();
        userServiceProxy.login("zhenyu", "123456");
        userServiceProxy.register(new User());
    }
}
总结
- JDK 动态代理
Proxy.newProxyInstance:通过接口创建代理的实现类 - Cglib 动态代理
Enhancer:通过继承⽗类创建的代理类
- JDK 动态代理
5.3 Spring工厂如何加工原始对象
思路分析:主要通过
BeanPostProcessor将原始对象加工为代理对象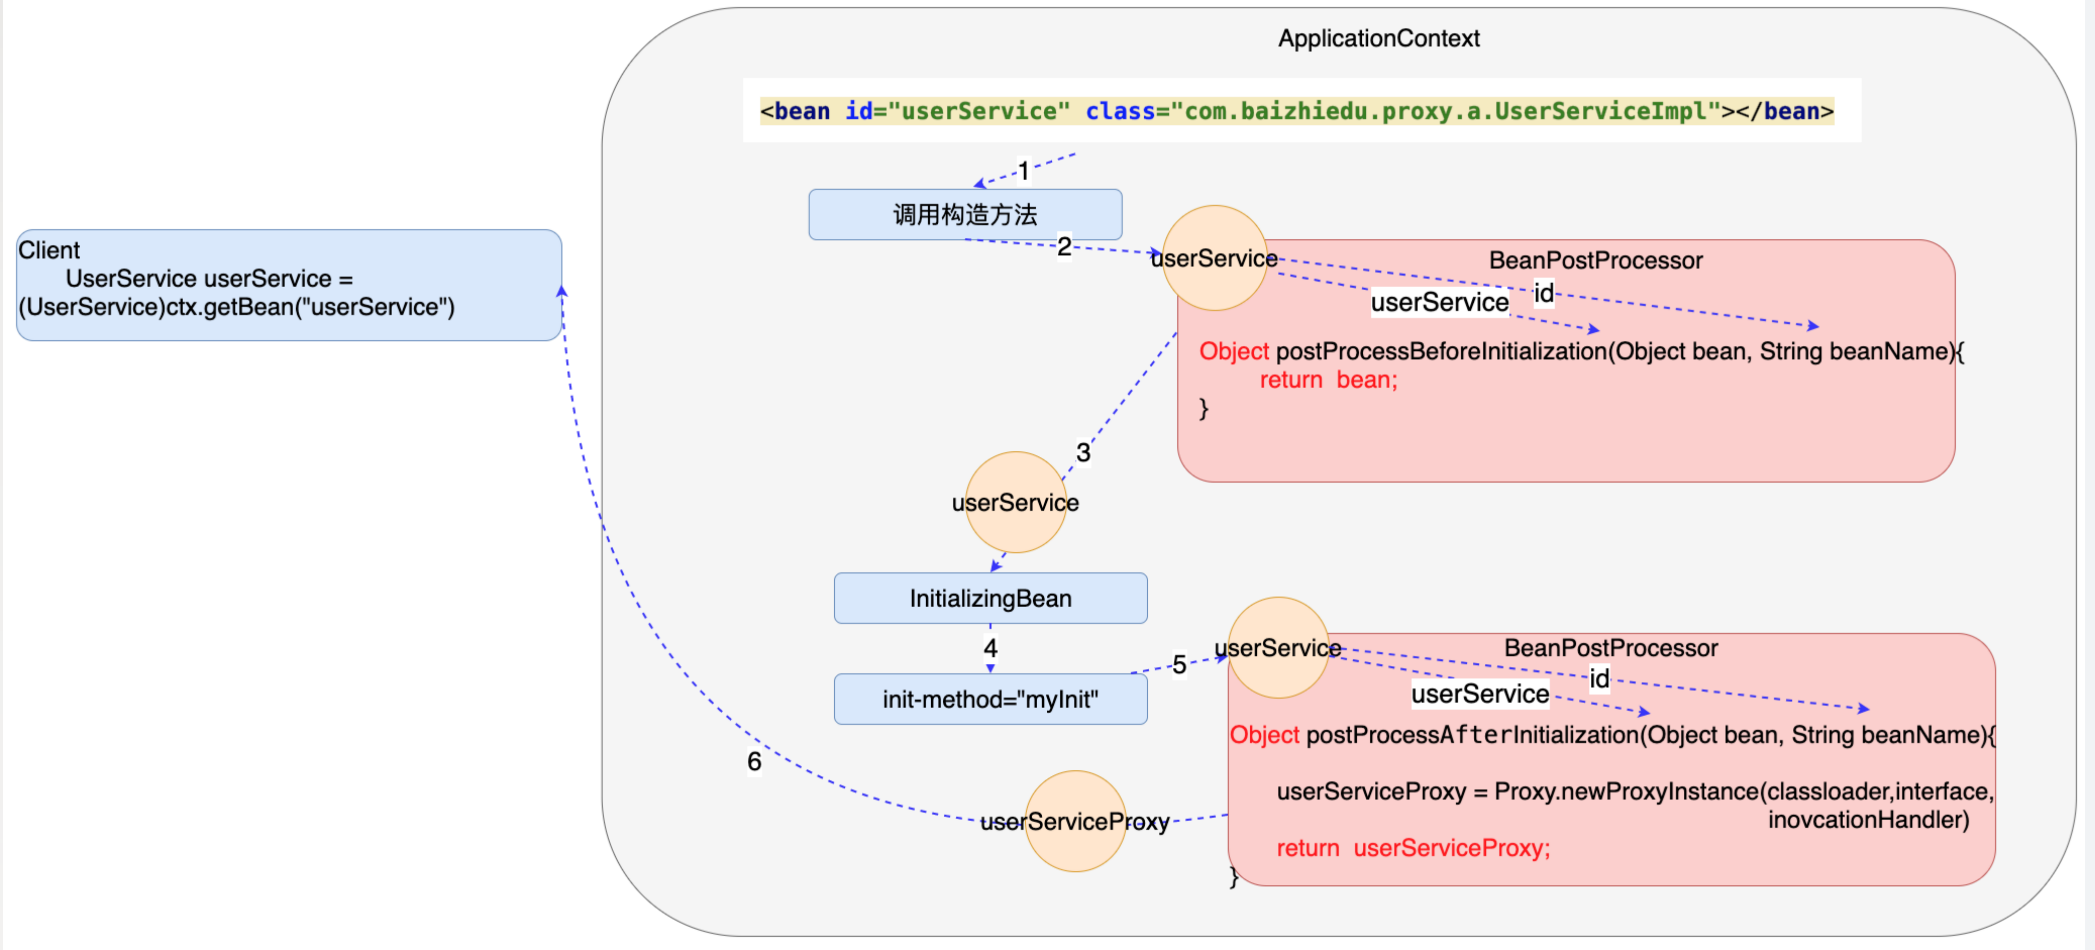
编码
public class ProxyBeanPostProcessor implements BeanPostProcessor { @Override public Object postProcessBeforeInitialization(Object bean, String beanName) throws BeansException { return bean; } @Override public Object postProcessAfterInitialization(Object bean, String beanName) throws BeansException { InvocationHandler handler = new InvocationHandler() { @Override public Object invoke(Object proxy, Method method, Object[] args) throws Throwable { System.out.println("--- new log ---"); Object ret = method.invoke(bean, args); return ret; } }; return Proxy.newProxyInstance(ProxyBeanPostProcessor.class.getClassLoader(), bean.getClass().getInterfaces(), handler); } }<bean id="userService" class="com.yusael.factory.UserServiceImpl"/> <!--1. 实现 BeanPostProcessor 进行加工--> <!--2. 配置文件中对 BeanPostProcessor 进行配置--> <bean id="proxyBeanPostProcessor" class="com.yusael.factory.ProxyBeanPostProcessor"/>
6. 基于注解的AOP编程
6.1 基于注解的AOP编程的开发步骤
- 原始对象
public interface UserService {
    void register(User user);
    boolean login(String name, String password);
}

public class UserServiceImpl implements UserService {
    @Override
    public void register(User user) {
        System.out.println("UserServiceImpl.register 业务运算 + DAO");
        // throw new RuntimeException("测试异常");
    }

    @Log
    @Override
    public boolean login(String name, String password) {
        System.out.println("UserServiceImpl.login 业务运算 + DAO");
        return true;
    }
}
额外功能
切入点
组装切面
/* 1. 额外功能 public class MyAround implements MethodInterceptor { public Object invoke(MethodInvocation invocation) { Object ret = invocation.invoke(); return ret; } } <bean id="around" class="com.yusael.dynamic.Around"/> 2. 切入点 <aop:config> <aop:pointcut id="pc" expression="execution(* login(..)))"/> <aop:advisor advice-ref="around" pointcut-ref="pc"/> </aop:config> */ //通过切面类定义了额外功能 @Around //切入点 @Around("execution(* login(..))") //切面类 @Aspect @Aspect public class MyAspect { @Around("execution(* login(..))") public Object around(ProceedingJoinPoint joinPoint) throws Throwable { System.out.println("---- aspect log ----"); Object ret = joinPoint.proceed(); return ret; } }<beans xmlns="http://www.springframework.org/schema/beans" xmlns:xsi="http://www.w3.org/2001/XMLSchema-instance" xmlns:aop="http://www.springframework.org/schema/aop" xsi:schemaLocation="http://www.springframework.org/schema/beans http://www.springframework.org/schema/beans/spring-beans.xsd http://www.springframework.org/schema/aop https://www.springframework.org/schema/aop/spring-aop.xsd"> <bean id="userService" class="com.yusael.aspect.UserServiceImpl"/> <!-- 切面: 1. 额外功能 2. 切入点啊 3. 组装切面 --> <bean id="around" class="com.yusael.aspect.MyAspect"/> <!--告知 Spring 基于注解进行 AOP 编程--> <aop:aspectj-autoproxy/> </beans>
6.2 细节
切入点复用:在切面类中定义⼀个函数,上面用 @Pointcut 注解
通过这种方式定义切入点表达式,后续更加有利于切入点复用
@Aspect
public class MyAspect {

    @Pointcut("execution(* login(..))")
    public void myPoincut() {}

    @Around(value = "myPoincut()")
    public Object around(ProceedingJoinPoint joinPoint) throws Throwable {
        System.out.println("---- aspect log ----");
        Object ret = joinPoint.proceed();
        return ret;
    }
    @Around(value = "myPoincut()")
    public Object around1(ProceedingJoinPoint joinPoint) throws Throwable {
        System.out.println("---- aspect transaction ----");
        Object ret = joinPoint.proceed();
        return ret;
    }
}
动态代理的创建方式
AOP 底层实现 2 种代理创建方式:
- JDK:通过 实现接口,做新的实现类 创建代理对象
- Cglib:通过 继承父类,做新的子类 创建代理对象
默认情况 AOP 编程 底层应用 JDK动态代理创建方式。
基于注解的 AOP 开发 中切换为 Cglib:
<aop:aspectj-autoproxy proxy-target-class="true"/>传统的 AOP 开发 中切换为 Cglib:
<aop:config proxy-target-class="true">
	...
</aop:config>
7. AOP开发中的一个坑
坑!:在同⼀个业务类中,进⾏业务方法间的相互调用,只有最外层的方法,才是加入了额外功能(内部的方法,通过普通的方式调用,都调用的是原始方法)。如果想让内层的方法也调用代理对象的方法,就要实现 AppicationContextAware 获得⼯厂,进而获得代理对象
public class UserServiceImpl implements UserService, ApplicationContextAware {
    private ApplicationContext ctx;
    @Override
    public void setApplicationContext(ApplicationContext applicationContext) throws BeansException {
        this.ctx = applicationContext;
    }
    @Override
    public void register(User user) {
        System.out.println("UserServiceImpl.register 业务运算 + DAO");

        // this.login("zhenyu", "123456"); // 这么写调用的是本类的 login 方法, 即原始对象的 login 方法
        // 为什么不在这里创建一个工厂获取代理对象呢?
        // Spring的工厂是重量级资源, 一个应用中应该只创建一个工厂.
        // 因此我们必须通过 ApplicationContextAware 拿到已经创建好的工厂
        UserService userService = (UserService) ctx.getBean("userService");
        userService.login("yusael", "123456");
    }

    @Override
    public boolean login(String name, String password) {
        System.out.println("UserServiceImpl.login 业务运算 + DAO");
        return true;
    }
}
8. AOP阶段知识总结

第四章、Spring持久层
1. 持久层整合
1.1Spring框架为什么要与持久层技术进行整合
- JavaEE开发需要持久层进行数据库的访问操作
- JDBC、Hibernate、MyBatis 进行持久开发过程存在大量的代码冗余
- Spring 基于模板设计模式对于上述的持久层技术进行了封装
1.2 Spring可以与那些持久层技术进行整合?
- JDBC ——
JDBCTemplate - Hibernate(JPA)——
HibernateTemplate - MyBatis ——
SqlSessionFactoryBean、MapperScannerConfigure
2. Spring与MyBatis整合
2.1 MyBatis开发步骤的回顾
- 实体类
User
public class User implements Serializable {
    private Integer id;
    private String name;
    private String password;

    public User() {
    }

    public User(Integer id, String name, String password) {
        this.id = id;
        this.name = name;
        this.password = password;
    }

    public Integer getId() {
        return id;
    }

    public void setId(Integer id) {
        this.id = id;
    }

    public String getName() {
        return name;
    }

    public void setName(String name) {
        this.name = name;
    }

    public String getPassword() {
        return password;
    }

    public void setPassword(String password) {
        this.password = password;
    }
}- 实体别名
mybatis-config.xml配置繁琐
<?xml version="1.0" encoding="UTF-8" ?>
<!DOCTYPE configuration
        PUBLIC "-//mybatis.org//DTD Confi 3.0//EN"
        "http://mybatis.org/dtd/mybatis-3-config.dtd">
<configuration>
    <typeAliases>
        <typeAlias alias="user" type="com.yusael.mybatis.User"/>
    </typeAliases>

    <environments default="mysql">
        <environment id="mysql">
            <transactionManager type="JDBC"></transactionManager>
            <dataSource type="POOLED">
                <property name="driver" value="com.mysql.jdbc.Driver"/>
                <property name="url" value="jdbc:mysql://localhost:3306/yus?useSSL=false"/>
                <property name="username" value="root"/>
                <property name="password" value="1234"/>
            </dataSource>
        </environment>
    </environments>
</configuration>- 表 t_users
create table t_users values (
	id int(11) primary key auto_increment,
	name varchar(12),
	password varchar(12)
);- 创建 DAO 接口:
UserDAO
public interface UserDAO {
    public void save(User user);
}- 实现Mapper文件:
UserDAOMapper.xml配置繁琐
<?xml version="1.0" encoding="UTF-8" ?>
<!DOCTYPE mapper PUBLIC "-//mybatis.org//DTD Mapper 3.0//EN"
        "http://mybatis.org/dtd/mybatis-3-mapper.dtd">

<mapper namespace="com.yusael.mybatis.UserDAO">
    <insert id="save" parameterType="user">
        insert into t_users(name, password) values (#{name}, #{password})
    </insert>
</mapper>- 注册 Mapper 文件
mybatis-config.xml
<mappers>
	<mapper resource="UserDAOMapper.xml"/>
</mappers>- MybatisAPI调用 代码冗余
public class TestMybatis {
    public static void main(String[] args) throws IOException {
        InputStream inputStream = Resources.getResourceAsStream("mybatis-config.xml");
        SqlSessionFactory sqlSessionFactory = new SqlSessionFactoryBuilder().build(inputStream);
        SqlSession session = sqlSessionFactory.openSession();
        UserDAO userDAO = session.getMapper(UserDAO.class);

        User user = new User();
        user.setName("yusael");
        user.setPassword("123456");
        userDAO.save(user);

        session.commit();
    }
}
2.2 Mybatis在开发过程中存在问题
# 配置繁琐  代码冗余
1. 实体
2. 实体别名         配置繁琐
3. 表
4. 创建DAO接口
5. 实现Mapper文件
6. 注册Mapper文件   配置繁琐
7. MybatisAPI调用  代码冗余
2.3 Spring与Mybatis整合思路分析
2.4 Spring与Mybatis整合的开发步骤
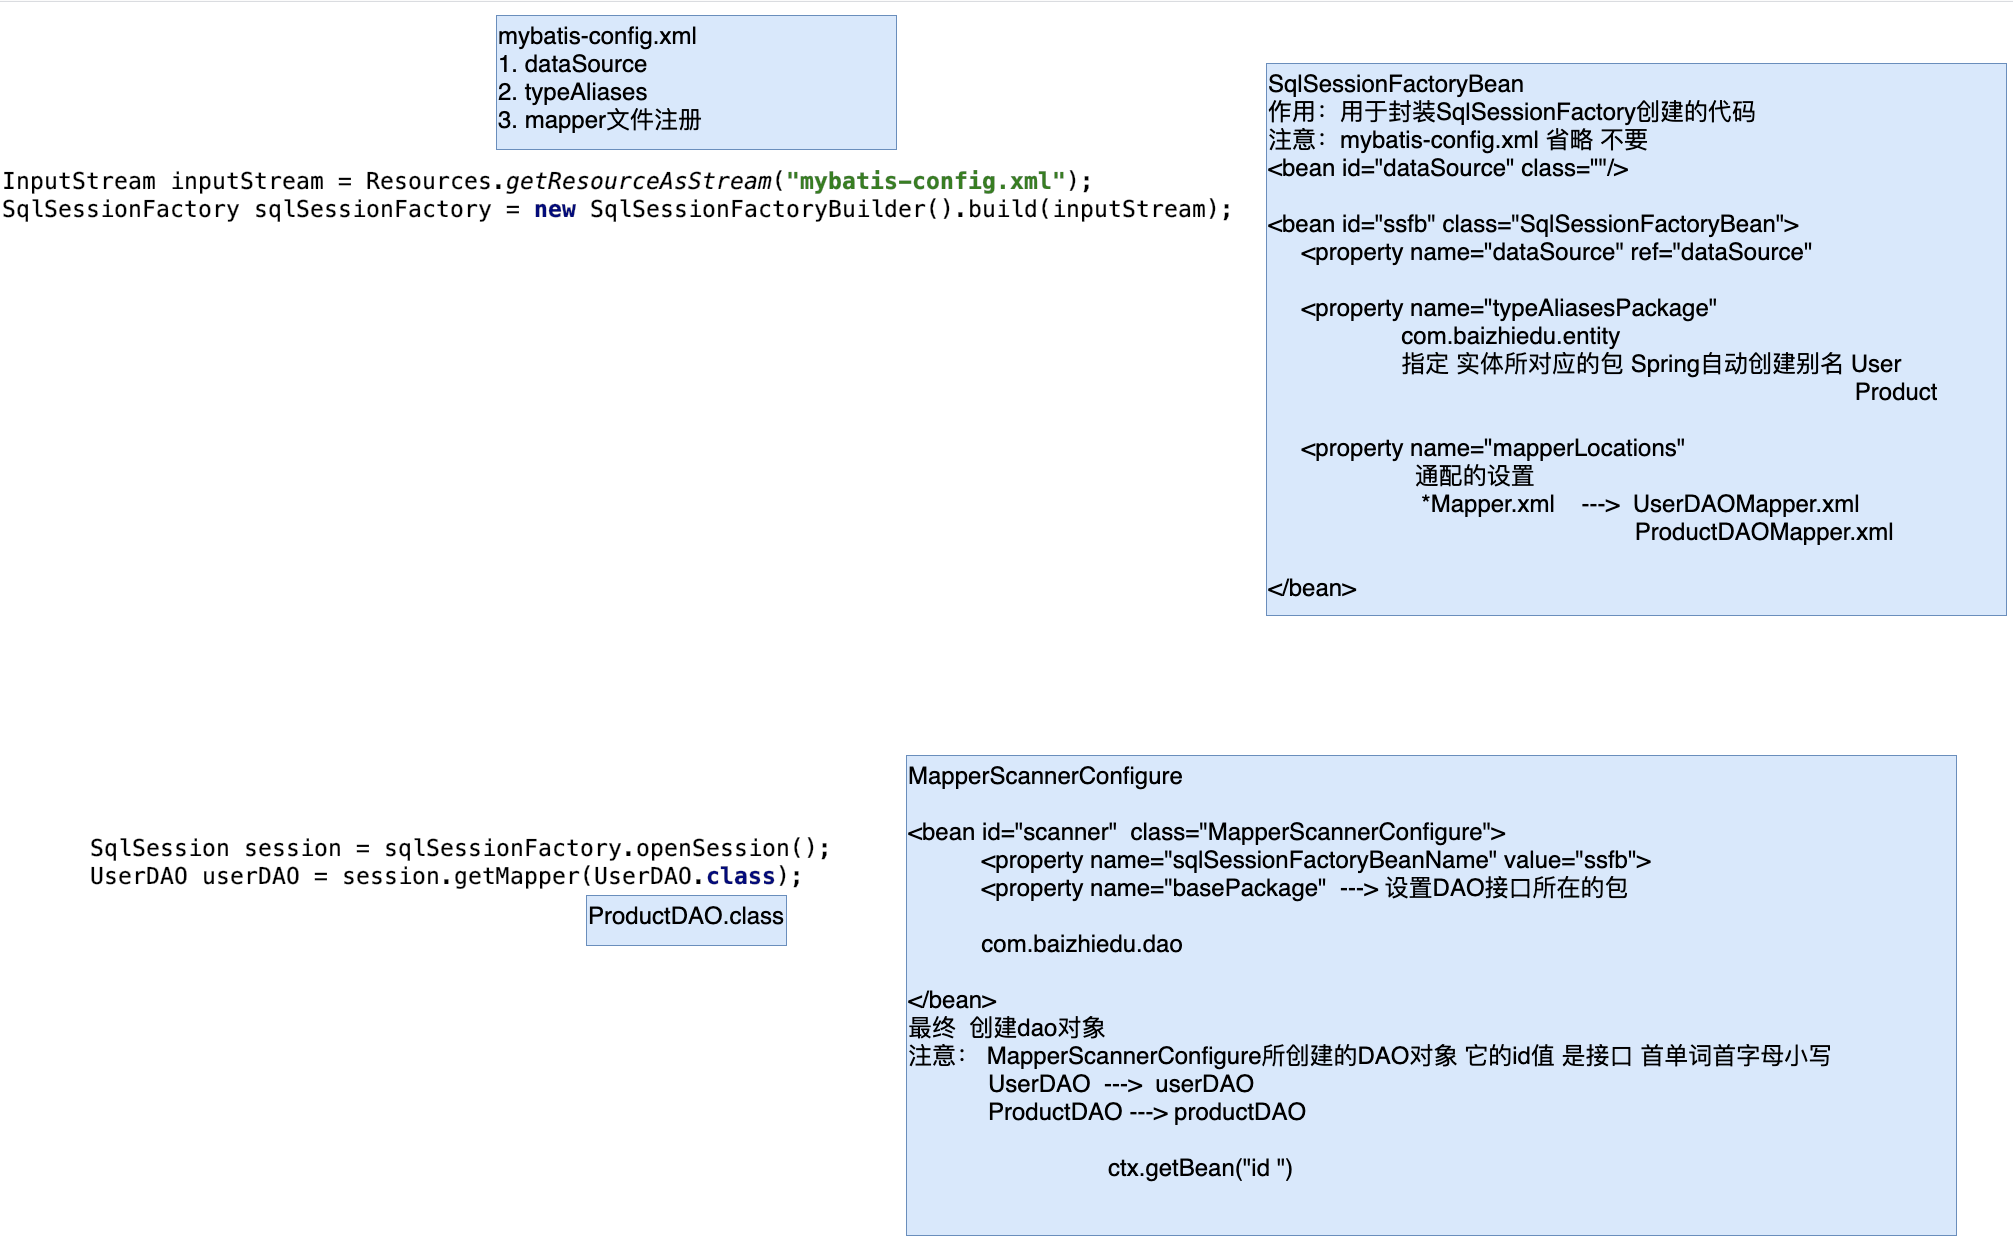
配置文件(
ApplicationContext.xml) 进行相关配置#配置 是需要配置一次 <bean id="dataSource" class=""/> <!--创建SqlSessionFactory--> <bean id="ssfb" class="SqlSessionFactoryBean"> <property name="dataSource" ref=""/> <property name="typeAliasesPackage"> 指定 实体类所在的包 com.baizhiedu.entity User Product </property> <property name="mapperLocations"> 指定 配置文件(映射文件)的路径 还有通用配置 com.baizhiedu.mapper/*Mapper.xml </property> </bean> <!--DAO接口的实现类 session ---> session.getMapper() --- xxxDAO实现类对象 XXXDAO ---> xXXDAO --> <bean id="scanner" class="MapperScannerConfigure"> <property name="sqlSessionFactoryBeanName" value="ssfb"/> <property name="basePacakge"> 指定 DAO接口放置的包 com.baizhiedu.dao </property> </bean>编码
# 实战经常根据需求 写的代码
1. 实体
2. 表
3. 创建DAO接口
4. 实现Mapper文件
2.5 Spring与Mybatis整合编码
搭建开发环境(jar)
<dependency>
  <groupId>org.springframework</groupId>
  <artifactId>spring-jdbc</artifactId>
  <version>5.1.14.RELEASE</version>
</dependency>

<dependency>
  <groupId>org.mybatis</groupId>
  <artifactId>mybatis-spring</artifactId>
  <version>2.0.2</version>
</dependency>

<dependency>
  <groupId>com.alibaba</groupId>
  <artifactId>druid</artifactId>
  <version>1.1.18</version>
</dependency>

<dependency>
  <groupId>mysql</groupId>
  <artifactId>mysql-connector-java</artifactId>
  <version>5.1.48</version>
</dependency>

<dependency>
  <groupId>org.mybatis</groupId>
  <artifactId>mybatis</artifactId>
  <version>3.4.6</version>
</dependency>
Spring配置文件的配置
<!--连接池-->
<bean id="dataSource" class="com.alibaba.druid.pool.DruidDataSource">
  <property name="driverClassName" value="com.mysql.jdbc.Driver"></property>
  <property name="url" value="jdbc:mysql://localhost:3306/suns?useSSL=false"></property>
  <property name="username" value="root"></property>
  <property name="password" value="root"></property>
</bean>

<!--创建SqlSessionFactory SqlSessionFactoryBean-->
<bean id="sqlSessionFactoryBean" class="org.mybatis.spring.SqlSessionFactoryBean">
  <property name="dataSource" ref="dataSource"></property>
  <property name="typeAliasesPackage" value="com.baizhiedu.entity"></property>
  <property name="mapperLocations">
    <list>
      <value>classpath:com.baizhiedu.mapper/*Mapper.xml</value>
    </list>
  </property>
</bean>

<!--创建DAO对象 MapperScannerConfigure-->

<bean id="scanner" class="org.mybatis.spring.mapper.MapperScannerConfigurer">
  <property name="sqlSessionFactoryBeanName" value="sqlSessionFactoryBean"></property>
  <property name="basePackage" value="com.baizhiedu.dao"></property>
</bean>
编码
1. 实体
2. 表
3. DAO接口
4. Mapper文件配置
实体
com.yusael.entity.User
public class User implements Serializable {
    private Integer id;
    private String name;
    private String password;

    public Integer getId() {
        return id;
    }

    public void setId(Integer id) {
        this.id = id;
    }

    public String getName() {
        return name;
    }

    public void setName(String name) {
        this.name = name;
    }

    public String getPassword() {
        return password;
    }

    public void setPassword(String password) {
        this.password = password;
    }
}- 表
t_user
create table t_users values (
	id int(11) primary key auto_increment,
	name varchar(12),
	password varchar(12)
);- DAO接口
com.yusael.dao.UserDAO
public interface UserDAO {
    public void save(User user);
}- Mapper文件配置
resources/applicationContext.xml
<beans xmlns="http://www.springframework.org/schema/beans"
       xmlns:xsi="http://www.w3.org/2001/XMLSchema-instance"
       xsi:schemaLocation="http://www.springframework.org/schema/beans
                           http://www.springframework.org/schema/beans/spring-beans.xsd">
        <!--连接池-->
        <bean id="dataSource" class="com.alibaba.druid.pool.DruidDataSource">
            <property name="driverClassName" value="com.mysql.jdbc.Driver"/>
            <property name="url" value="jdbc:mysql://localhost:3306/yus?useSSL=false"/>
            <property name="username" value="root"/>
            <property name="password" value="1234"/>
        </bean>

        <!--创建SqlSessionFactory SqlSessionFactoryBean-->
        <bean id="sqlSessionFactoryBean" class="org.mybatis.spring.SqlSessionFactoryBean">
            <property name="dataSource" ref="dataSource"/>
            <property name="typeAliasesPackage" value="com.yusael.entity"/>
            <property name="mapperLocations">
                <list>
                    <value>classpath:com.yusael.dao/*Mapper.xml</value>
                </list>
            </property>
        </bean>

        <!--创建DAO对象 MapperScannerConfigure-->
        <bean id="scanner" class="org.mybatis.spring.mapper.MapperScannerConfigurer">
            <property name="sqlSessionFactoryBeanName" value="sqlSessionFactoryBean"/>
            <property name="basePackage" value="com.yusael.dao"/>
        </bean>

</beans>
UserDAOMapper.xml
<insert id="save" parameterType="User">
	insert into t_users (name,password) values (#{name},#{password})
</insert>- 测试
/**
 * 用于测试: Spring 与 Mybatis 的整合
 */
@Test
public void test() {
    ApplicationContext ctx = new ClassPathXmlApplicationContext("/applicationContext.xml");
    UserDAO userDAO = (UserDAO) ctx.getBean("userDAO");

    User user = new User();
    user.setName("xiaojr");
    user.setPassword("999999");

    userDAO.save(user);
}
2.6 Spring与Mybatis整合细节
问题:Spring 与 Myabatis 整合后,为什么 DAO 不提交事务,但是数据能够插入数据库中?
- Mybatis 提供的连接池对象 —> 创建
Connection Connection.setAutoCommit(false)手工的控制了事务,操作完成后,需要手工提交 - Druid(C3P0、DBCP)作为连接池 —> 创建
Connection Connection.setAutoCommit(true)默认值为 true,保持自动控制事务,一条 sql 自动提交
答案:因为 Spring 与 Mybatis 整合时,引入了外部连接池对象,保持自动的事务提交这个机制Connection.setAutoCommit(true),不需要手工进行事务的操作,也能进行事务的提交
注意:实战中,还是会手工控制事务(多条SQL一起成功,一起失败),后续Spring通过事务控制解决这个问题
3. Spring的事务处理
3.1 什么是事务?
保证业务操作完整性的一种数据库机制
事务的4特点: A C I D
- A 原子性
- C 一致性
- I 隔离性
- D 持久性
3.2 如何控制事务
JDBC:
    Connection.setAutoCommit(false);
    Connection.commit();
    Connection.rollback();
Mybatis:
    Mybatis自动开启事务

    sqlSession(Connection).commit();
    sqlSession(Connection).rollback();

结论:控制事务的底层 都是Connection对象完成的
3.3 Spring控制事务的开发
Spring是通过AOP的方式进行事务开发
3.3.1 原始对象
public class XXXUserServiceImpl{
   private xxxDAO xxxDAO
   set get

   1. 原始对象 ---> 原始方法 ---> 核心功能 (业务处理+DAO调用)
   2. DAO作为Service的成员变量,依赖注入的方式进行赋值
}
3.3.2 额外功能
//以下代码Spring已经封装好,通过
//org.springframework.jdbc.datasource.DataSourceTransactionManager
//需要注入连接池DataSource

1. //实现MethodInterceptor
   public Object invoke(MethodInvocation invocation){
      try{
        Connection.setAutoCommit(false);
        Object ret = invocation.proceed();
        Connection.commit();
      }catch(Exception e){
        Connection.rollback();
      }
        return ret;
   }
2. //使用注解@Aspect
   //@Around
3.3.3 切入点
@Transactional
事务的额外功能加入给那些业务方法。

1. 类上:类中所有的方法都会加入事务
2. 方法上:这个方法会加入事务
3.3.4 组装切面
1. 切入点
2. 额外功能

<tx:annotation-driven transaction-manager=""/>
3.4 Spring控制事务的编码
搭建开发环境 (jar)
<dependency>
  <groupId>org.springframework</groupId>
  <artifactId>spring-tx</artifactId>
  <version>5.1.14.RELEASE</version>
</dependency>
编码
<bean id="userService" class="com.baizhiedu.service.UserServiceImpl">
  <property name="userDAO" ref="userDAO"/>
</bean>

<!--DataSourceTransactionManager-->
<bean id="dataSourceTransactionManager" class="org.springframework.jdbc.datasource.DataSourceTransactionManager">
  <property name="dataSource" ref="dataSource"/>
</bean>


@Transactional
public class UserServiceImpl implements UserService {
    private UserDAO userDAO;

<tx:annotation-driven transaction-manager="dataSourceTransactionManager"/>
细节
<!--tx:annotation-driven要以tx结尾-->
<tx:annotation-driven transaction-manager="dataSourceTransactionManager" proxy-target-class="true"/>
进行动态代理底层实现的切换   proxy-target-class
    默认 false JDK
        true  Cglib
4. Spring中的事务属性(Transaction Attribute)
4.1 什么是事务属性
属性:描述物体特征的一系列值
性别 身高 体重 …
事务属性:描述事务特征的一系列值
- 隔离属性
- 传播属性
- 只读属性
- 超时属性
- 异常属性
4.2 如何添加事务属性
@Transactional
(isloation=,propagation=,readOnly=,timeout=,rollbackFor=,noRollbackFor=,)
4.3 事务属性详解
4.3.1 隔离属性 (ISOLATION)
隔离属性的概念
概念:他描述了事务解决并发问题的特征
1. 什么是并发
       多个事务(用户)在同一时间,访问操作了相同的数据

       同一时间:0.000几秒 微小前 微小后
2. 并发会产生那些问题
       1. 脏读
       2. 不可重复读
       3. 幻影读
3. 并发问题如何解决
       通过隔离属性解决,隔离属性中设置不同的值,解决并发处理过程中的问题。
事务并发产生的问题
脏读
一个事务,读取了另一个事务中没有提交的数据。会在本事务中产生数据不一致的问题解决方案 @Transactional(isolation=Isolation.READ_COMMITTED)
不可重复读
一个事务中,多次读取相同的数据,但是读取结果不一样。会在本事务中产生数据不一致的问题注意:1 不是脏读 2 一个事务中解决方案 @Transactional(isolation=Isolation.REPEATABLE_READ)
本质: 一把行锁幻影读
一个事务中,多次对整表进行查询统计,但是结果不一样,会在本事务中产生数据不一致的问题解决方案 @Transactional(isolation=Isolation.SERIALIZABLE)
本质:表锁总结
一个事务中,多次对整表进行查询统计,但是结果不一样,会在本事务中产生数据不一致的问题解决方案 @Transactional(isolation=Isolation.SERIALIZABLE)
本质:表锁
数据库对于隔离属性的支持
隔离属性的值 MySQL Oracle ISOLATION_READ_COMMITTED ✅ ✅ IOSLATION_REPEATABLE_READ ✅ ❎ ISOLATION_SERIALIZABLE ✅ ✅ Oracle不支持REPEATABLE_READ值 如何解决不可重复读
采用的是多版本比对的方式 解决不可重复读的问题
默认隔离属性
ISOLATION_DEFAULT:会调用不同数据库所设置的默认隔离属性

MySQL : REPEATABLE_READ
Oracle: READ_COMMITTED
查看数据库默认隔离属性
MySQL
select @@tx_isolation;Oracle
SELECT s.sid, s.serial#,
   CASE BITAND(t.flag, POWER(2, 28))
      WHEN 0 THEN 'READ COMMITTED'
      ELSE 'SERIALIZABLE'
   END AS isolation_level
FROM v$transaction t
JOIN v$session s ON t.addr = s.taddr
AND s.sid = sys_context('USERENV', 'SID');
隔离属性在实战中的建议
- 推荐使用 Spring 默认指定的
ISOLATION_DEFAULT - 未来的实战中,遇到并发访问的情况,很少见
- 如果真的遇到并发问题,解决方案:乐观锁
Hibernate(JPA):version
MyBatis:通过拦截器自定义开发
- 推荐使用 Spring 默认指定的
4.3.2 传播属性(PROPAGATION)
传播属性的概念
概念:他描述了事务解决嵌套问题的特征
什么叫做事务的嵌套:他指的是一个大的事务中,包含了若干个小的事务
问题:大事务中融入了很多小的事务,他们彼此影响,最终就会导致外部大的事务,丧失了事务的原子性
传播属性的值及其用法
| 传播属性的值 | 外部不存在事务 | 外部存在事务 | 用法 | 备注 |
|---|---|---|---|---|
| REQUIRED | 开启新的事务 | 融合到外部事务中 | @Transactional(propagation = Propagation.REQUIRED) | 增删改方法 |
| SUPPORTS | 不开启事务 | 融合到外部事务中 | @Transactional(propagation = Propagation.SUPPORTS) | 查询方法 |
| REQUIRES_NEW | 开启新的事务 | 挂起外部事务,创建新的事务 | @Transactional(propagation = Propagation.REQUIRES_NEW) | 日志记录方法中 |
| NOT_SUPPORTED | 不开启事务 | 挂起外部事务 | @Transactional(propagation = Propagation.NOT_SUPPORTED) | 及其不常用 |
| NEVER | 不开启事务 | 抛出异常 | @Transactional(propagation = Propagation.NEVER) | 及其不常用 |
| MANDATORY | 抛出异常 | 融合到外部事务中 | @Transactional(propagation = Propagation.MANDATORY) | 及其不常用 |
默认的传播属性
REQUIRED是传播属性的默认值
推荐传播属性的使用方式
增删改 方法:直接使用默认值REQUIRED 查询
查询 方法:显示指定传播属性的值为SUPPORTS
4.3.3 只读属性(readOnly)
针对于只进行查询操作的业务方法,可以加入只读属性,提供运行效率
默认值:false@Transactional(readOnly = true)
4.3.4 超时属性(timeout)
指定了事务等待的最长时间
- 为什么事务会进行等待?
当前事务访问数据时,有可能访问的数据被别的事务进行加锁的处理,那么此时本事务就必须进行等待。 - 等待时间,单位是 秒
- 如何使用:@Transactional(timeout = 2)
- 超时属性的默认值:-1
-1 表示超时属性由对应的数据库来指定(一般不会主动指定,-1 即可)
4.3.5 异常属性
Spring 事务处理过程中:
- 默认对于
RuntimeException及其子类,采用 回滚 的策略 - 默认对于
Exception及其子类,采用 提交 的策略
使用方法:
@Transactional(rollbackFor = java.lang.Exception.class, xxx, xxx)

@Transactional(noRollbackFor = java.lang.RuntimeException, xxx, xxx)
4.4 事务属性常见配置总结
- 隔离属性 默认值
- 传播属性 Required(默认值)增删改、Supports 查询操作
- 只读属性 readOnly=false 增删改,true 查询操作
- 超时属性 默认值 -1
- 异常属性 默认值
增删改操作:@Transactional
查询操作:@Transactional(propagation = Propagation.SUPPORTS, readOnly = true)
4.5 基于标签的事务配置方式(事务开发的第二种形式)
基于注解 @Transaction 的事务配置回顾:
<bean id="userService" class="com.yusael.service.UserServiceImpl">
	<property name="userDAO" ref="userDAO"/>
</bean>

<!--DataSourceTransactionManager-->
<bean id="dataSourceTransactionManager" class="org.springframework.jdbc.datasource.DataSourceTransactionManager">
	<property name="dataSource" ref="dataSource"/>
</bean>

@Transactional
public class UserServiceImpl implements UserService {
    private UserDAO userDAO;

<tx:annotation-driven transaction-manager="dataSourceTransactionManager"/>
基于标签的事务配置:
<!--DataSourceTransactionManager-->
<bean id="dataSourceTransactionManager" class="org.springframework.jdbc.datasource.DataSourceTransactionManager">
    <property name="dataSource" ref="dataSource"/>
</bean>

<!--不同点-->
<tx:advice id="txAdvice" transaction-manager="dataSourceTransactionManager">
    <tx:attributes>
        <tx:method name="register" isolation="DEFAULT" propagation="REQUIRED"/>
          <!--等效于
          @Transactional(isolation=,propagation=,)
          public void register(){

          }-->
    </tx:attributes>
</tx:advice>

<aop:config>
    <aop:pointcut id="pc" expression="execution(* com.yusael.service.UserServiceImpl.register(..))"/>
    <aop:advisor advice-ref="txAdvice" pointcut-ref="pc"/>
</aop:config>
基于标签的事务配置在 实战 中的应用方式:
<tx:advice id="txAdvice" transaction-manager="dataSourceTransactionManager">
    <tx:attributes>
       	编程时候, service中负责进行增删改操作的方法 都以 modify 开头
       	查询操作 命名无所谓
      	tx的顺序表示匹配的顺序
        <tx:method name="register"/>
        <tx:method name="modify*"/>
				除了modify*,*表示剩下的都满足...
        <tx:method name="*" propagation="SUPPORTS" read-only="true"/>
    </tx:attributes>
</tx:advice>

<aop:config>
    <aop:pointcut id="pc" expression="execution(* com.yusael.service..*.*(..))"/>
   	应用的过程中, 将 service 都放到 service 包下
    <aop:advisor advice-ref="txAdvice" pointcut-ref="pc"/>
</aop:config
5. Spring开发过程中多配置文件的处理
Spring会根据需要,把配置信息分门别类的放置在多个配置文件中,便于后续的管理及维护。

DAO  ------  applicationContext-dao.xml
Service ---  applicationContext-service.xml
Action  ---  applicationContext-action.xml

注意:虽然提供了多个配置文件,但是后续应用的过程中,还要进行整合
通配符方式
1. 非web环境
   ApplicationContext ctx = new ClassPathXmlApplicationContext("/applicationContext-*.xml");
2. web环境
   <context-param>
       <param-name>contextConfigLocation</param-name>
       <param-value>classpath:applicationContext-*.xml</param-value>
   <context-param>
<import标签
applicationContext.xml 目的 整合其他配置内容
    <import resource="applicationContext-dao.xml " />
    <import resource="applicationContext-service.xml " />
    <import resource="applicationContext-action.xml " />

1. 非web环境
   ApplicationContext ctx = new ClassPathXmlApplicationContext("/applicationContext.xml");
2. web环境
   <context-param>
       <param-name>contextConfigLocation</param-name>
       <param-value>classpath:applicationContext.xml</param-value>
   <context-param>
第五章、Spring注解编程
1. 注解基础概念
1.1 什么是注解编程
- 在 类 或者 方法 上加入特定的注解(
@xxx),完成特定功能的开发
@Component
public class XXX{}
1.2 为什么要讲解注解编程
- 注解开发方便,代码简单,开发速度大大提高
- 注解开发是 Spring 开发潮流
Spring 2.x 引入注解,Spring 3.x 完善注解,SpringBoot 普及、推广注解编程
1.3 注解的作用
替换XML这种配置形式,简化配置
替换接口,实现调用双方的契约性
通过注解的方式,在功能调用者和功能提供者之间达成约定,进而进行功能的调用。因为注解应用更为方便灵活,所以在现在的开发中,更推荐通过注解的形式,完成
1.4 Spring注解的发展历程
- Spring 2.x: 开始支持注解编程
@Component、@Service、@Scope…
目的:提供的这些注解只是为了某些 XML 的配置,作为 XML 开发的有益补充。 - Spring 3.x:
@Configuration、@Bean…
目的:彻底替换 XML,基于纯注解 - Spring 4.x: SpringBoot 提倡使用注解进行开发
1.5 Spring注解开发的一个问题
Spring基于注解进行配置后,还能否解耦合呢?
在Spring框架应用注解时,如果对注解配置的内容不满意,可以通过Spring配置文件进行覆盖的
2. Spring的基础注解(Spring2.x)
这个阶段的注解,仅仅是简化XML的配置,并不能完全替代XML
2.1 对象创建相关注解
搭建开发环境
<context:component-scan base-package="com.baizhiedu"/>

作用:让Spring框架在设置包及其子包中扫描对应的注解,使其生效。
对象创建相关注解
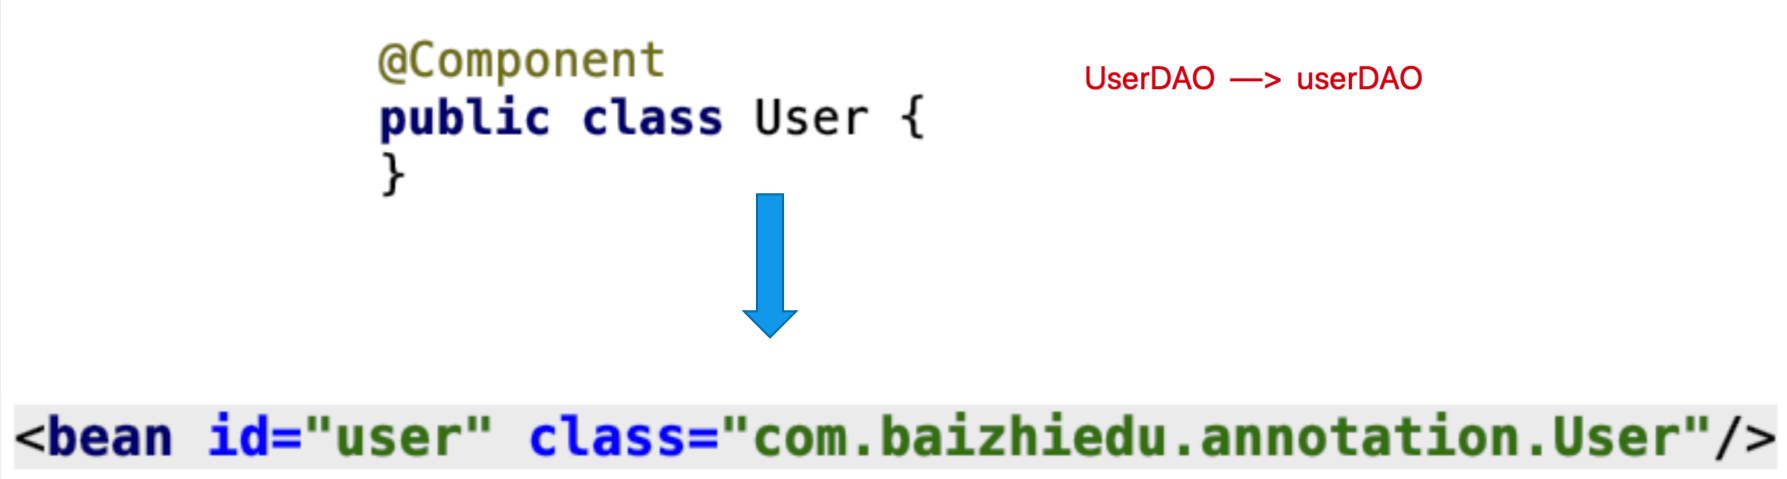
@Component注解
作用:替换原有Spring配置文件中的 <bean> 标签
id属性:在@Component中提供了默认的设置方式:首单词首字母小写(UserDAO –> userDAO)class属性:通过反射获得的class的内容
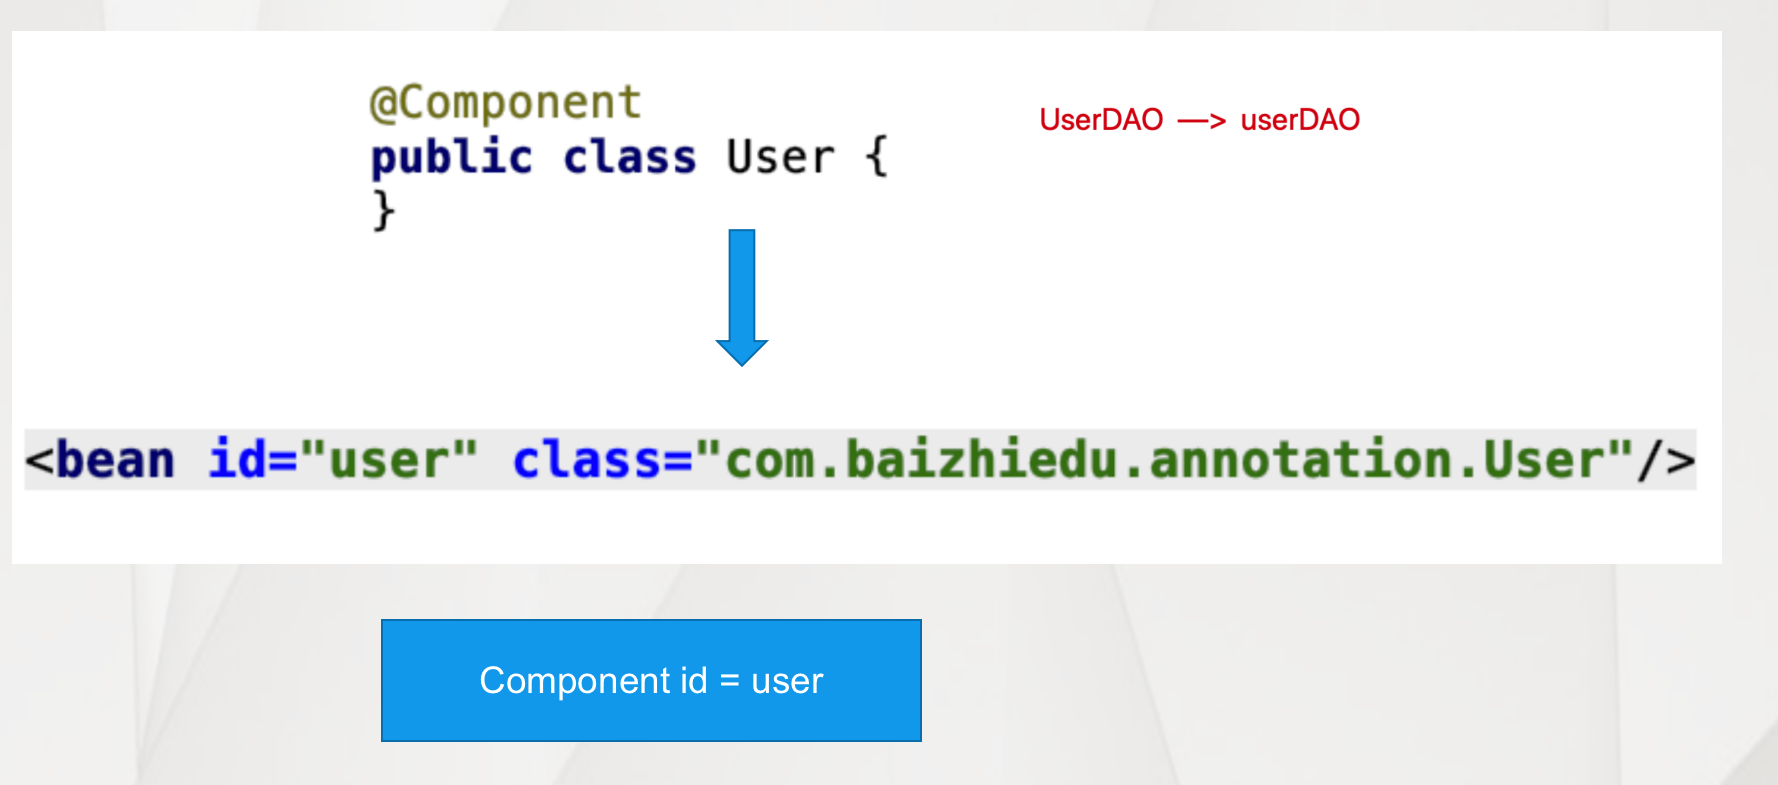
@Component 细节
如何显示指定工厂创建对象的id值
@Component("u")Spring配置文件覆盖注解配置内容
applicationContext.xml

<bean id="u" class="com.baizhiedu.bean.User"/>

id值 class的值 要和 注解中的设置保持一值
@Component的衍生注解
@Repository、@Service、@Controller都是@Component的 衍生注解- 本质上这些衍生注解就是
@Component,通过源码可以看见他们都使用了@Component,它们的存在是为了:更加准确的表达一个类型的作用
@Repository
public class UserDAO {}

@Service
public class UserService {}

@Controller
public class UserController {}
注意:Spring 整合 Mybatis 开发过程中,不使用
@Repository、@Component```JAVA
@Repository —> XXXDAO
@Repository
public class UserDAO{}
@Service
@Service
public class UserService{}
@Controller
@Controller
public class RegAction{}
注意:本质上这些衍生注解就是@Component作用 <bean 细节 @Service("s")目的:更加准确的表达一个类型的作用
注意:Spring整合Mybatis开发过程中 不使用@Repository @Component
#### `@Scope`注解

作用:控制简单对象创建次数
注意:不添加 `@Scope`,Spring 提供默认值 `singleton`

```xml
<bean id="" class="" scope="singleton|prototype"/>
// 创建单例对象
@Component
@Scope("singleton")
public class Customer {}

// 创建多例对象
@Component
@Scope("prototype")
public class Customer {}@Lazy注解
作用:延迟创建单实例对象
注意:一旦使用 @Lazy 注解后,Spring 会在使用这个对象的时候,才创建这个对象
<bean id="" class="" lazy="false"/>@Component
@Lazy
public class Account {
public Account() {
System.out.println("Account.Account");
}
}生命周期方法相关注解
初始化相关方法: @PostConstruct
InitializingBean
<bean init-method=""/>销毁方法:@PreDestory
DisposableBean
<bean destory-method=""/>
注意:
- 上述的两个注解并不是 Spring 提供的,由 JSR(JavaEE规范)520 提供
- 再次验证,通过注解实现了接口的契约性
2.2 注入相关注解
@Autowired
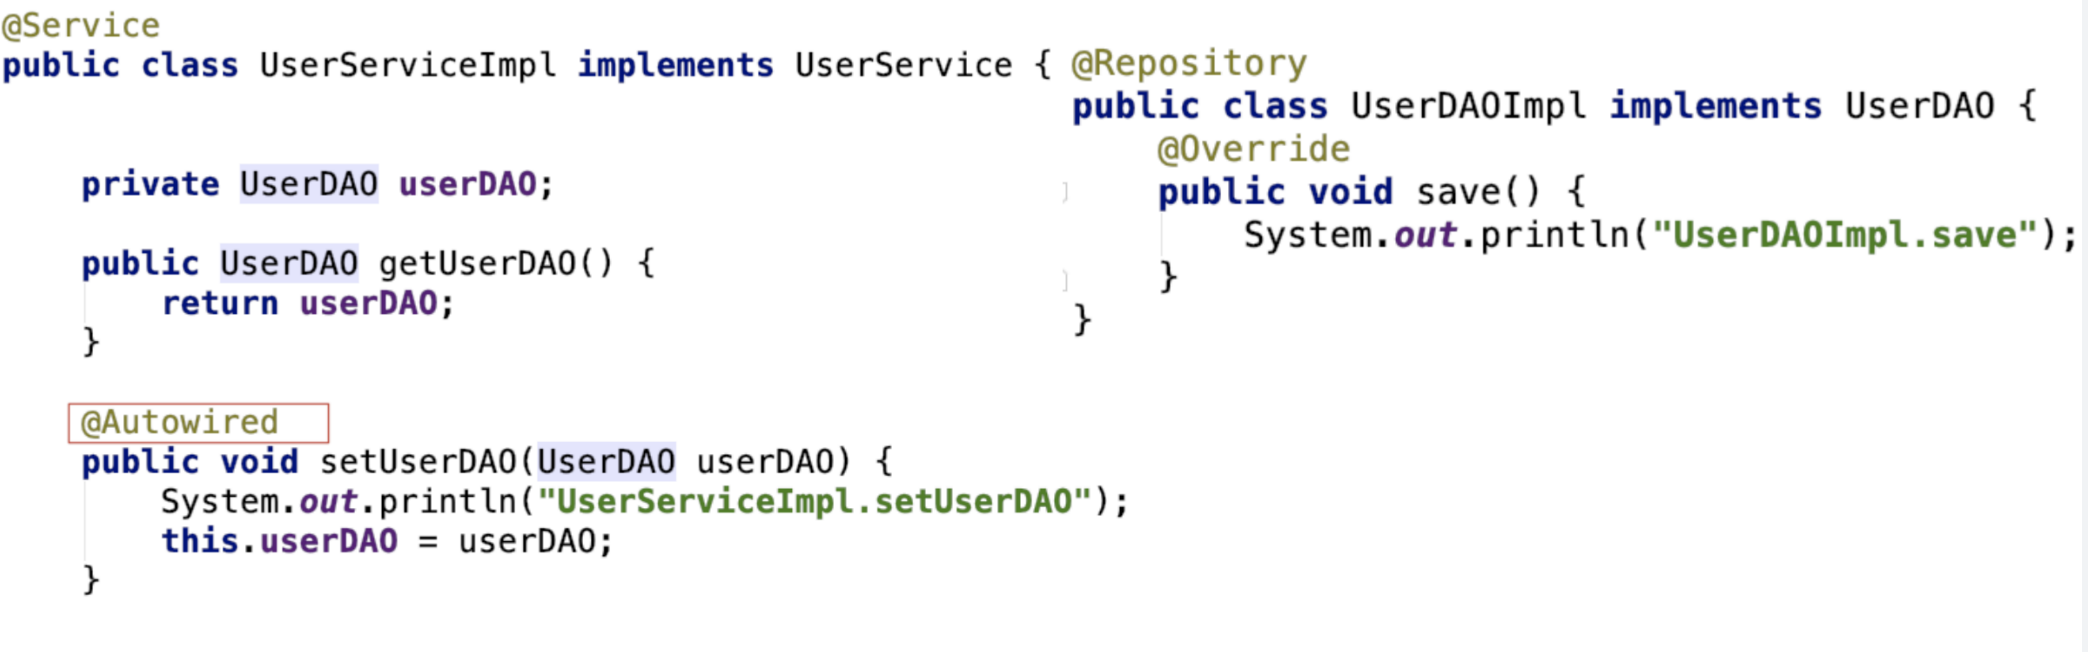
@Autowired 注解 基于类型进行注入 [推荐]:
- 注入对象的类型,必须与目标成员变量类型相同或者是其子类(实现类)
@Autowired
private UserDAO userDAO;@Autowired、@Qualifier 注解联合实现 基于名字进行注入 [了解]
- 注入对象的 id 值,必须与
@Qualifier注解中设置的名字相同
@Autowired
@Qualifier("userDAOImpl")
private UserDAO userDAO;
@Autowired 注解放置位置:
- 放置在对应成员变量的 set 方法上,调用 set 方法赋值(在 set 里写的代码会被执行)
- 直接放置在成员变量上,Spring 通过反射直接对成员变量进行赋值 [推荐]
JavaEE 规范中类似功能的注解:
- JSR250 提供的
@Resource(name="xxx")基于名字进行注入
等价于@Autowired与@Qualifier联合实现的效果
注意:@Resource注解如果名字没有配对成功,会继续 按照类型进行注入
@Resource(name="userDAOImpl")
private UserDAO userDAO;- JSR330 提供的
@Injection作用与@Autowired完全一样,一般用在 EJB3.0 中
JDK类型@value、@PropertySource
方法一:@value 注解的基本使用:
1. 设置xxx.properties
   id = 10
   name = suns
2. Spring的工厂读取这个配置文件
   <context:property-placeholder location="classpath:/xxx.properties"/>
3. 代码中进行注入
   属性 @Value("${key}")
方法二:使用 @PropertySource 取代 xml配置:
1. 设置xxx.properties
   id = 10
   name = suns
2. 在实体类上应用@PropertySource("classpath:/xx.properties")
3. 代码
   属性 @Value("${key}")
@value 注解使用细节:
@Value注解不能应用在静态成员变量上,如果使用,获取的值为 null@Value注解 + Properties 这种方式,不能注入集合类型- Spring 提供新的配置形式 YAML(YML) (更多的用于SpringBoot中)
2.3 注解扫描详解
这样配置,会扫描当前包及其子包
<context:component-scan base-package="com.baizhiedu"/>2.3.1 排除方式
<context:component-scan base-package="com.yusael">
   <context:exclude-filter type="" expression=""/>
</context:component-scan>type="xxx",xxx 有以下几个可选项:
assignable:排除特定的类型annotation:排除特定的注解aspectj:切入点表达式,比较常用
包切入点:com.yusael.bean..*
类切入点:*..Userregex:正则表达式,不常用,与切入点类似custom:自定义排除策略,常用于框架底层开发(在 SpringBoot 源码中大量使用)
排除策略可以叠加使用:
<context:component-scan base-package="com.yusael">
  <context:exclude-filter type="assignable" expression="com.yusael.bean.User"/>
  <context:exclude-filter type="aspectj" expression="com.yusael.injection..*"/>
</context:component-scan>
2.3.1 包含方式
<context:component-scan base-package="com.yusael" use-default-filters="false">
   <context:include-filter type="" expression=""/>
</context:component-scan>
与排除方式使用的区别:
use-default-filters="false"让 Spring 默认的注解扫描方式失效<context:include-filter type="" expression=""/>用于指定扫描哪些注解type="xxx"与排除方式完全一样,可以参考上面
包含策略也可以叠加使用:
<context:component-scan base-package="com.baizhiedu" use-default-filters="false">
	<context:include-filter type="annotation" expression="org.springframework.stereotype.Repository"/>
	<context:include-filter type="annotation" expression="org.springframework.stereotype.Service"/>
</context:component-scan>
2.4 对于注解开发的思考
Spring 通过注解配置,与通过xml文件进行配置是互通的
// 通过注解配置UserDAOImpl
@Repository
public class UserDAOImpl{
}

public class UserServiceImpl{
   private UserDAO userDAO;
   set
   get
}
// 通过xml配置创建userDAO对象
<bean id="userService" class="com.baizhiedu.UserServiceImpl">
   <property name="userDAO" ref="userDAOImpl"/>
</bean>
什么情况下使用注解 什么情况下使用配置文件
基础注解(@Component、@Autowired、@Value)用于程序员开发类型的配置:
- 在程序员开发的类型上,可以加入对应注解进行对象的创建
- User、UserService、UserDAO、UserAction… 这些类都很适合用注解
- 应用其他非程序员开发的类型时(框架自带的类),需要使用
<bean>标签进行配置- SqlSessionFactoryBean、MapperScannerConfigure 等 Spring 创建的类,无法使用注解
3. Spring的高级注解(Spring3.x 及以上)
3.1 配置Bean
Spring 在 3.x 提供的新的注解@Configuration,用于替换 XML 配置文件
@Configuration
public class AppConfig {
}- 配置Bean在应用的过程中 替换了XML具体什么内容呢?
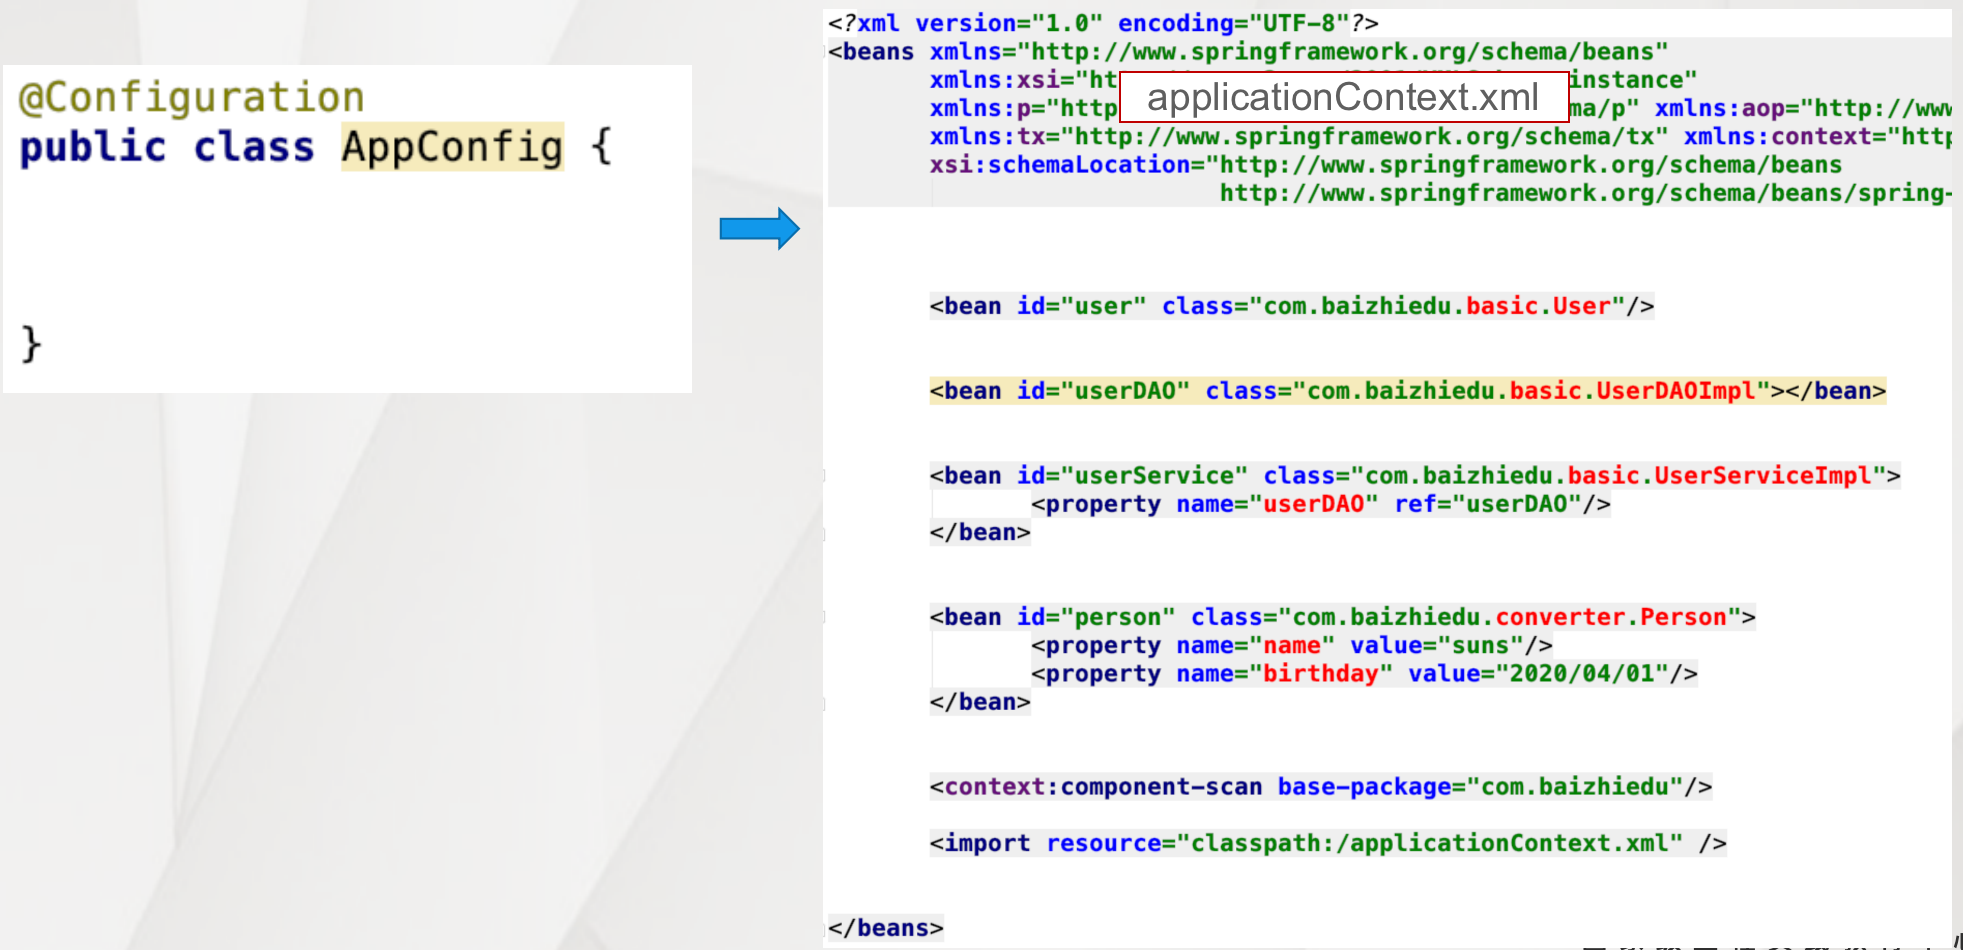
- 使用了
@Configuration后,用AnnotationConfigApplicationContext创建工厂:
方法1: 指定配置bean的Class
ApplicationContext ctx = new AnnotationConfigApplicationContext(AppConfig.class);

方法2: 指定配置bean所在的路径(某个包及其子包)
ApplicationContext ctx = new AnnotationConfigApplicationContext("com.yusael");
@Configuration 注解的本质:查看源码可知,它也是 @Component 注解的衍生注解
因此我们可以用 <context:component-scan 进行扫描,但我们不会这么做,因为注解就是为了取代 xml
配置Bean开发的细节分析
基于注解开发使用日志
Spring基于注解的开发不能集成Log4j,推荐使用集成logback,需要自己引入
引入相关jar
<dependency>
  <groupId>org.slf4j</groupId>
  <artifactId>slf4j-api</artifactId>
  <version>1.7.25</version>
</dependency>

<dependency>
  <groupId>org.slf4j</groupId>
  <artifactId>jcl-over-slf4j</artifactId>
  <version>1.7.25</version>
</dependency>

<dependency>
  <groupId>ch.qos.logback</groupId>
  <artifactId>logback-classic</artifactId>
  <version>1.2.3</version>
</dependency>

<dependency>
  <groupId>ch.qos.logback</groupId>
  <artifactId>logback-core</artifactId>
  <version>1.2.3</version>
</dependency>

<dependency>
  <groupId>org.logback-extensions</groupId>
  <artifactId>logback-ext-spring</artifactId>
  <version>0.1.4</version>
</dependency>
引入logback配置文件
(logback.xml)<?xml version="1.0" encoding="UTF-8"?> <configuration> <!-- 控制台输出 --> <appender name="STDOUT" class="ch.qos.logback.core.ConsoleAppender"> <encoder> <!--格式化输出:%d表示日期,%thread表示线程名,%-5level:级别从左显示5个字符宽度%msg:日志消息,%n是换行符--> <pattern>%d{yyyy-MM-dd HH:mm:ss.SSS} [%thread] %-5level %logger{50} - %msg%n</pattern> </encoder> </appender> <root level="DEBUG"> <appender-ref ref="STDOUT" /> </root> </configuration>
@Configuration注解的本质
本质:也是@Component注解的衍生注解
可以应用<context:component-scan进行扫描,但是实际开发不常用
3.2 @Bean注解
@Bean注解在配置bean中进行使用,等同于XML配置文件中的<bean标签
3.2.1 @Bean注解的基本使用
对象的创建
简单对象:直接能够通过 new 方式创建的对象
- User、UserService、UserDAO
复杂对象:不能通过 new 的方式直接创建的对象
- Connection、SqlSessionFactory

@Bean 注解创建复杂对象的注意事项:遗留系统整合
@Bean
public Connection conn1() {
	Connection conn = null;
	try {
		ConnectionFactoryBean factoryBean = new ConnectionFactoryBean();
		conn = factoryBean.getObject();
	} catch (Exception e) {
		e.printStackTrace();
	}
	return conn;
}
@Bean 注解创建对象,自定义 id 值
@Bean("id")@Bean 注解创建对象,控制对象创建次数
@Bean
@Scope("singleton|prototype") //默认值 singleton
3.2.2 @Bean注解的注入
用户自定义类型
@Configuration
public class AppConfig{

@Bean
public UserDAO userDAO() {
	return new UserDAOImpl();
}

@Bean
public UserService userService(UserDAO userDAO) {
	UserServiceImpl userService = new UserServiceImpl();
	userService.setUserDAO(userDAO);
	return userService;

//简化写法
@Bean
public UserService userService() {
	UserServiceImpl userService = new UserServiceImpl();
	userService.setUserDAO(userDAO());
	return userService;
}

}
JDK类型的注入
@Bean
public Customer customer() {
	Customer customer = new Customer();
	customer.setId(1);
	customer.setName("xiaohei");

	return customer;
}
JDK类型注入的细节分析
如果直接在代码中进行 set 方法的调用,会存在耦合的问题,通过配置文件解决:
@Configuration
@PropertySource("classpath:/init.properties")
public class AppConfig1 {

	@Value("${id}")
	private Integer id;
	@Value("${name}")
	private String name;

	@Bean
	public Customer customer() {
		Customer customer = new Customer();
		customer.setId(id);
		customer.setName(name);

		return customer;
	}
}
3.3 @ComponentScan注解
@ComponentScan 注解在配置 bean 中进行使用,等同于 XML 配置文件中的 <context:component-scan> 标签
目的:进行相关注解的扫描(@Component、@Value、@Autowired …)
3.3.1 基本使用
- XML 方式:
<context:component-scan base-package="com.yusael.scan"/>- 注解方式
@Configuration
@ComponentScan(basePackages = "com.yusael.scan")
public class AppConfig2 {
}
3.3.2 排除、包含的使用
排除
- XML 方式:
<context:component-scan base-package="com.yusael">
	<context:exclude-filter type="assignable" expression="com.yusael.bean.User"/>
</context:component-scan>- 注解方式:
排除特定的注解:type = FilterType.ANNOTATION, value={}
排除特定的类型:type = FilterType.ASSIGNABLE_TYPE , value={]
切入点表达式:type = FilterType.ASPECTJ, pattern=""
正则表达式:type = FilterType.REGEX, pattern=""
自定义排除策略:type = FilterType.CUSTOM, pattern=""
@ComponentScan(basePackages = "com.yusael.scan",
 excludeFilters = {@ComponentScan.Filter(type= FilterType.ANNOTATION, value={Service.class}),
                   @ComponentScan.Filter(type= FilterType.ASPECTJ, pattern = "*..User1")})
包含
- XML 方式:
<context:component-scan base-package="com.yusael" use-default-filters="false">
	<context:include-filter type="" expression=""/>
</context:component-scan>- 注解方式:参数与排除策略中一样
@ComponentScan(basePackages = "com.yusaael.scan",
useDefaultFilters = false,
includeFilters = {@ComponentScan.Filter(type= FilterType.ANNOTATION,value={Service.class})})
3.4 Spring工厂创建对象的多种配置方式
3.4.1 多种配置方式的应用场景
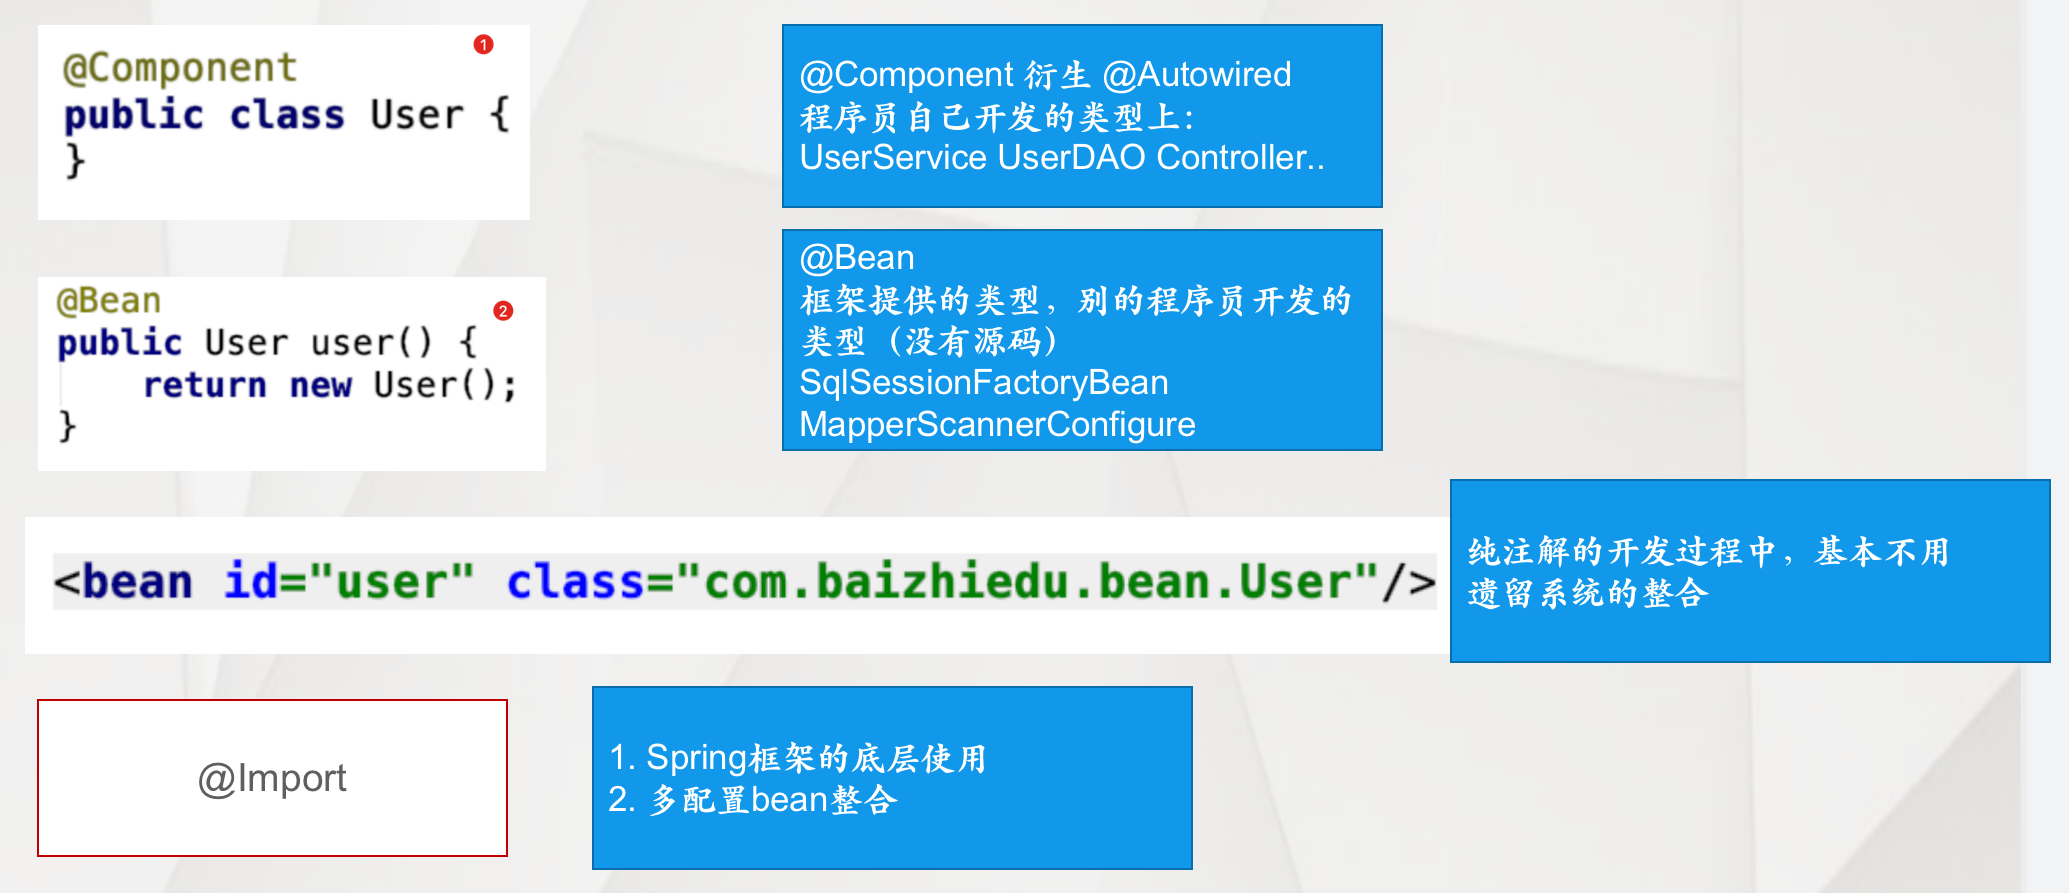
3.4.2 配置优先级
配置优先级:@Component 及其衍生注解 **<** @Bean **<** 配置文件<bean>标签
- 优先级高的配置,会覆盖优先级低配置
- 配置覆盖:id 值需要保持一致
通过配置优先级,可以解决基于注解进行配置的耦合问题:
@Configuration
//@ImportResource("applicationContext.xml")
public class AppConfig4 {

    @Bean
    public UserDAO userDAO() {
        return new UserDAOImpl();
    }
}

@Configuration
@ImportResource("applicationContext.xml")
public class AppConfig5{

}

//applicationContext.xml覆盖旧实现
<bean id="userDAO" class="com.baizhiedu.injection.UserDAOImplNew"/>
3.5 整合多个配置信息
为什么会有多个配置信息
拆分多个配置bean的开发,是一种模块化开发的形式,也体现了面向对象各司其职的设计思想
多配置信息整合的方式
- 多个配置Bean的整合
- 配置Bean与
@Component相关注解的整合 - 配置Bean与SpringXML配置文件的整合
整合多种配置需要关注那些要点
- 如何使多配置的信息汇总成一个整体
- 如何实现跨配置的注入
3.5.1. 多个配置Bean的整合
多配置的信息汇总
base-package进行多个配置Bean的整合
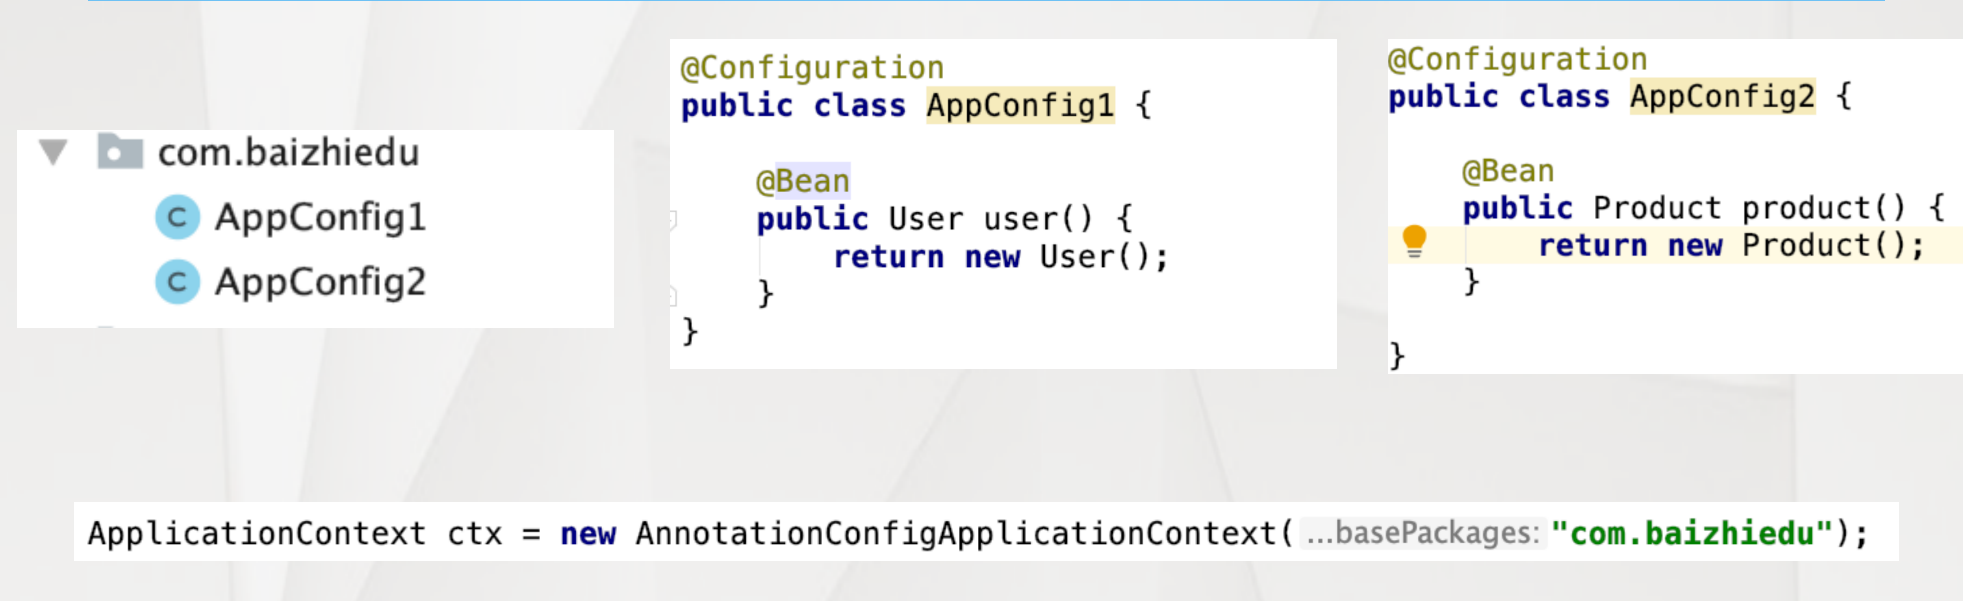
@Import- 可以创建对象
- 多配置bean的整合
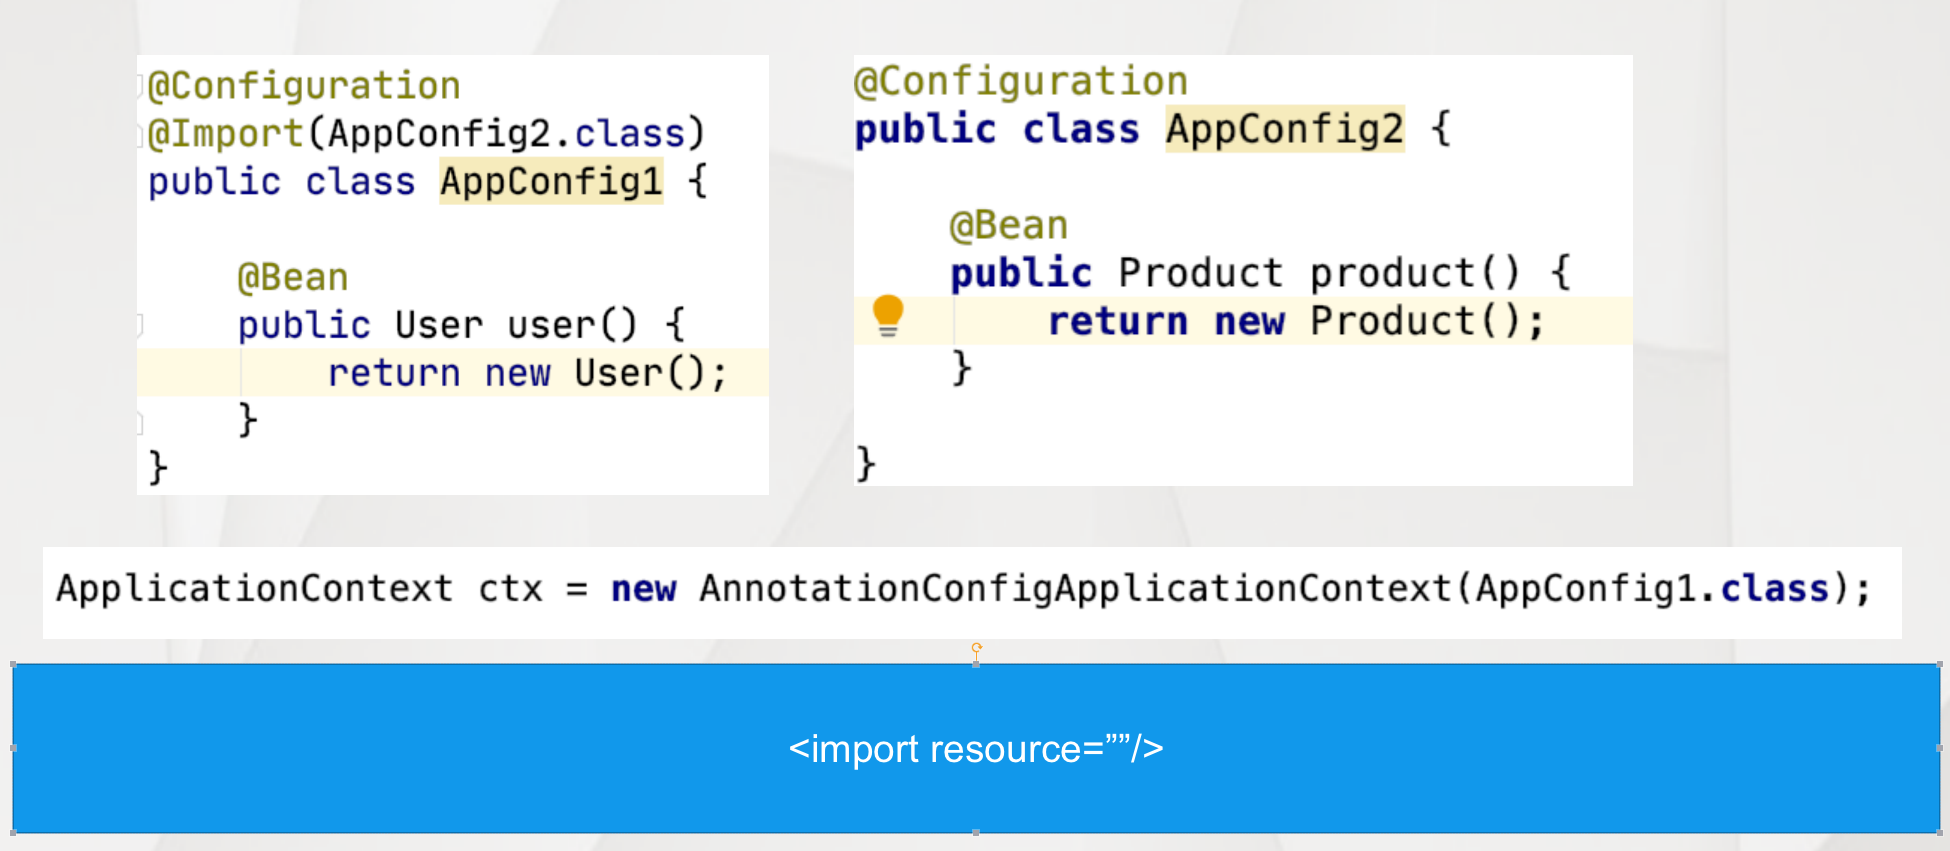
在工厂创建时,指定多个配置Bean的Class对象 【了解】
ApplicationContext ctx = new AnnotationConfigApplicationContext(AppConfig1.class,AppConfig2.class);跨配置进行注入
在应用配置 Bean 的过程中,不管使用哪种方式进行配置信息的汇总,其操作方式都是通过成员变量加入
@Autowired注解完成@Configuration @Import(AppConfig2.class) public class AppConfig1 { @Autowired private UserDAO userDAO; @Bean public UserService userService() { UserServiceImpl userService = new UserServiceImpl(); userService.setUserDAO(userDAO); return userService; } } @Configuration public class AppConfig2 { @Bean public UserDAO userDAO() { return new UserDAOImpl(); } }
3.5.2 配置Bean与@Component相关注解的整合
@Component/@Repository
public class UserDAOImpl implements UserDAO{
}

@Configuration
@ComponentScan("UserDao所在的包")
public class AppConfig3 {

    @Autowired
    private UserDAO userDAO;

    @Bean
    public UserService userService() {
        UserServiceImpl userService = new UserServiceImpl();
        userService.setUserDAO(userDAO);
        return userService;
    }
}

ApplicationContext ctx = new AnnotationConfigApplicationContext(AppConfig3.class);
3.5.3 配置Bean与配置文件整合
主要用于:
- 遗留系统的整合
- 配置覆盖
public class UserDAOImpl implements UserDAO{
}
<bean id="userDAO" class="com.baizhiedu.injection.UserDAOImpl"/>
@Configuration
@ImportResource("applicationContext.xml")
public class AppConfig4 {
@Autowired
private UserDAO userDAO;
@Bean
public UserService userService() {
UserServiceImpl userService = new UserServiceImpl();
userService.setUserDAO(userDAO);
return userService;
}
}
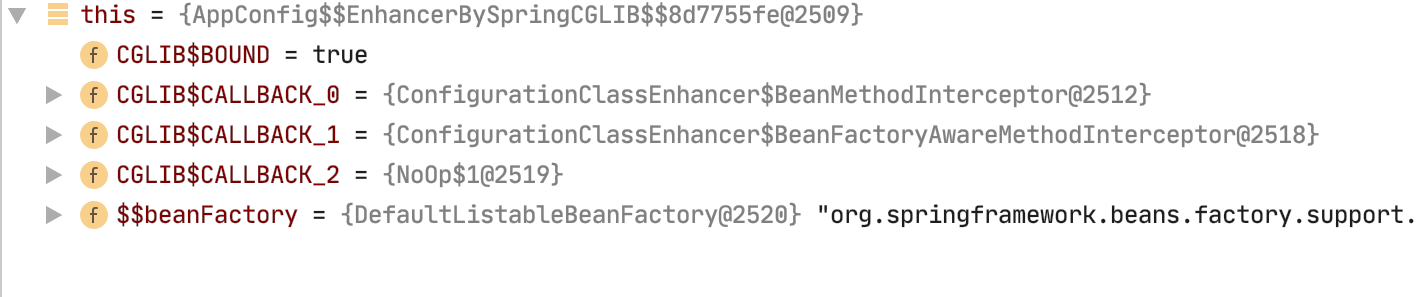
ApplicationContext ctx = new AnnotationConfigApplicationContext(AppConfig4.class);3.6 配置Bean底层实现原理
Spring 在配置 Bean 中加入了
@Configuration注解后,Spring底层就会通过AOP的方式来控制对象的创建次数,即 Cglib 的代理方式,来进行对象相关的配置、处理
4. 四维一体的开发思想
4.1 什么是四维一体
Spring开发一个功能的4种形式,虽然开发方式不同,但是最终效果是一样的
- 基于schema
- 基于特定功能注解
- 基于原始<bean
- 基于@Bean注解
4.2 四维一体的开发案例
1.<context:property-placehoder
2.@PropertySource  【推荐】
3.<bean id="" class="PropertySourcePlaceholderConfigure"/>
  <property name="location" value="classpath:xx.properties"/>
4.@Bean            【推荐】
5. 纯注解版AOP编程
5.1 搭建环境
- 应用配置Bean
- 注解扫描
5.2 开发步骤
1. 原始对象
   @Service/@Component
   public class UserServiceImpl implements UserService{

   }
2. 创建切面类 (额外功能 切入点 组装切面)
    @Aspect
    @Component
    public class MyAspect {

        @Around("execution(* login(..))")
        public Object arround(ProceedingJoinPoint joinPoint) throws Throwable {
            System.out.println("----aspect log ------");
            Object ret = joinPoint.proceed();
            return ret;
        }
    }
3. Spring的配置文件中
   <aop:aspectj-autoproxy />
   @EnableAspectjAutoProxy ---> 配置Bean
5.3 注解AOP细节分析
1. 代理创建方式的切换 JDK Cglib
   <aop:aspectj-autoproxy proxy-target-class=true|false />
   @EnableAspectjAutoProxy(proxyTargetClass = "true|false")
2. SpringBoot AOP的开发方式
     @EnableAspectjAutoProxy 已经设置好了

    1. 原始对象
     @Service(@Component)
     public class UserServiceImpl implements UserService{

     }
    2. 创建切面类 (额外功能 切入点 组装切面)
      @Aspect
      @Component
      public class MyAspect {

        @Around("execution(* login(..))")
        public Object arround(ProceedingJoinPoint joinPoint) throws Throwable {
          System.out.println("----aspect log ------");
          Object ret = joinPoint.proceed();
          return ret;
        }
      }
//Spring AOP 代理默认实现 JDK  SpringBOOT AOP 代理默认实现 Cglib
5.4 纯注解版Spring+MyBatis整合
基础配置 (配置Bean)
1. 连接池
  <!--连接池-->
  <bean id="dataSource" class="com.alibaba.druid.pool.DruidDataSource">
    <property name="driverClassName" value="com.mysql.jdbc.Driver"></property>
    <property name="url" value="jdbc:mysql://localhost:3306/suns?useSSL=false"></property>
    <property name="username" value="root"></property>
    <property name="password" value="123456"></property>
  </bean>

   @Bean
   public DataSource dataSource(){
      DruidDataSource dataSource = new DruidDataSource();
      dataSource.setDriverClassName("");
      dataSource.setUrl();
      ...
      return dataSource;
   }

2. SqlSessionFactoryBean
    <!--创建SqlSessionFactory SqlSessionFactoryBean-->
    <bean id="sqlSessionFactoryBean" class="org.mybatis.spring.SqlSessionFactoryBean">
      <property name="dataSource" ref="dataSource"></property>
      <property name="typeAliasesPackage" value="com.baizhiedu.entity"></property>
      <property name="mapperLocations">
        <list>
          <value>classpath:com.baizhiedu.mapper/*Mapper.xml</value>
        </list>
      </property>
    </bean>

    @Bean
    public SqlSessionFactoryBean sqlSessionFactoryBean(DataSource dataSource){
         SqlSessionFactoryBean sqlSessionFactoryBean = new SqlSessionFactoryBean();
         sqlSessionFactoryBean.setDataSource(dataSource);
         sqlSessionFactoryBean.setTypeAliasesPackage("");
         ...
         return sqlSessionFactoryBean;
    }

3. MapperScannerConfigure
   <!--创建DAO对象 MapperScannerConfigure-->
  <bean id="scanner" class="org.mybatis.spring.mapper.MapperScannerConfigurer">
    <property name="sqlSessionFactoryBeanName" value="sqlSessionFactoryBean"></property>
    <property name="basePackage" value="com.baizhiedu.dao"></property>
  </bean>

  @MapperScan(basePackages={"com.baizhiedu.dao"}) ---> 配置bean完成
编码
- 实体
- 表
- DAO接口
- Mapper文件
5.4.1 MapperLocations编码时通配的写法
//设置Mapper文件的路径
sqlSessionFactoryBean.setMapperLocations(Resource..);
Resource resouce = new ClassPathResouce("UserDAOMapper.xml")

sqlSessionFactoryBean.setMapperLocations(new ClassPathResource("UserDAOMapper.xml"));

<property name="mapperLocations">
   <list>
     <value>classpath:com.baizhiedu.mapper/*Mapper.xml</value>
   </list>
</property>
//传入的是一组Mapper文件,不适用上面setMapperLocations的方式
更好的写法
ResourcePatternResolver resolver = new PathMatchingResourcePatternResolver();
Resource[] resources = resolver.getResources("com.baizhi.mapper/*Mapper.xml");
sqlSessionFactoryBean.setMapperLocations(resources)
5.4.2 配置Bean数据耦合的问题
mybatis.driverClassName = com.mysql.jdbc.Driver
mybatis.url = jdbc:mysql://localhost:3306/suns?useSSL=false
mybatis.username = root
mybatis.password = 123456
mybatis.typeAliasesPackages = com.baizhiedu.mybatis
mybatis.mapperLocations = com.baizhiedu.mapper/*Mapper.xml
@Component
@PropertySource("classpath:mybatis.properties")
public class MybatisProperties {
@Value("${mybatis.driverClassName}")
private String driverClassName;
@Value("${mybatis.url}")
private String url;
@Value("${mybatis.username}")
private String username;
@Value("${mybatis.password}")
private String password;
@Value("${mybatis.typeAliasesPackages}")
private String typeAliasesPackages;
@Value("${mybatis.mapperLocations}")
private String mapperLocations;
}
public class MyBatisAutoConfiguration {
@Autowired
private MybatisProperties mybatisProperties;
@Bean
public DataSource dataSource() {
DruidDataSource dataSource = new DruidDataSource();
dataSource.setDriverClassName(mybatisProperties.getDriverClassName());
dataSource.setUrl(mybatisProperties.getUrl());
dataSource.setUsername(mybatisProperties.getUsername());
dataSource.setPassword(mybatisProperties.getPassword());
return dataSource;
}
@Bean
public SqlSessionFactoryBean sqlSessionFactoryBean(DataSource dataSource) {
SqlSessionFactoryBean sqlSessionFactoryBean = new SqlSessionFactoryBean();
sqlSessionFactoryBean.setDataSource(dataSource);
sqlSessionFactoryBean.setTypeAliasesPackage(mybatisProperties.getTypeAliasesPackages(""));
//sqlSessionFactoryBean.setMapperLocations(new ClassPathResource("UserDAOMapper.xml"));
try {
ResourcePatternResolver resolver = new PathMatchingResourcePatternResolver();
Resource[] resources = resolver.getResources(mybatisProperties.getMapperLocations());
sqlSessionFactoryBean.setMapperLocations(resources);
} catch (IOException e) {
e.printStackTrace();
}
return sqlSessionFactoryBean;
}
}6. 纯注解版事务编程
1. 原始对象 XXXService
   <bean id="userService" class="com.baizhiedu.service.UserServiceImpl">
     <property name="userDAO" ref="userDAO"/>
   </bean>

   @Service
   public class UserServiceImpl implements UserService{
         @Autowired
         private UserDAO userDAO;
   }

2. 额外功能
   <!--DataSourceTransactionManager-->
    <bean id="dataSourceTransactionManager" class="org.springframework.jdbc.datasource.DataSourceTransactionManager">
      <property name="dataSource" ref="dataSource"/>
    </bean>

    @Bean
    public DataSourceTransactionManager dataSourceTransactionManager(DataSource dataSource){
          DataSourceTransactionManager dstm = new DataSourceTransactionManager();
          dstm.setDataSource(dataSource);
          return dstm;
    }

3. 事务属性
    @Transactional
    @Service
    public class UserServiceImpl implements UserService {
        @Autowired
        private UserDAO userDAO;

4. 基于Schema的事务配置
   <tx:annotation-driven transaction-manager="dataSourceTransactionManager"/>
   @EnableTransactionManager ---> 配置Bean
1. ApplicationContext ctx = new AnnotationConfigApplicationContext("com.baizhiedu.mybatis");
SpringBoot 实现思想
2. 注解版MVC整合,SpringMVC中进行详细讲解
SpringMyBatis --->DAO 事务基于注解 --> Service Controller
org.springframework.web.context.ContextLoaderListener ---> XML工厂 无法提供 new AnnotationConfigApplicationContext7. Spring框架中YML的使用
7.1 什么是YML
YML(YAML) 是一种新形式的配置文件,比 XML 更简单,比 Properties 更强大
7.2 Properties进行配置问题
- Properties 表达过于繁琐,无法表达数据的内在联系
- Properties 无法表达对象、集合类型
7.3 YML语法简介
1. 定义yml文件
   xxx.yml xxx.yaml
2. 语法
   1. 基本语法
      name: suns
      password: 123456
   2. 对象概念
      account:
         id: 1
         password: 123456
   3. 定义集合
      service:
         - 11111
         - 22222
7.4 Spring与YML集成思路的分析
1. 准备yml配置文件
   init.yml
   name: suns
   password: 123456
2. 读取yml 转换成 Properties
   YamlPropertiesFactoryBean.setResources( yml配置文件的路径 new ClassPathResource();)
   YamlPropertiesFactoryBean.getObject() ---> Properties
3. 应用PropertySourcesPlaceholderConfigurer
   PropertySourcesPlaceholderConfigurer.setProperties();
4. 类中 @Value注解 注入
7.5 Spring与YML集成编码
环境搭建
<dependency>
  <groupId>org.yaml</groupId>
  <artifactId>snakeyaml</artifactId>
  <version>1.23</version>
</dependency>
最低版本 1.18
编码
//1. 准备yml配置文件
//2. 配置Bean中操作 完成YAML读取 与 PropertySourcePlaceholderConfigure的创建
    @Bean
    public PropertySourcesPlaceholderConfigurer configurer() {
YamlPropertiesFactoryBean yamlPropertiesFactoryBean = new YamlPropertiesFactoryBean();
      	//读取
        yamlPropertiesFactoryBean.setResources(new ClassPathResource("init.yml"));
        Properties properties = yamlPropertiesFactoryBean.getObject();
      	//创建好集合
PropertySourcesPlaceholderConfigurer configurer = new PropertySourcesPlaceholderConfigurer();
        configurer.setProperties(properties);
        return configurer;
    }
//3. 类 加入 @Value注解
7.6 Spring与YML集成的问题
1. 集合处理的问题
   SpringEL表达式解决
   list:111,222,333
   @Value("#{'${list}'.split(',')}")
2. 对象类型的YAML进行配置时 过于繁琐
   @Value("${account.name}")

# SpringBoot解决了以上两个问题,利用@ConfigurationProperties
第六章、SpringMVC
1. 简介
Spring Web MVC 是一种基于 Java 的实现了 Web MVC 设计模式的请求驱动类型的轻量级 Web 框架,即使用了 MVC 架构模式的思想,将 web 层进行职责解耦,基于请求驱动指的就是使用请求-响应模型,框架的目的就是帮助我们简化开发,Spring Web MVC 也是要简化我们日常 Web 开发的。在 传统的 Jsp/Servlet 技术体系中,如果要开发接口,一个接口对应一个 Servlet,会导致我们开发出许多 Servlet,使用 SpringMVC 可以有效的简化这一步骤
Spring Web MVC 也是服务到工作者模式的实现,但进行可优化。前端控制器是
DispatcherServlet;应用控制器可以拆为处理器映射器(Handler Mapping)进行处理器管理和视图解析器(View Resolver)进行视图管理;页面控制器/动作/处理器为 Controller 接口(仅包含ModelAndView handleRequest(request, response) 方法,也有人称作 Handler)的实现(也可以是任何的 POJO 类);支持本地化(Locale)解析、主题(Theme)解析及文件上传等;提供了非常灵活的数据验证、格式化和数据绑定机制;提供了强大的约定大于配置(惯例优先原则)的契约式编程支持
Spring Web MVC能帮我们做什么
- 让我们能非常简单的设计出干净的 Web 层和薄薄的 Web 层;
- 进行更简洁的 Web 层的开发;
- 天生与 Spring 框架集成(如 IoC 容器、AOP 等);
- 提供强大的约定大于配置的契约式编程支持;
- 能简单的进行 Web 层的单元测试;
- 支持灵活的 URL 到页面控制器的映射;
- 非常容易与其他视图技术集成,如 Velocity、FreeMarker 等等,因为模型数据不放在特定的 API 里,而是放在一个 Model 里(Map 数据结构实现,因此很容易被其他框架使用);
- 非常灵活的数据验证、格式化和数据绑定机制,能使用任何对象进行数据绑定,不必实现特定框架的 API;
- 提供一套强大的 JSP 标签库,简化 JSP 开发;
- 支持灵活的本地化、主题等解析;
- 更加简单的异常处理;
- 对静态资源的支持;
- 支持 RESTful 风格
2. HelloWorld
- 在
pom.xml文件中,添加 spring-webmvc 的依赖:
<dependencies>
    <dependency>
        <groupId>org.springframework</groupId>
        <artifactId>spring-webmvc</artifactId>
        <version>RELEASE</version>
    </dependency>
    <dependency>
        <groupId>javax.servlet</groupId>
        <artifactId>javax.servlet-api</artifactId>
        <version>4.0.1</version>
    </dependency>
    <dependency>
        <groupId>javax.servlet.jsp</groupId>
        <artifactId>javax.servlet.jsp-api</artifactId>
        <version>2.3.3</version>
    </dependency>
</dependencies>
添加 spring-webmvc 依赖之后,spring-web、spring-aop、spring-context等等就全部都加入进来了
- 准备一个 Controller,即一个处理浏览器请求的接口。
public class MyController implements Controller {
    /**
     * 这就是一个请求处理接口
     * @param req 这就是前端发送来的请求
     * @param resp 这就是服务端给前端的响应
     * @return 返回值是一个 ModelAndView,Model 相当于是我们的数据模型,View 是我们的视图
     * @throws Exception
     */
    public ModelAndView handleRequest(HttpServletRequest req, HttpServletResponse resp) throws Exception {
        ModelAndView mv = new ModelAndView("hello");
        mv.addObject("name", "javaboy");
        return mv;
    }
}
这里我们我们创建出来的 Controller 就是前端请求处理接口
- 创建视图
这里我们就采用 jsp 作为视图,在 webapp 目录下创建hello.jsp文件,内容如下:
<%@ page contentType="text/html;charset=UTF-8" language="java" %>
<html>
<head>
    <title>Title</title>
</head>
<body>
<h1>hello ${name}!</h1>
</body>
</html>- 在
resources目录下,创建一个名为spring-servlet.xml的 springmvc 的配置文件,这里,我们先写一个简单的 demo ,因此可以先不用添加 spring 的配置
<?xml version="1.0" encoding="UTF-8"?>
<beans xmlns="http://www.springframework.org/schema/beans"
       xmlns:xsi="http://www.w3.org/2001/XMLSchema-instance"
       xsi:schemaLocation="http://www.springframework.org/schema/beans http://www.springframework.org/schema/beans/spring-beans.xsd">
		 <!--MyController实例-->
    <bean class="org.javaboy.helloworld.MyController" name="/hello"/>
    <!--这个是处理器映射器,这种方式,请求地址其实就是一个 Bean 的名字,然后根据这个 bean 的名字查找对应的处理器-->
    <bean class="org.springframework.web.servlet.handler.BeanNameUrlHandlerMapping" id="handlerMapping">
        <property name="beanName" value="/hello"/>
    </bean>
   <!--处理适配器-->
    <bean class="org.springframework.web.servlet.mvc.SimpleControllerHandlerAdapter" id="handlerAdapter"/>
    <!--视图解析器-->
    <bean class="org.springframework.web.servlet.view.InternalResourceViewResolver" id="viewResolver">
        <property name="prefix" value="/jsp/"/>
        <property name="suffix" value=".jsp"/>
    </bean>
</beans>- 加载 springmvc 配置文件
在 web 项目启动时,加载 springmvc 配置文件,这个配置是在 web.xml中完成的。
<?xml version="1.0" encoding="UTF-8"?>
<web-app xmlns="http://xmlns.jcp.org/xml/ns/javaee"
         xmlns:xsi="http://www.w3.org/2001/XMLSchema-instance"
         xsi:schemaLocation="http://xmlns.jcp.org/xml/ns/javaee http://xmlns.jcp.org/xml/ns/javaee/web-app_4_0.xsd"
         version="4.0">
    <servlet>
        <servlet-name>springmvc</servlet-name>
        <servlet-class>org.springframework.web.servlet.DispatcherServlet</servlet-class>
        <init-param>
            <param-name>contextConfigLocation</param-name>
            <param-value>classpath:spring-servlet.xml</param-value>
        </init-param>
    </servlet>
    <servlet-mapping>
        <servlet-name>springmvc</servlet-name>
        <url-pattern>/</url-pattern>
    </servlet-mapping>
</web-app>
所有请求都将自动拦截下来,拦截下来后,请求交给 DispatcherServlet 去处理,在加载 DispatcherServlet 时,还需要指定配置文件路径。这里有一个默认的规则,如果配置文件放在 webapp/WEB-INF/ 目录下,并且配置文件的名字等于 DispatcherServlet 的名字+ -servlet(即这里的配置文件路径是 webapp/WEB-INF/springmvc-servlet.xml),如果是这样的话,可以不用添加 init-param 参数,即不用手动配置 springmvc 的配置文件,框架会自动加载
配置并启动项目
项目启动成功后,浏览器输入 http://localhost:8080/hello 就可以看到如下页面:
3. SpringMVC 工作流程
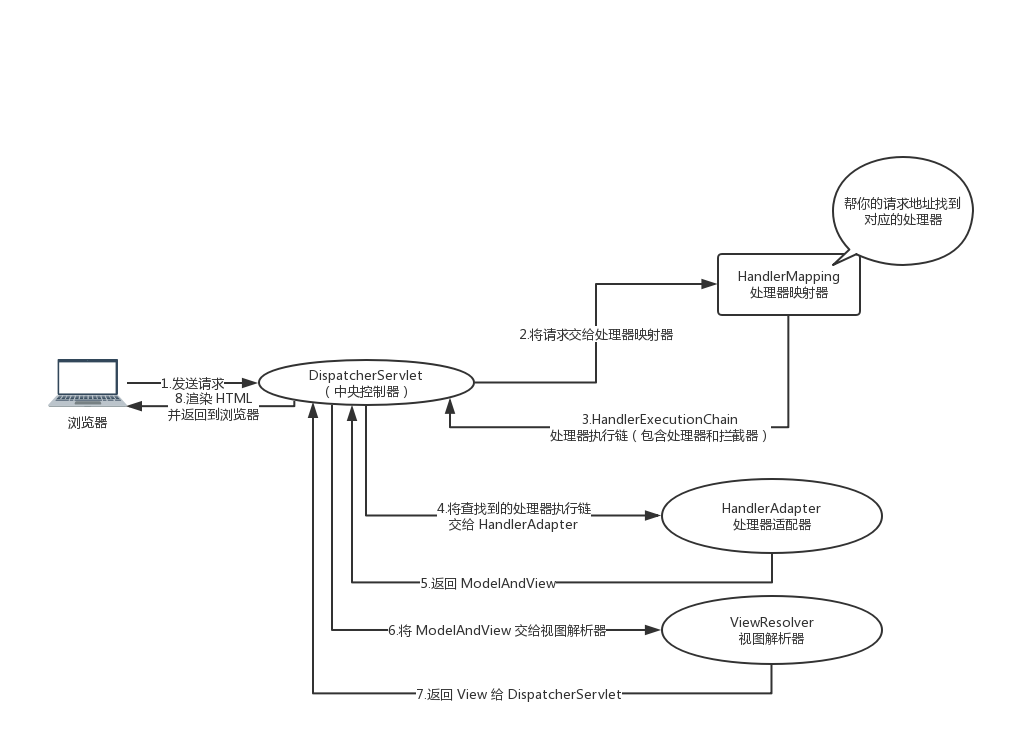
DispatcherServlet:前端控制器
用户请求到达前端控制器,它就相当于 mvc 模式中的c,DispatcherServlet 是整个流程控制的中心,相当于是 SpringMVC 的大脑,由它调用其它组件处理用户的请求,DispatcherServlet 的存在降低了组件之间的耦合性。
HandlerMapping:处理器映射器
HandlerMapping 负责根据用户请求找到 Handler 即处理器(也就是我们所说的 Controller),SpringMVC 提供了不同的映射器实现不同的映射方式,例如:配置文件方式,实现接口方式,注解方式等,在实际开发中,我们常用的方式是注解方式。
Handler:处理器
Handler 是继 DispatcherServlet 前端控制器的后端控制器,在DispatcherServlet 的控制下 Handler 对具体的用户请求进行处理。由于 Handler 涉及到具体的用户业务请求,所以一般情况需要程序员根据业务需求开发 Handler。(这里所说的 Handler 就是指我们的 Controller)
HandlAdapter:处理器适配器
通过 HandlerAdapter 对处理器进行执行,这是适配器模式的应用,通过扩展适配器可以对更多类型的处理器进行执行。
ViewResolver:视图解析器
ViewResolver 负责将处理结果生成 View 视图,ViewResolver 首先根据逻辑视图名解析成物理视图名即具体的页面地址,再生成 View 视图对象,最后对 View 进行渲染将处理结果通过页面展示给用户。 SpringMVC 框架提供了很多的 View 视图类型,包括:jstlView、freemarkerView、pdfView 等。一般情况下需要通过页面标签或页面模版技术将模型数据通过页面展示给用户,需要由程序员根据业务需求开发具体的页面。
4. DispatcherServlet
4.1 DispatcherServlet作用
DispatcherServlet 是前端控制器设计模式的实现,提供 Spring Web MVC 的集中访问点,而且负责职责的分派,而且与 Spring IoC 容器无缝集成,从而可以获得 Spring 的所有好处。DispatcherServlet 主要用作职责调度工作,本身主要用于控制流程,主要职责如下:
- 文件上传解析,如果请求类型是
multipart将通过MultipartResolver进行文件上传解析; - 通过
HandlerMapping,将请求映射到处理器(返回一个HandlerExecutionChain,它包括一个处理器、多个HandlerInterceptor拦截器); - 通过
HandlerAdapter支持多种类型的处理器(HandlerExecutionChain中的处理器); - 通过
ViewResolver解析逻辑视图名到具体视图实现; - 本地化解析;
- 渲染具体的视图等;
- 如果执行过程中遇到异常将交给
HandlerExceptionResolver来解析
4.2 DispathcherServlet配置详解
<servlet>
    <servlet-name>springmvc</servlet-name>
    <servlet-class>org.springframework.web.servlet.DispatcherServlet</servlet-class>
    <init-param>
        <param-name>contextConfigLocation</param-name>
        <param-value>classpath:spring-servlet.xml</param-value>
    </init-param>
    <load-on-startup>1</load-on-startup>
</servlet>
<servlet-mapping>
    <servlet-name>springmvc</servlet-name>
    <url-pattern>/</url-pattern>
</servlet-mapping>load-on-startup:表示启动容器时初始化该 Servlet;url-pattern:表示哪些请求交给 Spring Web MVC 处理, “/” 是用来定义默认 servlet 映射的。也可以如*.html表示拦截所有以 html 为扩展名的请求contextConfigLocation:表示 SpringMVC 配置文件的路径
其他的参数配置:
| 参数 | 描述 |
|---|---|
| contextClass | 实现WebApplicationContext接口的类,当前的servlet用它来创建上下文。如果这个参数没有指定, 默认使用XmlWebApplicationContext。 |
| contextConfigLocation | 传给上下文实例(由contextClass指定)的字符串,用来指定上下文的位置。这个字符串可以被分成多个字符串(使用逗号作为分隔符) 来支持多个上下文(在多上下文的情况下,如果同一个bean被定义两次,后面一个优先)。 |
| namespace | WebApplicationContext命名空间。默认值是[server-name]-servlet。 |
4.3 Spring 配置
之前的案例中,只有 SpringMVC,没有 Spring,Web 项目也是可以运行的。在实际开发中,Spring 和 SpringMVC 是分开配置的,所以我们对上面的项目继续进行完善,添加 Spring 相关配置。
首先,项目添加一个 service 包,提供一个 HelloService 类,如下:
@Service
public class HelloService {
    public String hello(String name) {
        return "hello " + name;
    }
}
现在,假设我需要将 HelloService 注入到 Spring 容器中并使用它,这个是属于 Spring 层的 Bean,所以我们一般将除了 Controller 之外的所有 Bean 注册到 Spring 容器中,而将 Controller 注册到 SpringMVC 容器中,现在,在 resources 目录下添加 applicationContext.xml 作为 spring 的配置:
<?xml version="1.0" encoding="UTF-8"?>
<beans xmlns="http://www.springframework.org/schema/beans"
       xmlns:xsi="http://www.w3.org/2001/XMLSchema-instance"
       xmlns:context="http://www.springframework.org/schema/context"
       xsi:schemaLocation="http://www.springframework.org/schema/beans http://www.springframework.org/schema/beans/spring-beans.xsd http://www.springframework.org/schema/context https://www.springframework.org/schema/context/spring-context.xsd">

    <context:component-scan base-package="org.javaboy" use-default-filters="true">
        <context:exclude-filter type="annotation" expression="org.springframework.stereotype.Controller"/>
    </context:component-scan>
</beans>
但是,这个配置文件,默认情况下,并不会被自动加载,所以,需要我们在 web.xml 中对其进行配置:
<context-param>
    <param-name>contextConfigLocation</param-name>
    <param-value>classpath:applicationContext.xml</param-value>
</context-param>
<listener>
    <listener-class>org.springframework.web.context.ContextLoaderListener</listener-class>
</listener>
首先通过 context-param 指定 Spring 配置文件的位置,这个配置文件也有一些默认规则,它的配置文件名默认就叫 applicationContext.xml ,并且,如果你将这个配置文件放在 WEB-INF 目录下,那么这里就可以不用指定配置文件位置了,只需要指定监听器就可以了。这段配置是 Spring 集成 Web 环境的通用配置;一般用于加载除 Web 层的 Bean(如DAO、Service 等),以便于与其他任何Web框架集成。
contextConfigLocation:表示用于加载 Bean 的配置文件;contextClass:表示用于加载 Bean 的ApplicationContext实现类,默认WebApplicationContext
配置完成之后,还需要修改 MyController,在 MyController 中注入 HelloSerivce:
@org.springframework.stereotype.Controller("/hello")
public class MyController implements Controller {
    @Autowired
    HelloService helloService;
    /**
     * 这就是一个请求处理接口
     * @param req 这就是前端发送来的请求
     * @param resp 这就是服务端给前端的响应
     * @return 返回值是一个 ModelAndView,Model 相当于是我们的数据模型,View 是我们的视图
     * @throws Exception
     */
    public ModelAndView handleRequest(HttpServletRequest req, HttpServletResponse resp) throws Exception {
        System.out.println(helloService.hello("javaboy"));
        ModelAndView mv = new ModelAndView("hello");
        mv.addObject("name", "javaboy");
        return mv;
    }
}
注意
为了在 SpringMVC 容器中能够扫描到 MyController ,这里给 MyController 添加了 @Controller 注解,同时,由于我们目前采用的HandlerMapping是 BeanNameUrlHandlerMapping(意味着请求地址就是处理器 Bean 的名字),所以,还需要手动指定MyController的名字。
最后,修改 SpringMVC 的配置文件,将 Bean 配置为扫描形式:
<!--只扫描Controller-->
<context:component-scan base-package="org.javaboy.helloworld" use-default-filters="false">
    <context:include-filter type="annotation" expression="org.springframework.stereotype.Controller"/>
</context:component-scan>


<bean class="org.springframework.web.servlet.handler.BeanNameUrlHandlerMapping" id="handlerMapping">
    <property name="beanName" value="/hello"/>
</bean>
<bean class="org.springframework.web.servlet.mvc.SimpleControllerHandlerAdapter" id="handlerAdapter"/>
<!--视图解析器-->
<bean class="org.springframework.web.servlet.view.InternalResourceViewResolver" id="viewResolver">
    <property name="prefix" value="/jsp/"/>
    <property name="suffix" value=".jsp"/>
</bean>
配置完成后,再次启动项目,Spring 容器也将会被创建。访问 /hello 接口,HelloService 中的 hello 方法就会自动被调用
4.4 两个容器
当 Spring 和 SpringMVC 同时出现,我们的项目中将存在两个容器,一个是 Spring 容器,另一个是 SpringMVC 容器,Spring 容器通过 ContextLoaderListener 来加载,SpringMVC 容器则通过 DispatcherServlet 来加载,这两个容器不一样:
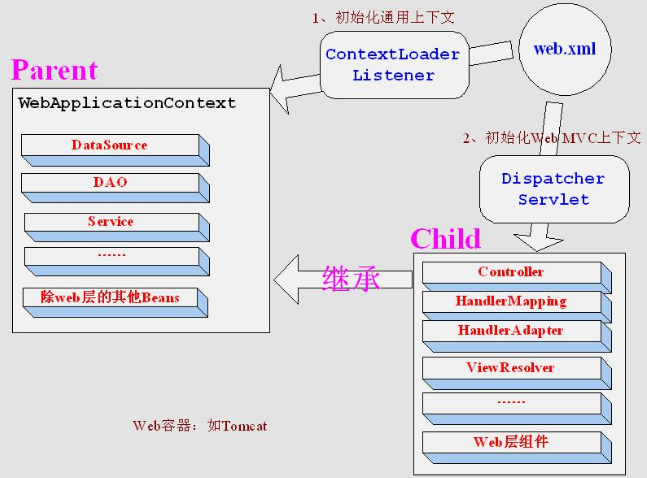
从图中可以看出:
ContextLoaderListener初始化的上下文加载的 Bean 是对于整个应用程序共享的,不管是使用什么表现层技术,一般如 DAO 层、Service 层 Bean;DispatcherServlet初始化的上下文加载的 Bean 是只对 Spring Web MVC 有效的 Bean,如 Controller、HandlerMapping、HandlerAdapter 等等,该初始化上下文应该只加载 Web相关组件- 所以Controller里面能
@AutowiredService,而Service里不能@AutowiredController
为什么不在 Spring 容器中扫描所有 Bean?
这个是不可能的。因为请求达到服务端后,找 DispatcherServlet 去处理,只会去 SpringMVC 容器中找,这就意味着 Controller 必须在 SpringMVC 容器中扫描。
为什么不在 SpringMVC 容器中扫描所有 Bean?
这个是可以的,可以在 SpringMVC 容器中扫描所有 Bean。不写在一起,有两个方面的原因:
- 为了方便配置文件的管理
- 在 Spring+SpringMVC+Hibernate 组合中,实际上也不支持这种写法
5. 处理器详解
5.1 HandlerMapping
注意,下文所说的处理器即我们平时所见到的 Controller
HandlerMapping ,中文译作处理器映射器,在 SpringMVC 中,系统提供了很多 HandlerMapping:
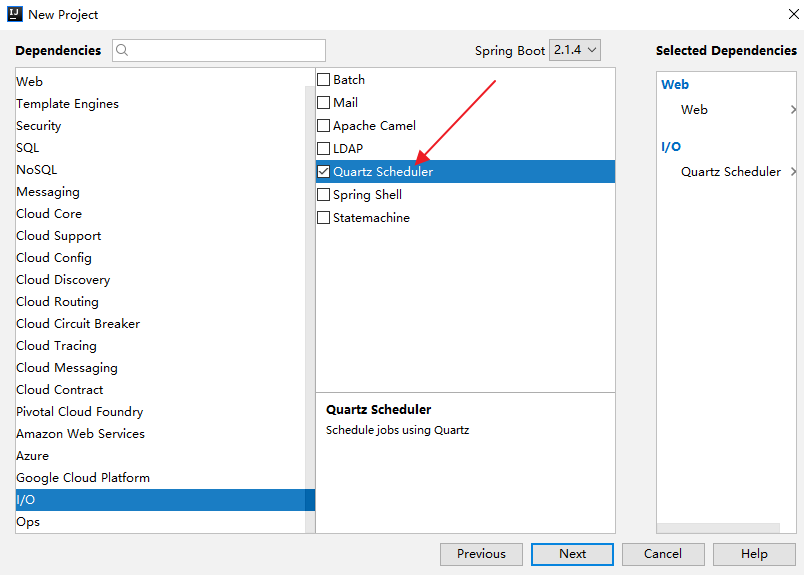
HandlerMapping 是负责根据 request 请求找到对应的 Handler 处理器及 Interceptor 拦截器,将它们封装在 HandlerExecutionChain 对象中返回给前端控制器。
BeanNameUrlHandlerMapping
BeanNameUrl 处理器映射器,根据请求的 url 与 Spring 容器中定义的 bean 的 name 进行匹配,从而从 Spring 容器中找到 bean 实例,就是说,请求的 Url 地址就是处理器 Bean 的名字。
这个 HandlerMapping 配置如下:
<bean class="org.springframework.web.servlet.handler.BeanNameUrlHandlerMapping" id="handlerMapping">
    <property name="beanName" value="/hello"/>
</bean>
SimpleUrlHandlerMapping
SimpleUrlHandlerMapping 是 BeanNameUrlHandlerMapping 的增强版本,它可以将 url 和处理器 bean 的 id 进行统一映射配置:
<bean class="org.springframework.web.servlet.handler.SimpleUrlHandlerMapping" id="handlerMapping">
    <property name="mappings">
        <props>
            <prop key="/hello">myController</prop>
            <prop key="/hello2">myController2</prop>
        </props>
    </property>
</bean>
注意,在 props 中,可以配置多个请求路径和处理器实例的映射关系
5.2 HandlerAdapter
HandlerAdapter,中文译作处理器适配器
HandlerAdapter 会根据适配器接口对后端控制器进行包装(适配),包装后即可对处理器进行执行,通过扩展处理器适配器可以执行多种类型的处理器,这里使用了适配器设计模式
在 SpringMVC 中,HandlerAdapter 也有诸多实现类:
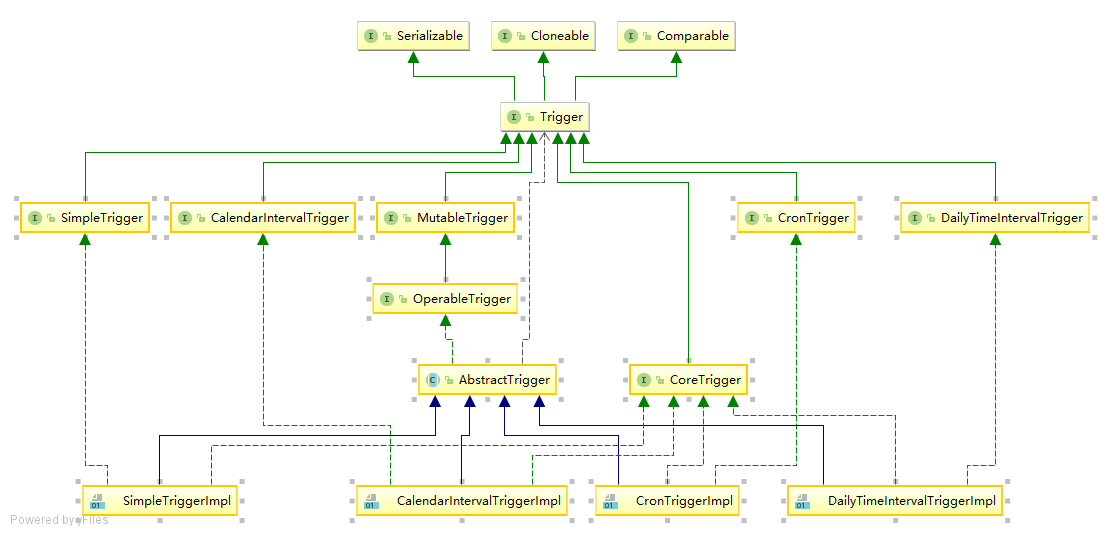
SimpleControllerHandlerAdapter
SimpleControllerHandlerAdapter 简单控制器处理器适配器,所有实现了 org.springframework.web.servlet.mvc.Controller 接口的 Bean 通过此适配器进行适配、执行,也就是说,如果我们开发的接口是通过实现 Controller 接口来完成的(不是通过注解开发的接口),那么 HandlerAdapter 必须是 SimpleControllerHandlerAdapter
<bean class="org.springframework.web.servlet.mvc.SimpleControllerHandlerAdapter" />HttpRequestHandlerAdapter
HttpRequestHandlerAdapter,http 请求处理器适配器,所有实现了 org.springframework.web.HttpRequestHandler 接口的 Bean 通过此适配器进行适配、执行。
例如存在如下接口:
@Controller
public class MyController2 implements HttpRequestHandler {
    public void handleRequest(HttpServletRequest request, HttpServletResponse response) throws ServletException, IOException {
        System.out.println("-----MyController2-----");
    }
}


<bean class="org.springframework.web.servlet.handler.SimpleUrlHandlerMapping" id="handlerMapping">
    <property name="mappings">
        <props>
            <prop key="/hello2">myController2</prop>
        </props>
    </property>
</bean>
<bean class="org.springframework.web.servlet.mvc.HttpRequestHandlerAdapter" id="handlerAdapter"/>
5.3 最佳实践
各种情况都大概了解了,我们看下项目中的具体实践。
- 组件自动扫描
web 开发中,我们基本上不再通过 XML 或者 Java 配置来创建一个 Bean 的实例,而是直接通过组件扫描来实现 Bean 的配置,如果要扫描多个包,多个包之间用 , 隔开即可:
<context:component-scan base-package="org.sang"/>HandlerMapping
正常情况下,我们在项目中使用的是 RequestMappingHandlerMapping,这个是根据处理器中的注解,来匹配请求(即 @RequestMapping 注解中的 url 属性)。因为在上面我们都是通过实现类来开发接口的,相当于还是一个类一个接口,所以,我们可以通过RequestMappingHandlerMapping来做处理器映射器,这样我们可以在一个类中开发出多个接口
HandlerAdapter
对于上面提到的通过 @RequestMapping 注解所定义出来的接口方法,这些方法的调用都是要通过 RequestMappingHandlerAdapter 这个适配器来实现
例如我们开发一个接口:
@Controller
public class MyController3 {
    @RequestMapping("/hello3")
    public ModelAndView hello() {
        return new ModelAndView("hello3");
    }
}
要能够访问到这个接口,我们需要 RequestMappingHandlerMapping 才能定位到需要执行的方法,需要 RequestMappingHandlerAdapter,才能执行定位到的方法,修改 spring-servlet.xml 的配置文件如下:
<context:component-scan base-package="org.javaboy.helloworld"/>

<!--找到方法-->
    <bean class="org.springframework.web.servlet.mvc.method.annotation.RequestMappingHandlerMapping" id="handlerMapping"/>
<!--执行方法-->
    <bean class="org.springframework.web.servlet.mvc.method.annotation.RequestMappingHandlerAdapter" id="handlerAdapter"/>

    <!--视图解析器-->
    <bean class="org.springframework.web.servlet.view.InternalResourceViewResolver" id="viewResolver">
        <property name="prefix" value="/jsp/"/>
        <property name="suffix" value=".jsp"/>
    </bean>
</beans>
然后,启动项目,访问 /hello3 接口,就可以看到相应的页面了。
- 继续优化
由于开发中,我们常用的是 RequestMappingHandlerMapping 和 RequestMappingHandlerAdapter ,这两个有一个简化的写法,如下:
<mvc:annotation-driven>可以用这一行配置,代替 RequestMappingHandlerMapping 和 RequestMappingHandlerAdapter 的两行配置。
    <context:component-scan base-package="org.javaboy.helloworld"/>

    <mvc:annotation-driven/>
    <!--视图解析器-->
    <bean class="org.springframework.web.servlet.view.InternalResourceViewResolver" id="viewResolver">
        <property name="prefix" value="/jsp/"/>
        <property name="suffix" value=".jsp"/>
    </bean>
</beans>访问效果和上一步的效果一样。这是我们实际开发中,最终配置的形态
6. Controller
6.1 @RequestMapping
这个注解用来标记一个接口,这算是我们在接口开发中,使用最多的注解之一
6.1.1 请求 URL
标记请求 URL 很简单,只需要在相应的方法上添加该注解即可:
@Controller
public class HelloController {
    @RequestMapping("/hello")
    public ModelAndView hello() {
        return new ModelAndView("hello");
    }
}这里@RequestMapping(“/hello”)表示当请求地址为 /hello 的时候,这个方法会被触发。其中,地址可以是多个,就是可以多个地址映射到同一个方法。
@Controller
public class HelloController {
    @RequestMapping({"/hello","/hello2"})
    public ModelAndView hello() {
        return new ModelAndView("hello");
    }
}
这个配置,表示 /hello 和 /hello2 都可以访问到该方法
6.1.2 请求窄化
同一个项目中,会存在多个接口,例如订单相关的接口都是 /order/xxx 格式的,用户相关的接口都是 /user/xxx 格式的。为了方便处理,这里的前缀(就是 /order、/user)可以统一在 Controller 上面处理。
@Controller
@RequestMapping("/user")
public class HelloController {
    @RequestMapping({"/hello","/hello2"})
    public ModelAndView hello() {
        return new ModelAndView("hello");
    }
}
当类上加了 @RequestMapping 注解之后,此时,要想访问到 hello ,地址就应该是 /user/hello 或者 /user/hello2
6.1.3 请求方法限定
默认情况下,使用@RequestMapping注解定义好的方法,可以被 GET 请求访问到,也可以被 POST 请求访问到,但是 DELETE 请求以及 PUT 请求不可以访问到
当然,我们也可以指定具体的访问方法:
@Controller
@RequestMapping("/user")
public class HelloController {
    @RequestMapping(value = "/hello",method = RequestMethod.GET)
    public ModelAndView hello() {
        return new ModelAndView("hello");
    }
}
通过 @RequestMapping 注解,指定了该接口只能被 GET 请求访问到,此时,该接口就不可以被 POST 以及请求请求访问到了。强行访问会报如下错误:
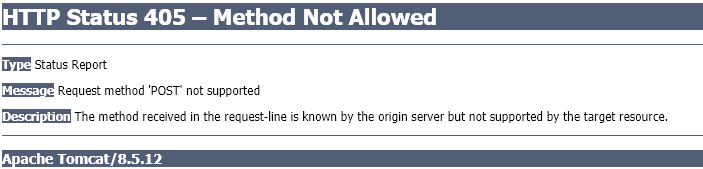
当然,限定的方法也可以有多个:
@Controller
@RequestMapping("/user")
public class HelloController {
    @RequestMapping(value = "/hello",method = {RequestMethod.GET,RequestMethod.POST,RequestMethod.PUT,RequestMethod.DELETE})
    public ModelAndView hello() {
        return new ModelAndView("hello");
    }
}
此时,这个接口就可以被 GET、POST、PUT、以及 DELETE 访问到了。但是,由于 JSP 支支持 GET、POST 以及 HEAD ,所以这个测试,不能使用 JSP 做页面模板。可以讲视图换成其他的,或者返回 JSON,这里就不影响了。
6.2 Controller 方法的返回值
6.2.1 返回 ModelAndView
如果是前后端不分的开发,大部分情况下,我们返回 ModelAndView,即数据模型+视图:
@Controller
@RequestMapping("/user")
public class HelloController {
    @RequestMapping("/hello")
    public ModelAndView hello() {
        ModelAndView mv = new ModelAndView("hello");
        mv.addObject("username", "javaboy");
        return mv;
    }
}
Model 中,放我们的数据,然后在 ModelAndView 中指定视图名称。
6.2.2 返回 Void
没有返回值。没有返回值,并不一定真的没有返回值,只是方法的返回值为 void,我们可以通过其他方式给前端返回。实际上,这种方式也可以理解为 Servlet 中的那一套方案。
注意,由于默认的 Maven 项目没有 Servlet,因此这里需要额外添加一个依赖:
<dependency>
<groupId>javax.servlet</groupId>
<artifactId>javax.servlet-api</artifactId>
<version>4.0.1</version>
</dependency>- 通过
HttpServletRequest做服务端跳转
@RequestMapping("/hello2")
public void hello2(HttpServletRequest req, HttpServletResponse resp) throws ServletException, IOException {
req.getRequestDispatcher("/jsp/hello.jsp").forward(req,resp);//服务器端跳转
}- 通过
HttpServletResponse做重定向
@RequestMapping("/hello3")
public void hello3(HttpServletRequest req, HttpServletResponse resp) throws IOException {
resp.sendRedirect("/hello.jsp");
}也可以自己手动指定响应头去实现重定向:
@RequestMapping("/hello3")
public void hello3(HttpServletRequest req, HttpServletResponse resp) throws IOException {
resp.setStatus(302);
resp.addHeader("Location", "/jsp/hello.jsp");
}- 通过
HttpServletResponse给出响应
@RequestMapping("/hello4")
public void hello4(HttpServletRequest req, HttpServletResponse resp) throws IOException {
resp.setContentType("text/html;charset=utf-8");
PrintWriter out = resp.getWriter();
out.write("hello javaboy!");
out.flush();
out.close();
}这种方式,既可以返回 JSON,也可以返回普通字符串。
6.2.3 返回字符串
- 返回逻辑视图名
前面的 ModelAndView 可以拆分为两部分,Model 和 View,在 SpringMVC 中,Model 我们可以直接在参数中指定,然后返回值是逻辑视图名:
@RequestMapping("/hello5")
public String hello5(Model model) {
model.addAttribute("username", "lucifer");//这是数据模型
return "hello";//表示去查找一个名为 hello 的视图
}- 服务端跳转
@RequestMapping("/hello5")
public String hello5() {
return "forward:/jsp/hello.jsp";
}forward 后面跟上跳转的路径。
- 客户端跳转
@RequestMapping("/hello5")
public String hello5() {
return "redirect:/user/hello";
}这种,本质上就是浏览器重定向。
- 真的返回一个字符串
上面三个返回的字符串,都是由特殊含义的,如果一定要返回一个字符串,需要额外添加一个注意:@ResponseBody ,这个注解表示当前方法的返回值就是要展示出来返回值,没有特殊含义。
@RequestMapping("/hello5")
@ResponseBody
public String hello5() {
return "redirect:/user/hello";
}上面代码表示就是想返回一段内容为 redirect:/user/hello 的字符串,他没有特殊含义。注意,这里如果单纯的返回一个中文字符串,是会乱码的,可以在 @RequestMapping 中添加 produces 属性来解决:
@RequestMapping(value = "/hello5",produces = "text/html;charset=utf-8")
@ResponseBody
public String hello5() {
return "Java 语言程序设计";
}6.3 参数绑定
6.3.1 默认支持的参数类型
默认支持的参数类型,就是可以直接写在 @RequestMapping 所注解的方法中的参数类型,一共有四类:
- HttpServletRequest
- HttpServletResponse
- HttpSession
- Model/ModelMap
这几个例子可以参考上一小节
在请求的方法中,默认的参数就是这几个,如果在方法中,刚好需要这几个参数,那么就可以把这几个参数加入到方法中。
6.3.2 简单数据类型
Integer、Boolean、Double 等等简单数据类型也都是支持的。例如添加一本书:
首先,在 /jsp/ 目录下创建 add book.jsp 作为图书添加页面:
<%@ page contentType="text/html;charset=UTF-8" language="java" %>
<html>
<head>
<title>Title</title>
</head>
<body>
<form action="/doAdd" method="post">
<table>
<tr>
<td>书名:</td>
<td><input type="text" name="name"></td>
</tr>
<tr>
<td>作者:</td>
<td><input type="text" name="author"></td>
</tr>
<tr>
<td>价格:</td>
<td><input type="text" name="price"></td>
</tr>
<tr>
<td>是否上架:</td>
<td>
<input type="radio" value="true" name="ispublic">是
<input type="radio" value="false" name="ispublic">否
</td>
</tr>
<tr>
<td colspan="2">
<input type="submit" value="添加">
</td>
</tr>
</table>
</form>
</body>
</html>创建控制器,控制器提供两个功能,一个是访问 jsp 页面,另一个是提供添加接口:
@Controller
public class BookController {
@RequestMapping("/book")
public String addBook() {
return "addbook";
}
@RequestMapping(value = "/doAdd",method = RequestMethod.POST)
@ResponseBody
public void doAdd(String name,String author,Double price,Boolean ispublic) {
System.out.println(name);
System.out.println(author);
System.out.println(price);
System.out.println(ispublic);
}
}注意,由于 doAdd 方法确实不想返回任何值,所以需要给该方法添加 @ResponseBody 注解,表示这个方法到此为止,不用再去查找相关视图了。另外, POST 请求传上来的中文会乱码,所以,我们在 web.xml 中再额外添加一个编码过滤器:
<filter>
<filter-name>encoding</filter-name>
<filter-class>org.springframework.web.filter.CharacterEncodingFilter</filter-class>
<init-param>
<param-name>encoding</param-name>
<param-value>UTF-8</param-value>
</init-param>
<init-param>
<param-name>forceRequestEncoding</param-name>
<param-value>true</param-value>
</init-param>
<init-param>
<param-name>forceResponseEncoding</param-name>
<param-value>true</param-value>
</init-param>
</filter>
<filter-mapping>
<filter-name>encoding</filter-name>
<url-pattern>/*</url-pattern>
</filter-mapping>最后,浏览器中输入 http://localhost:8080/book ,就可以执行添加操作,服务端会打印出来相应的日志。
在上面的绑定中,有一个要求,表单中字段的 name 属性要和接口中的变量名一一对应,才能映射成功,否则服务端接收不到前端传来的数据。有一些特殊情况,我们的服务端的接口变量名可能和前端不一致,这个时候我们可以通过 @RequestParam 注解来解决。
@RequestParam
这个注解的的功能主要有三方面:
- 给变量取别名
- 设置变量是否必填
- 给变量设置默认值
如下:
@RequestMapping(value = "/doAdd",method = RequestMethod.POST)
@ResponseBody
public void doAdd(@RequestParam("name") String bookname, String author, Double price, Boolean ispublic) {
System.out.println(bookname);
System.out.println(author);
System.out.println(price);
System.out.println(ispublic);
}注解中的 “name” 表示给 bookname 这个变量取的别名,也就是说,bookname 将接收前端传来的 name 这个变量的值。在这个注解中,还可以添加 required 属性和 defaultValue 属性,如下:
@RequestMapping(value = "/doAdd",method = RequestMethod.POST)
@ResponseBody
public void doAdd(@RequestParam(value = "name",required = true,defaultValue = "三国演义") String bookname, String author, Double price, Boolean ispublic) {
System.out.println(bookname);
System.out.println(author);
System.out.println(price);
System.out.println(ispublic);
}required 属性默认为 true,即只要添加了 @RequestParam 注解,这个参数默认就是必填的,如果不填,请求无法提交,会报 400 错误,如果这个参数不是必填项,可以手动把 required 属性设置为 false。但是,如果同时设置了 defaultValue,这个时候,前端不传该参数到后端,即使 required 属性为 true,它也不会报错。
6.3.3 实体类
参数除了是简单数据类型之外,也可以是实体类。实际上,在开发中,大部分情况下,都是实体类。
还是上面的例子,我们改用一个 Book 对象来接收前端传来的数据:
public class Book {
private String name;
private String author;
private Double price;
private Boolean ispublic;
@Override
public String toString() {
return "Book{" +
"name='" + name + '\'' +
", author='" + author + '\'' +
", price=" + price +
", ispublic=" + ispublic +
'}';
}
public String getName() {
return name;
}
public void setName(String name) {
this.name = name;
}
public String getAuthor() {
return author;
}
public void setAuthor(String author) {
this.author = author;
}
public Double getPrice() {
return price;
}
public void setPrice(Double price) {
this.price = price;
}
public Boolean getIspublic() {
return ispublic;
}
public void setIspublic(Boolean ispublic) {
this.ispublic = ispublic;
}
}服务端接收数据方式如下:
@RequestMapping(value = "/doAdd",method = RequestMethod.POST)
@ResponseBody
public void doAdd(Book book) {
System.out.println(book);
}前端页面传值的时候和上面的一样,只需要写属性名就可以了,不需要写 book 对象名。
当然,对象中可能还有对象。例如如下对象:
public class Book {
private String name;
private Double price;
private Boolean ispublic;
private Author author;
public void setAuthor(Author author) {
this.author = author;
}
public String getName() {
return name;
}
public void setName(String name) {
this.name = name;
}
@Override
public String toString() {
return "Book{" +
"name='" + name + '\'' +
", price=" + price +
", ispublic=" + ispublic +
", author=" + author +
'}';
}
public Double getPrice() {
return price;
}
public void setPrice(Double price) {
this.price = price;
}
public Boolean getIspublic() {
return ispublic;
}
public void setIspublic(Boolean ispublic) {
this.ispublic = ispublic;
}
}
public class Author {
private String name;
private Integer age;
@Override
public String toString() {
return "Author{" +
"name='" + name + '\'' +
", age=" + age +
'}';
}
public Integer getAge() {
return age;
}
public void setAge(Integer age) {
this.age = age;
}
public String getName() {
return name;
}
public void setName(String name) {
this.name = name;
}
}Book 对象中,有一个 Author 属性,如何给 Author 属性传值呢?前端写法如下:
<%@ page contentType="text/html;charset=UTF-8" language="java" %>
<html>
<head>
<title>Title</title>
</head>
<body>
<form action="/doAdd" method="post">
<table>
<tr>
<td>书名:</td>
<td><input type="text" name="name"></td>
</tr>
<tr>
<td>作者姓名:</td>
<td><input type="text" name="author.name"></td>
</tr>
<tr>
<td>作者年龄:</td>
<td><input type="text" name="author.age"></td>
</tr>
<tr>
<td>价格:</td>
<td><input type="text" name="price"></td>
</tr>
<tr>
<td>是否上架:</td>
<td>
<input type="radio" value="true" name="ispublic">是
<input type="radio" value="false" name="ispublic">否
</td>
</tr>
<tr>
<td colspan="2">
<input type="submit" value="添加">
</td>
</tr>
</table>
</form>
</body>
</html>这样在后端直接用 Book 对象就可以接收到所有数据了。
6.3.4 自定义参数绑定
前面的转换,都是系统自动转换的,这种转换仅限于基本数据类型。特殊的数据类型,系统无法自动转换,例如日期。例如前端传一个日期到后端,后端不是用字符串接收,而是使用一个 Date 对象接收,这个时候就会出现参数类型转换失败。这个时候,需要我们手动定义参数类型转换器,将日期字符串手动转为一个 Date 对象。
@Component
public class DateConverter implements Converter<String, Date> {
SimpleDateFormat sdf = new SimpleDateFormat("yyyy-MM-dd");
@Override
public Date convert(String source) {
try {
return sdf.parse(source);
} catch (ParseException e) {
e.printStackTrace();
}
return null;
}
}在自定义的参数类型转换器中,将一个 String 转为 Date 对象,同时,将这个转换器注册为一个 Bean。
接下来,在 SpringMVC 的配置文件中,配置该 Bean,使之生效。
<mvc:annotation-driven conversion-service="conversionService"/>
<bean class="org.springframework.format.support.FormattingConversionServiceFactoryBean" id="conversionService">
<property name="converters">
<set>
<ref bean="dateConverter"/>
</set>
</property>
</bean>配置完成后,在服务端就可以接收前端传来的日期参数了。
6.3.5 集合类的参数
- String 数组
String 数组可以直接用数组去接收,前端传递的时候,数组的传递其实就多相同的 key,这种一般用在 checkbox 中较多。
例如前端增加兴趣爱好一项:
<form action="/doAdd" method="post">
<table>
<tr>
<td>书名:</td>
<td><input type="text" name="name"></td>
</tr>
<tr>
<td>作者姓名:</td>
<td><input type="text" name="author.name"></td>
</tr>
<tr>
<td>作者年龄:</td>
<td><input type="text" name="author.age"></td>
</tr>
<tr>
<td>出生日期:</td>
<td><input type="date" name="author.birthday"></td>
</tr>
<tr>
<td>兴趣爱好:</td>
<td>
<input type="checkbox" name="favorites" value="足球">足球
<input type="checkbox" name="favorites" value="篮球">篮球
<input type="checkbox" name="favorites" value="乒乓球">乒乓球
</td>
</tr>
<tr>
<td>价格:</td>
<td><input type="text" name="price"></td>
</tr>
<tr>
<td>是否上架:</td>
<td>
<input type="radio" value="true" name="ispublic">是
<input type="radio" value="false" name="ispublic">否
</td>
</tr>
<tr>
<td colspan="2">
<input type="submit" value="添加">
</td>
</tr>
</table>
</form>在服务端用一个数组去接收 favorites 对象:
@RequestMapping(value = "/doAdd",method = RequestMethod.POST)
@ResponseBody
public void doAdd(Book book,String[] favorites) {
System.out.println(Arrays.toString(favorites));
System.out.println(book);
}注意,前端传来的数组对象,服务端不可以使用 List 集合去接收。
- List 集合
如果需要使用 List 集合接收前端传来的数据,List 集合本身需要放在一个封装对象中,这个时候,List 中,可以是基本数据类型,也可以是对象。例如有一个班级类,班级里边有学生,学生有多个:
public class MyClass {
private Integer id;
private List<Student> students;
@Override
public String toString() {
return "MyClass{" +
"id=" + id +
", students=" + students +
'}';
}
public Integer getId() {
return id;
}
public void setId(Integer id) {
this.id = id;
}
public List<Student> getStudents() {
return students;
}
public void setStudents(List<Student> students) {
this.students = students;
}
}
public class Student {
private Integer id;
private String name;
@Override
public String toString() {
return "Student{" +
"id=" + id +
", name='" + name + '\'' +
'}';
}
public Integer getId() {
return id;
}
public void setId(Integer id) {
this.id = id;
}
public String getName() {
return name;
}
public void setName(String name) {
this.name = name;
}
}添加班级的时候,可以传递多个 Student,前端页面写法如下:
<form action="/addclass" method="post">
<table>
<tr>
<td>班级编号:</td>
<td><input type="text" name="id"></td>
</tr>
<tr>
<td>学生编号:</td>
<td><input type="text" name="students[0].id"></td>
</tr>
<tr>
<td>学生姓名:</td>
<td><input type="text" name="students[0].name"></td>
</tr>
<tr>
<td>学生编号:</td>
<td><input type="text" name="students[1].id"></td>
</tr>
<tr>
<td>学生姓名:</td>
<td><input type="text" name="students[1].name"></td>
</tr>
<tr>
<td colspan="2">
<input type="submit" value="提交">
</td>
</tr>
</table>
</form>服务端直接接收数据即可:
@RequestMapping("/addclass")
@ResponseBody
public void addClass(MyClass myClass) {
System.out.println(myClass);
}- Map
相对于实体类而言,Map 是一种比较灵活的方案,但是,Map 可维护性比较差,因此一般不推荐使用。
例如给上面的班级类添加其他属性信息:
public class MyClass {
private Integer id;
private List<Student> students;
private Map<String, Object> info;
@Override
public String toString() {
return "MyClass{" +
"id=" + id +
", students=" + students +
", info=" + info +
'}';
}
public Map<String, Object> getInfo() {
return info;
}
public void setInfo(Map<String, Object> info) {
this.info = info;
}
public Integer getId() {
return id;
}
public void setId(Integer id) {
this.id = id;
}
public List<Student> getStudents() {
return students;
}
public void setStudents(List<Student> students) {
this.students = students;
}
}在前端,通过如下方式给 info 这个 Map 赋值。
<form action="/addclass" method="post">
<table>
<tr>
<td>班级编号:</td>
<td><input type="text" name="id"></td>
</tr>
<tr>
<td>班级名称:</td>
<td><input type="text" name="info['name']"></td>
</tr>
<tr>
<td>班级位置:</td>
<td><input type="text" name="info['pos']"></td>
</tr>
<tr>
<td>学生编号:</td>
<td><input type="text" name="students[0].id"></td>
</tr>
<tr>
<td>学生姓名:</td>
<td><input type="text" name="students[0].name"></td>
</tr>
<tr>
<td>学生编号:</td>
<td><input type="text" name="students[1].id"></td>
</tr>
<tr>
<td>学生姓名:</td>
<td><input type="text" name="students[1].name"></td>
</tr>
<tr>
<td colspan="2">
<input type="submit" value="提交">
</td>
</tr>
</table>
</form>6.4 @ControllerAdvice
@ControllerAdvice ,很多初学者可能都没有听说过这个注解,实际上,这是一个非常有用的注解,顾名思义,这是一个增强的 Controller。使用这个 Controller ,可以实现三个方面的功能:
- 全局异常处理
- 全局数据绑定
- 全局数据预处理
@ControllerAdvice返回的是页面,对应于@Controller;@RestControllerAdvice返回的是字符串,对应于@RestController
灵活使用这三个功能,可以帮助我们简化很多工作,需要注意的是,这是 SpringMVC 提供的功能,在 Spring Boot 中可以直接使用,下面分别来看
6.4.1 全局异常处理
使用 @ControllerAdvice 实现全局异常处理,只需要定义类,添加该注解即可定义方式如下:
@ControllerAdvice
public class MyGlobalExceptionHandler {
@ExceptionHandler(Exception.class)
public ModelAndView customException(Exception e) {
ModelAndView mv = new ModelAndView();
mv.addObject("message", e.getMessage());
mv.setViewName("myerror");
return mv;
}
}在该类中,可以定义多个方法,不同的方法处理不同的异常,例如专门处理空指针的方法、专门处理数组越界的方法…,也可以直接向上面代码一样,在一个方法中处理所有的异常信息。
@ExceptionHandler 注解用来指明异常的处理类型,即如果这里指定为 NullpointerException,则数组越界异常就不会进到这个方法中来。
6.4.2 全局数据绑定
全局数据绑定功能可以用来做一些初始化的数据操作,我们可以将一些公共的数据定义在添加了 @ControllerAdvice 注解的类中,这样,在每一个 Controller 的接口中,就都能够访问导致这些数据。
使用步骤,首先定义全局数据,如下:
@ControllerAdvice
public class MyGlobalExceptionHandler {
@ModelAttribute(name = "md")
public Map<String,Object> mydata() {
HashMap<String, Object> map = new HashMap<>();
map.put("age", 99);
map.put("gender", "男");
return map;
}
}使用@ModelAttribute注解标记该方法的返回数据是一个全局数据,默认情况下,这个全局数据的 key 就是返回的变量名,value 就是方法返回值,当然开发者可以通过 @ModelAttribute 注解的 name 属性去重新指定 key。
定义完成后,在任何一个Controller 的接口中,都可以获取到这里定义的数据:
@RestController
public class HelloController {
@GetMapping("/hello")
public String hello(Model model) {
Map<String, Object> map = model.asMap();
System.out.println(map);
int i = 1 / 0;
return "hello controller advice";
}
}6.4.3 全局数据预处理
考虑我有两个实体类,Book 和 Author,分别定义如下:
public class Book {
private String name;
private Long price;
//getter/setter
}
public class Author {
private String name;
private Integer age;
//getter/setter
}此时,如果我定义一个数据添加接口,如下:
@PostMapping("/book")
public void addBook(Book book, Author author) {
System.out.println(book);
System.out.println(author);
}这个时候,添加操作就会有问题,因为两个实体类都有一个 name 属性,从前端传递时 ,无法区分。此时,通过@ControllerAdvice的全局数据预处理可以解决这个问题
解决步骤如下:
1.给接口中的变量取别名
@PostMapping("/book")
public void addBook(@ModelAttribute("b") Book book, @ModelAttribute("a") Author author) {
System.out.println(book);
System.out.println(author);
}2.进行请求数据预处理
在@ControllerAdvice标记的类中添加如下代码:
@InitBinder("b")
public void b(WebDataBinder binder) {
binder.setFieldDefaultPrefix("b.");
}
@InitBinder("a")
public void a(WebDataBinder binder) {
binder.setFieldDefaultPrefix("a.");
}@InitBinder(“b”) 注解表示该方法用来处理和Book和相关的参数,在方法中,给参数添加一个 b 前缀,即请求参数要有b前缀.
3.发送请求
请求发送时,通过给不同对象的参数添加不同的前缀,可以实现参数的区分.
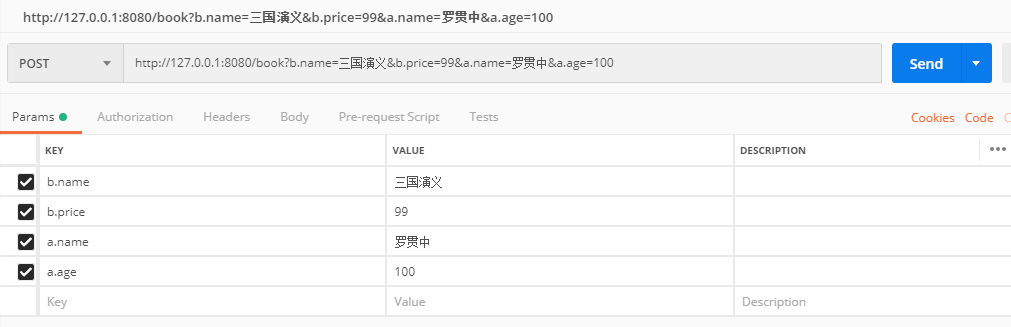
6.3.4 总结
这就是 @ControllerAdvice 的几个简单用法,这些点既可以在传统的 SSM 项目中使用,也可以在 Spring Boot + Spring Cloud 微服务中使用
7. 文件上传
SpringMVC 中对文件上传做了封装,我们可以更加方便的实现文件上传。从 Spring3.1 开始,对于文件上传,提供了两个处理器:
- CommonsMultipartResolver
- StandardServletMultipartResolver
第一个处理器兼容性较好,可以兼容 Servlet3.0 之前的版本,但是它依赖了commons-fileupload这个第三方工具,所以如果使用这个,一定要添加 commons-fileupload 依赖
第二个处理器兼容性较差,它适用于 Servlet3.0 之后的版本,它不依赖第三方工具,使用它,可以直接做文件上传
7.1 CommonsMultipartResolver
使用 CommonsMultipartResolver 做文件上传,需要首先添加 commons-fileupload 依赖,如下:
<dependency>
<groupId>commons-fileupload</groupId>
<artifactId>commons-fileupload</artifactId>
<version>1.4</version>
</dependency>然后,在 SpringMVC 的配置文件中,配置 MultipartResolver:
<bean class="org.springframework.web.multipart.commons.CommonsMultipartResolver" id="multipartResolver"/>注意,这个 Bean 一定要有 id,并且 id 必须是 multipartResolver
接下来,创建 jsp 页面:
<form action="/upload" method="post" enctype="multipart/form-data">
<input type="file" name="file">
<input type="submit" value="上传">
</form>注意文件上传请求是 POST 请求,enctype 一定是 multipart/form-data,同时MultipartFile file的file要和jsp中的一致
然后,开发文件上传接口:
@Controller
public class FileUploadController {
SimpleDateFormat sdf = new SimpleDateFormat("/yyyy/MM/dd/");
@RequestMapping("/upload")
@ResponseBody
public String upload(MultipartFile file, HttpServletRequest req) {
//1.准备文件夹
String format = sdf.format(new Date());
String realPath = req.getServletContext().getRealPath("/img") + format;
File folder = new File(realPath);
if (!folder.exists()) {
folder.mkdirs();
}
//2.准备文件名
String oldName = file.getOriginalFilename();
String newName = UUID.randomUUID().toString() + oldName.substring(oldName.lastIndexOf("."));
//3.存储
try {
file.transferTo(new File(folder, newName));
//4.组装url
String url = req.getScheme() + "://" + req.getServerName() + ":" + req.getServerPort() + "/img" + format + newName;
return url;
} catch (IOException e) {
e.printStackTrace();
}
return "failed";
}
}这个文件上传方法中,一共做了四件事:
- 解决文件保存路径,这里是保存在项目运行目录下的 img 目录下,然后利用日期继续宁分类
- 处理文件名问题,使用 UUID 做新的文件名,用来代替旧的文件名,可以有效防止文件名冲突
- 保存文件
- 生成文件访问路径
这里还有一个小问题,在 SpringMVC 中,静态资源默认都是被自动拦截的,无法访问,意味着上传成功的图片无法访问,因此,还需要我们在 SpringMVC 的配置文件中,再添加如下配置:
<mvc:resources mapping="/**" location="/"/>完成之后,就可以访问 jsp 页面,做文件上传了
当然,默认的配置不一定满足我们的需求,我们还可以自己手动配置文件上传大小等:
<bean class="org.springframework.web.multipart.commons.CommonsMultipartResolver" id="multipartResolver">
<!--默认的编码-->
<property name="defaultEncoding" value="UTF-8"/>
<!--上传的总文件大小-->
<property name="maxUploadSize" value="1048576"/>
<!--上传的单个文件大小-->
<property name="maxUploadSizePerFile" value="1048576"/>
<!--内存中最大的数据量,超过这个数据量,数据就要开始往硬盘中写了-->
<property name="maxInMemorySize" value="4096"/>
<!--临时目录,超过 maxInMemorySize 配置的大小后,数据开始往临时目录写,等全部上传完成后,再将数据合并到正式的文件上传目录-->
<property name="uploadTempDir" value="file:///E:\\tmp"/>
</bean>7.2 StandardServletMultipartResolver
这种文件上传方式,不需要依赖第三方 jar(主要是不需要添加commons-fileupload这个依赖),但是也不支持 Servlet3.0 之前的版本。
使用 StandardServletMultipartResolver ,那我们首先在 SpringMVC 的配置文件中,配置这个 Bean
<bean class="org.springframework.web.multipart.support.StandardServletMultipartResolver" id="multipartResolver">
</bean>注意,这里 Bean 的名字依然叫 multipartResolver
配置完成后,注意,这个 Bean 无法直接配置上传文件大小等限制。需要在web.xml中进行配置(这里,即使不需要限制文件上传大小,也需要在 web.xml 中配置 multipart-config):
<servlet>
<servlet-name>springmvc</servlet-name>
<servlet-class>org.springframework.web.servlet.DispatcherServlet</servlet-class>
<init-param>
<param-name>contextConfigLocation</param-name>
<param-value>classpath:spring-servlet.xml</param-value>
</init-param>
<multipart-config>
<!--文件保存的临时目录,这个目录系统不会主动创建-->
<location>E:\\temp</location>
<!--上传的单个文件大小-->
<max-file-size>1048576</max-file-size>
<!--上传的总文件大小-->
<max-request-size>1048576</max-request-size>
<!--这个就是内存中保存的文件最大大小-->
<file-size-threshold>4096</file-size-threshold>
</multipart-config>
</servlet>
<servlet-mapping>
<servlet-name>springmvc</servlet-name>
<url-pattern>/</url-pattern>
</servlet-mapping>配置完成后,就可以测试文件上传了,测试方式和上面一样。
7.3 多文件上传
多文件上传分为两种,一种是 key 相同的文件,另一种是 key 不同的文件。
8.3.1 key 相同的文件
这种上传,前端页面一般如下:
<form action="/upload2" method="post" enctype="multipart/form-data">
<input type="file" name="files" multiple>
<input type="submit" value="上传">
</form>主要是 input 节点中多了 multiple 属性。后端用一个数组来接收文件即可:
@RequestMapping("/upload2")
@ResponseBody
public void upload2(MultipartFile[] files, HttpServletRequest req) {
String format = sdf.format(new Date());
String realPath = req.getServletContext().getRealPath("/img") + format;
File folder = new File(realPath);
if (!folder.exists()) {
folder.mkdirs();
}
try {
for (MultipartFile file : files) {
String oldName = file.getOriginalFilename();
String newName = UUID.randomUUID().toString() + oldName.substring(oldName.lastIndexOf("."));
file.transferTo(new File(folder, newName));
String url = req.getScheme() + "://" + req.getServerName() + ":" + req.getServerPort() + "/img" + format + newName;
System.out.println(url);
}
} catch (IOException e) {
e.printStackTrace();
}
}8.3.2 key 不同的文件
key 不同的,一般前端定义如下:
<form action="/upload3" method="post" enctype="multipart/form-data">
<input type="file" name="file1">
<input type="file" name="file2">
<input type="submit" value="上传">
</form>这种,在后端用不同的变量来接收就行了:
@RequestMapping("/upload3")
@ResponseBody
public void upload3(MultipartFile file1, MultipartFile file2, HttpServletRequest req) {
String format = sdf.format(new Date());
String realPath = req.getServletContext().getRealPath("/img") + format;
File folder = new File(realPath);
if (!folder.exists()) {
folder.mkdirs();
}
try {
String oldName = file1.getOriginalFilename();
String newName = UUID.randomUUID().toString() + oldName.substring(oldName.lastIndexOf("."));
file1.transferTo(new File(folder, newName));
String url1 = req.getScheme() + "://" + req.getServerName() + ":" + req.getServerPort() + "/img" + format + newName;
System.out.println(url1);
String oldName2 = file2.getOriginalFilename();
String newName2 = UUID.randomUUID().toString() + oldName2.substring(oldName2.lastIndexOf("."));
file2.transferTo(new File(folder, newName2));
String url2 = req.getScheme() + "://" + req.getServerName() + ":" + req.getServerPort() + "/img" + format + newName2;
System.out.println(url2);
} catch (IOException e) {
e.printStackTrace();
}
}8. 全局异常处理
项目中,可能会抛出多个异常,我们不可以直接将异常的堆栈信息展示给用户,有两个原因:
- 用户体验不好
- 非常不安全
所以,针对异常,我们可以自定义异常处理,SpringMVC 中,针对全局异常也提供了相应的解决方案,主要是通过 @ControllerAdvice 和 @ExceptionHandler 两个注解来处理的。
以第八节的文件上传大小超出限制为例,自定义异常,只需要提供一个异常处理类即可:
@ControllerAdvice//表示这是一个增强版的 Controller,主要用来做全局数据处理
public class MyException {
@ExceptionHandler(Exception.class)
public ModelAndView fileuploadException(Exception e) {
ModelAndView error = new ModelAndView("error");
error.addObject("error", e.getMessage());
return error;
}
}在这里:
@ControllerAdvice表示这是一个增强版的 Controller,主要用来做全局数据处理@ExceptionHandler表示这是一个异常处理方法,这个注解的参数,表示需要拦截的异常,参数为 Exception 表示拦截所有异常,这里也可以具体到某一个异常,如果具体到某一个异常,那么发生了其他异常则不会被拦截到。- 异常方法的定义,和 Controller 中方法的定义一样,可以返回
ModelAndview,也可以返回 String 或者 void
例如如下代码,指挥拦截文件上传异常,其他异常和它没关系,不会进入到自定义异常处理的方法中来。
@ControllerAdvice//表示这是一个增强版的 Controller,主要用来做全局数据处理
public class MyException {
@ExceptionHandler(MaxUploadSizeExceededException.class)
public ModelAndView fileuploadException(MaxUploadSizeExceededException e) {
ModelAndView error = new ModelAndView("error");
error.addObject("error", e.getMessage());
return error;
}
}9. 服务端数据校验
B/S 系统中对 http 请求数据的校验多数在客户端进行,这也是出于简单及用户体验性上考虑,但是在一些安全性要求高的系统中服务端校验是不可缺少的,实际上,几乎所有的系统,凡是涉及到数据校验,都需要在服务端进行二次校验。为什么要在服务端进行二次校验呢?这需要理解客户端校验和服务端校验各自的目的。
- 客户端校验,我们主要是为了提高用户体验,例如用户输入一个邮箱地址,要校验这个邮箱地址是否合法,没有必要发送到服务端进行校验,直接在前端用 js 进行校验即可。但是大家需要明白的是,前端校验无法代替后端校验,前端校验可以有效的提高用户体验,但是无法确保数据完整性,因为在 B/S 架构中,用户可以方便的拿到请求地址,然后直接发送请求,传递非法参数。
- 服务端校验,虽然用户体验不好,但是可以有效的保证数据安全与完整性。
- 综上,实际项目中,两个一起用。
Spring 支持 JSR-303 验证框架,JSR-303 是 JAVA EE 6 中的一项子规范,叫做 Bean Validation,官方参考实现是 Hibernate Validator(与Hibernate ORM 没有关系),JSR-303 用于对 Java Bean 中的字段的值进行验证。
9.1 普通校验
普通校验,是这里最基本的用法。
首先,我们需要加入校验需要的依赖:
<dependency>
<groupId>org.hibernate</groupId>
<artifactId>hibernate-validator</artifactId>
<version>6.1.0.Final</version>
</dependency>接下来,在 SpringMVC 的配置文件中配置校验的 Bean:
<bean class="org.springframework.validation.beanvalidation.LocalValidatorFactoryBean" id="validatorFactoryBean">
<property name="providerClass" value="org.hibernate.validator.HibernateValidator"/>
</bean>
<mvc:annotation-driven validator="validatorFactoryBean"/>配置时,提供一个 LocalValidatorFactoryBean 的实例,然后 Bean 的校验使用 HibernateValidator
接下来,我们提供一个添加学生的页面:
<form action="/addstudent" method="post">
<table>
<tr>
<td>学生编号:</td>
<td><input type="text" name="id"></td>
</tr>
<tr>
<td>学生姓名:</td>
<td><input type="text" name="name"></td>
</tr>
<tr>
<td>学生邮箱:</td>
<td><input type="text" name="email"></td>
</tr>
<tr>
<td>学生年龄:</td>
<td><input type="text" name="age"></td>
</tr>
<tr>
<td colspan="2">
<input type="submit" value="提交">
</td>
</tr>
</table>
</form>在这里需要提交的数据中,假设学生编号不能为空,学生姓名长度不能超过 10 且不能为空,邮箱地址要合法,年龄不能超过 150。那么在定义实体类的时候,就可以加入这个判断条件了。
public class Student {
@NotNull
private Integer id;
@NotNull
@Size(min = 2,max = 10)
private String name;
@Email
private String email;
@Max(150)
private Integer age;
public String getEmail() {
return email;
}
@Override
public String toString() {
return "Student{" +
"id=" + id +
", name='" + name + '\'' +
", email='" + email + '\'' +
", age=" + age +
'}';
}
public void setEmail(String email) {
this.email = email;
}
public Integer getAge() {
return age;
}
public void setAge(Integer age) {
this.age = age;
}
public Integer getId() {
return id;
}
public void setId(Integer id) {
this.id = id;
}
public String getName() {
return name;
}
public void setName(String name) {
this.name = name;
}
}在这里:
@NotNull表示这个字段不能为空@Size中描述了这个字符串长度的限制@Email表示这个字段的值必须是一个邮箱地址@Max表示这个字段的最大值
定义完成后,接下来,在 Controller 中定义接口:
@Controller
public class StudentController {
@RequestMapping("/addstudent")
@ResponseBody
public void addStudent(@Validated Student student, BindingResult result) {
if (result != null) {
//校验未通过,获取所有的异常信息并展示出来
List<ObjectError> allErrors = result.getAllErrors();
for (ObjectError allError : allErrors) {
System.out.println(allError.getObjectName()+":"+allError.getDefaultMessage());
}
}
}
}在这里:
@Validated表示 Student 中定义的校验规则将会生效BindingResult表示出错信息,如果这个变量不为空,表示有错误,否则校验通过。
接下来就可以启动项目了。访问 jsp 页面,然后添加 Student,查看校验规则是否生效。
默认情况下,打印出来的错误信息时系统默认的错误信息,这个错误信息,我们也可以自定义。自定义方式如下:
由于 properties 文件中的中文会乱码,所以需要我们先修改一下 IDEA 配置,点 File–>Settings->Editor–>File Encodings,如下:
然后定义错误提示文本,在 resources 目录下新建一个 MyMessage.properties 文件,内容如下:
student.id.notnull=id 不能为空
student.name.notnull=name 不能为空
student.name.length=name 最小长度为 2 ,最大长度为 10
student.email.error=email 地址非法
student.age.error=年龄不能超过 150接下来,在 SpringMVC 配置中,加载这个配置文件:
<bean class="org.springframework.validation.beanvalidation.LocalValidatorFactoryBean" id="validatorFactoryBean">
<property name="providerClass" value="org.hibernate.validator.HibernateValidator"/>
<property name="validationMessageSource" ref="bundleMessageSource"/>
</bean>
<bean class="org.springframework.context.support.ReloadableResourceBundleMessageSource" id="bundleMessageSource">
<property name="basenames">
<list>
<!--没有后缀 -->
<value>classpath:MyMessage</value>
</list>
</property>
<property name="defaultEncoding" value="UTF-8"/>
<property name="cacheSeconds" value="300"/>
</bean>
<mvc:annotation-driven validator="validatorFactoryBean"/>最后,在实体类上的注解中,加上校验出错时的信息:
public class Student {
@NotNull(message = "{student.id.notnull}")
private Integer id;
@NotNull(message = "{student.name.notnull}")
@Size(min = 2,max = 10,message = "{student.name.length}")
private String name;
@Email(message = "{student.email.error}")
private String email;
@Max(value = 150,message = "{student.age.error}")
private Integer age;配置完成后,如果校验再出错,就会展示我们自己的出错信息了。
9.2 分组校验
由于校验规则都是定义在实体类上面的,但是,在不同的数据提交环境下,校验规则可能不一样。例如,用户的 id 是自增长的,添加的时候,可以不用传递用户 id,但是修改的时候则必须传递用户 id,这种情况下,就需要使用分组校验。
分组校验,首先需要定义校验组,所谓的校验组,其实就是空接口:
public interface ValidationGroup1 {
}
public interface ValidationGroup2 {
}然后,在实体类中,指定每一个校验规则所属的组:
public class Student {
@NotNull(message = "{student.id.notnull}",groups = ValidationGroup1.class)
private Integer id;
@NotNull(message = "{student.name.notnull}",groups = {ValidationGroup1.class, ValidationGroup2.class})
@Size(min = 2,max = 10,message = "{student.name.length}",groups = {ValidationGroup1.class, ValidationGroup2.class})
private String name;
@Email(message = "{student.email.error}",groups = {ValidationGroup1.class, ValidationGroup2.class})
private String email;
@Max(value = 150,message = "{student.age.error}",groups = {ValidationGroup2.class})
private Integer age;在 group 中指定每一个校验规则所属的组,一个规则可以属于一个组,也可以属于多个组。
最后,在接收参数的地方,指定校验组:
@Controller
public class StudentController {
@RequestMapping("/addstudent")
@ResponseBody
public void addStudent(@Validated(ValidationGroup2.class) Student student, BindingResult result) {
if (result != null) {
//校验未通过,获取所有的异常信息并展示出来
List<ObjectError> allErrors = result.getAllErrors();
for (ObjectError allError : allErrors) {
System.out.println(allError.getObjectName()+":"+allError.getDefaultMessage());
}
}
}
}配置完成后,属于 ValidationGroup2 这个组的校验规则,才会生效。
9.3 校验注解
校验注解,主要有如下几种:
- @Null 被注解的元素必须为 null
- @NotNull 被注解的元素必须不为 null
- @AssertTrue 被注解的元素必须为 true
- @AssertFalse 被注解的元素必须为 false
- @Min(value) 被注解的元素必须是一个数字,其值必须大于等于指定的最小值
- @Max(value) 被注解的元素必须是一个数字,其值必须小于等于指定的最大值
- @DecimalMin(value) 被注解的元素必须是一个数字,其值必须大于等于指定的最小值
- @DecimalMax(value) 被注解的元素必须是一个数字,其值必须小于等于指定的最大值
- @Size(max=, min=) 被注解的元素的大小必须在指定的范围内
- @Digits (integer, fraction) 被注解的元素必须是一个数字,其值必须在可接受的范围内
- @Past 被注解的元素必须是一个过去的日期
- @Future 被注解的元素必须是一个将来的日期
- @Pattern(regex=,flag=) 被注解的元素必须符合指定的正则表达式
- @NotBlank(message =) 验证字符串非 null,且长度必须大于0
- @Email 被注解的元素必须是电子邮箱地址
- @Length(min=,max=) 被注解的字符串的大小必须在指定的范围内
- @NotEmpty 被注解的字符串的必须非空
- @Range(min=,max=,message=) 被注解的元素必须在合适的范围内
10. 数据回显
10.1 数据回显基本用法
数据回显就是当用户数据提交失败时,自动填充好已经输入的数据。一般来说,如果使用 Ajax 来做数据提交,基本上是没有数据回显这个需求的,但是如果是通过表单做数据提交,那么数据回显就非常有必要了。
10.1.1 简单数据类型
简单数据类型,实际上框架在这里没有提供任何形式的支持,就是我们自己手动配置。我们继续在第 10 小节的例子上演示 Demo。加入提交的 Student 数据不符合要求,那么重新回到添加 Student 页面,并且预设之前已经填好的数据。
首先我们先来改造一下 student.jsp 页面:
<form action="/addstudent" method="post">
<table>
<tr>
<td>学生编号:</td>
<td><input type="text" name="id" value="${id}"></td>
</tr>
<tr>
<td>学生姓名:</td>
<td><input type="text" name="name" value="${name}"></td>
</tr>
<tr>
<td>学生邮箱:</td>
<td><input type="text" name="email" value="${email}"></td>
</tr>
<tr>
<td>学生年龄:</td>
<td><input type="text" name="age" value="${age}"></td>
</tr>
<tr>
<td colspan="2">
<input type="submit" value="提交">
</td>
</tr>
</table>
</form>在接收数据时,使用简单数据类型去接收:
@RequestMapping("/addstudent")
public String addStudent2(Integer id, String name, String email, Integer age, Model model) {
model.addAttribute("id", id);
model.addAttribute("name", name);
model.addAttribute("email", email);
model.addAttribute("age", age);
return "student";
}这种方式,相当于框架没有做任何工作,就是我们手动做数据回显的。此时访问页面,服务端会再次定位到该页面,而且数据已经预填好
10.1.2 实体类
上面这种简单数据类型的回显,实际上非常麻烦,因为需要开发者在服务端一个一个手动设置。如果使用对象的话,就没有这么麻烦了,因为 SpringMVC 在页面跳转时,会自动将对象填充进返回的数据中
此时,首先修改一下 student.jsp 页面:
<form action="/addstudent" method="post">
<table>
<tr>
<td>学生编号:</td>
<td><input type="text" name="id" value="${student.id}"></td>
</tr>
<tr>
<td>学生姓名:</td>
<td><input type="text" name="name" value="${student.name}"></td>
</tr>
<tr>
<td>学生邮箱:</td>
<td><input type="text" name="email" value="${student.email}"></td>
</tr>
<tr>
<td>学生年龄:</td>
<td><input type="text" name="age" value="${student.age}"></td>
</tr>
<tr>
<td colspan="2">
<input type="submit" value="提交">
</td>
</tr>
</table>
</form>注意,在预填数据中,多了一个 student. 前缀。这 student 就是服务端接收数据的变量名,服务端的变量名和这里的 student 要保持一致。服务端定义如下:
@RequestMapping("/addstudent")
public String addStudent(@Validated(ValidationGroup2.class) Student student, BindingResult result) {
if (result != null) {
//校验未通过,获取所有的异常信息并展示出来
List<ObjectError> allErrors = result.getAllErrors();
for (ObjectError allError : allErrors) {
System.out.println(allError.getObjectName()+":"+allError.getDefaultMessage());
}
return "student";
}
return "hello";
}注意,服务端什么都不用做,就说要返回的页面就行了,student 这个变量会被自动填充到返回的 Model 中。变量名就是填充时候的 key。如果想自定义这个 key,可以在参数中写出来 Model,然后手动加入 Student 对象,就像简单数据类型回显那样。
另一种定义回显变量别名的方式,就是使用@ModelAttribute注解
10.2 @ModelAttribute
@ModelAttribute 这个注解,主要有两方面的功能:
- 在数据回显时,给变量定义别名
- 定义全局数据
10.2.1 定义别名
在数据回显时,给变量定义别名,非常容易,直接加这个注解即可:
@RequestMapping("/addstudent")
public String addStudent(@ModelAttribute("s") @Validated(ValidationGroup2.class) Student student, BindingResult result) {
if (result != null) {
//校验未通过,获取所有的异常信息并展示出来
List<ObjectError> allErrors = result.getAllErrors();
for (ObjectError allError : allErrors) {
System.out.println(allError.getObjectName()+":"+allError.getDefaultMessage());
}
return "student";
}
return "hello";
}这样定义完成后,在前端再次访问回显的变量时,变量名称就不是 student 了,而是 s:
<form action="/addstudent" method="post">
<table>
<tr>
<td>学生编号:</td>
<td><input type="text" name="id" value="${s.id}"></td>
</tr>
<tr>
<td>学生姓名:</td>
<td><input type="text" name="name" value="${s.name}"></td>
</tr>
<tr>
<td>学生邮箱:</td>
<td><input type="text" name="email" value="${s.email}"></td>
</tr>
<tr>
<td>学生年龄:</td>
<td><input type="text" name="age" value="${s.age}"></td>
</tr>
<tr>
<td colspan="2">
<input type="submit" value="提交">
</td>
</tr>
</table>
</form>10.2.2 定义全局数据
假设有一个 Controller 中有很多方法,每个方法都会返回数据给前端,但是每个方法返回给前端的数据又不太一样,虽然不太一样,但是没有方法的返回值又有一些公共的部分。可以将这些公共的部分提取出来单独封装成一个方法,用 @ModelAttribute 注解来标记。
例如在一个 Controller 中 ,添加如下代码:
@ModelAttribute("info")
public Map<String,Object> info() {
Map<String, Object> map = new HashMap<>();
map.put("username", "lucifer");
map.put("address", "www.github.com");
return map;
}当用户访问当前 Controller 中的任意一个方法,在返回数据时,都会将添加了@ModelAttribute注解的方法的返回值,一起返回给前端。@ModelAttribute 注解中的 info 表示返回数据的 key
11. JSON
11.1 返回 JSON
目前主流的 JSON 处理工具主要有三种:
- jackson
- gson
- fastjson
在 SpringMVC 中,对 jackson 和 gson 都提供了相应的支持,就是如果使用这两个作为 JSON 转换器,只需要添加对应的依赖就可以了,返回的对象和返回的集合、Map 等都会自动转为 JSON,但是,如果使用 fastjson,除了添加相应的依赖之外,还需要自己手动配置 HttpMessageConverter 转换器。其实前两个也是使用 HttpMessageConverter 转换器,但是是 SpringMVC 自动提供的,SpringMVC 没有给 fastjson 提供相应的转换器
11.1.1 jackson
jackson 是一个使用比较多,时间也比较长的 JSON 处理工具,在 SpringMVC 中使用 jackson ,只需要添加 jackson 的依赖即可:
<dependency>
<groupId>com.fasterxml.jackson.core</groupId>
<artifactId>jackson-databind</artifactId>
<version>2.10.1</version>
</dependency>依赖添加成功后,凡是在接口中直接返回的对象,集合等等,都会自动转为 JSON。如下:
public class Book {
private Integer id;
private String name;
private String author;
public String getName() {
return name;
}
public void setName(String name) {
this.name = name;
}
public String getAuthor() {
return author;
}
public void setAuthor(String author) {
this.author = author;
}
public Integer getId() {
return id;
}
public void setId(Integer id) {
this.id = id;
}
}
@RequestMapping("/book")
@ResponseBody
public Book getBookById() {
Book book = new Book();
book.setId(1);
book.setName("三国演义");
book.setAuthor("罗贯中");
return book;
}这里返回一个对象,但是在前端接收到的则是一个 JSON 字符串,这个对象会通过 HttpMessageConverter 自动转为 JSON 字符串
如果想返回一个 JSON 数组,写法如下:
@RequestMapping("/books")
@ResponseBody
public List<Book> getAllBooks() {
List<Book> list = new ArrayList<Book>();
for (int i = 0; i < 10; i++) {
Book book = new Book();
book.setId(i);
book.setName("三国演义:" + i);
book.setAuthor("罗贯中:" + i);
list.add(book);
}
return list;
}添加了 jackson ,就能够自动返回 JSON,这个依赖于一个名为 HttpMessageConverter 的类,这本身是一个接口,从名字上就可以看出,它的作用是 Http 消息转换器,既然是消息转换器,它提供了两方面的功能:
- 将返回的对象转为 JSON
- 将前端提交上来的 JSON 转为对象
但是,HttpMessageConverter 只是一个接口,由各个 JSON 工具提供相应的实现,在 jackson 中,实现的名字叫做 MappingJackson2HttpMessageConverter,而这个东西的初始化,则由 SpringMVC 来完成。除非自己有一些自定义配置的需求,否则一般来说不需要自己提供 MappingJackson2HttpMessageConverter
举一个简单的应用场景,例如每一本书,都有一个出版日期,修改 Book 类如下:
public class Book {
private Integer id;
private String name;
private String author;
private Date publish;
public Date getPublish() {
return publish;
}
public void setPublish(Date publish) {
this.publish = publish;
}
public String getName() {
return name;
}
public void setName(String name) {
this.name = name;
}
public String getAuthor() {
return author;
}
public void setAuthor(String author) {
this.author = author;
}
public Integer getId() {
return id;
}
public void setId(Integer id) {
this.id = id;
}
}然后在构造 Book 时添加日期属性:
@RequestMapping("/book")
@ResponseBody
public Book getBookById() {
Book book = new Book();
book.setId(1);
book.setName("三国演义");
book.setAuthor("罗贯中");
book.setPublish(new Date());
return book;
}访问 /book 接口,返回的 json 格式如下:
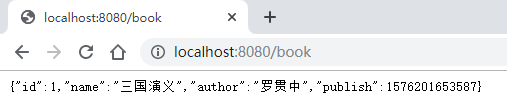
如果我们想自己定制返回日期的格式,简单的办法,可以通过添加注解来实现:
public class Book {
private Integer id;
private String name;
private String author;
@JsonFormat(pattern = "yyyy-MM-dd",timezone = "Asia/Shanghai")
private Date publish;注意这里一定要设置时区
这样,就可以定制返回的日期格式了
但是,这种方式有一个弊端,这个注解可以加在属性上,也可以加在类上,也就说,最大可以作用到一个类中的所有日期属性上。如果项目中有很多实体类都需要做日期格式化,使用这种方式就比较麻烦了,这个时候,我们可以自己提供一个 jackson 的 HttpMesageConverter 实例,在这个实例中,自己去配置相关属性,这里的配置将是一个全局配置
在 SpringMVC 配置文件中,添加如下配置:
<mvc:annotation-driven>
<mvc:message-converters>
<ref bean="httpMessageConverter"/>
</mvc:message-converters>
</mvc:annotation-driven>
<bean class="org.springframework.http.converter.json.MappingJackson2HttpMessageConverter" id="httpMessageConverter">
<property name="objectMapper">
<bean class="com.fasterxml.jackson.databind.ObjectMapper">
<property name="dateFormat">
<bean class="java.text.SimpleDateFormat">
<constructor-arg name="pattern" value="yyyy-MM-dd HH:mm:ss"/>
</bean>
</property>
<property name="timeZone" value="Asia/Shanghai"/>
</bean>
</property>
</bean>添加完成后,去掉 Book 实体类中日期格式化的注解,再进行测试,结果如下:
11.1.2 gson
gson 是 Google 推出的一个 JSON 解析器,主要在 Android 开发中使用较多,不过,Web 开发中也是支持这个的,而且 SpringMVC 还针对 Gson 提供了相关的自动化配置,以致我们在项目中只要添加 gson 依赖,就可以直接使用 gson 来做 JSON 解析
<dependency>
<groupId>com.google.code.gson</groupId>
<artifactId>gson</artifactId>
<version>2.8.6</version>
</dependency>如果项目中,同时存在 jackson 和 gson 的话,那么默认使用的是 jackson,在 org.springframework.http.converter.support.AllEncompassingFormHttpMessageConverter 类的构造方法中,加载顺序就是先加载 jackson 的 HttpMessageConverter,后加载 gson 的 HttpMessageConverter
加完依赖之后,就可以直接返回 JSON 字符串了。使用 Gson 时,如果想做自定义配置,则需要自定义 HttpMessageConverter
<mvc:annotation-driven>
<mvc:message-converters>
<ref bean="httpMessageConverter"/>
</mvc:message-converters>
</mvc:annotation-driven>
<bean class="org.springframework.http.converter.json.GsonHttpMessageConverter" id="httpMessageConverter">
<property name="gson">
<bean class="com.google.gson.Gson" factory-bean="gsonBuilder" factory-method="create"/>
</property>
</bean>
<bean class="com.google.gson.GsonBuilder" id="gsonBuilder">
<property name="dateFormat" value="yyyy-MM-dd"/>
</bean>11.1.3 fastjson
fastjson 号称最快的 JSON 解析器,但是也是这三个中 BUG 最多的一个。在 SpringMVC 并没针对 fastjson 提供相应的 HttpMessageConverter,所以,fastjson 在使用时,一定要自己手动配置 HttpMessageConverter(前面两个如果没有特殊需要,直接添加依赖就可以了)
使用 fastjson,我们首先添加 fastjson 依赖:
<dependency>
<groupId>com.alibaba</groupId>
<artifactId>fastjson</artifactId>
<version>1.2.60</version>
</dependency>然后在 SpringMVC 的配置文件中配置 HttpMessageConverter
<mvc:annotation-driven>
<mvc:message-converters>
<ref bean="httpMessageConverter"/>
</mvc:message-converters>
</mvc:annotation-driven>
<bean class="com.alibaba.fastjson.support.spring.FastJsonHttpMessageConverter" id="httpMessageConverter">
<property name="fastJsonConfig">
<bean class="com.alibaba.fastjson.support.config.FastJsonConfig">
<property name="dateFormat" value="yyyy-MM-dd"/>
</bean>
</property>
</bean>fastjson 默认中文乱码,添加如下配置解决
<mvc:annotation-driven>
<mvc:message-converters>
<ref bean="httpMessageConverter"/>
</mvc:message-converters>
</mvc:annotation-driven>
<bean class="com.alibaba.fastjson.support.spring.FastJsonHttpMessageConverter" id="httpMessageConverter">
<property name="fastJsonConfig">
<bean class="com.alibaba.fastjson.support.config.FastJsonConfig">
<property name="dateFormat" value="yyyy-MM-dd"/>
</bean>
</property>
<property name="supportedMediaTypes">
<list>
<value>application/json;charset=utf-8</value>
</list>
</property>
</bean>12.2 接收 JSON
浏览器传来的参数,可以是 key/value 形式的,也可以是一个 JSON 字符串。在 Jsp/Servlet 中,我们接收 key/value 形式的参数,一般是通过getParameter方法。如果客户端商户传入的是 JSON 数据,我们可以通过如下格式进行解析:
@RequestMapping("/addbook2")
@ResponseBody
public void addBook2(HttpServletRequest req) throws IOException {
ObjectMapper om = new ObjectMapper();
Book book = om.readValue(req.getInputStream(), Book.class);
System.out.println(book);
}但是这种解析方式有点麻烦,在 SpringMVC 中,我们可以通过一个注解来快速的将一个 JSON 字符串转为一个对象:
@RequestMapping("/addbook3")
@ResponseBody
public void addBook3(@RequestBody Book book) {
System.out.println(book);
}这样就可以直接收到前端传来的 JSON 字符串了。这也是 HttpMessageConverter 提供的第二个功能
12. RESTful
越来越多的人开始意识到,网站即软件,而且是一种新型的软件。这种”互联网软件”采用客户端/服务器模式,建立在分布式体系上,通过互联网通信,具有高延时(high latency)、高并发等特点。网站开发,完全可以采用软件开发的模式。但是传统上,软件和网络是两个不同的领域,很少有交集;软件开发主要针对单机环境,网络则主要研究系统之间的通信。互联网的兴起,使得这两个领域开始融合,现在我们必须考虑,如何开发在互联网环境中使用的软件。
RESTful 架构,就是目前最流行的一种互联网软件架构。它结构清晰、符合标准、易于理解、扩展方便,所以正得到越来越多网站的采用。
RESTful 它不是一个具体的架构,不是一个软件,不是一个框架,而是一种规范。在移动互联网兴起之前,我们都很少提及 RESTful,主要是因为用的少,移动互联网兴起后,RESTful 得到了非常广泛的应用,因为在移动互联网兴起之后,我们再开发后端应用,就不仅仅只是开发一个网站了,还对应了多个前端(Android、iOS、HTML5 等等),这个时候,我们在设计后端接口是,就需要考虑接口的形式,格式,参数的传递等等诸多问题了。
12.1 起源
REST 这个词,是 Roy Thomas Fielding 在他 2000 年的博士论文中提出的。
Fielding 是一个非常重要的人,他是 HTTP 协议(1.0版和1.1版)的主要设计者、Apache 服务器软件的作者之一、Apache 基金会的第一任主席。所以,他的这篇论文一经发表,就引起了关注,并且立即对互联网开发产生了深远的影响。
他这样介绍论文的写作目的:
“本文研究计算机科学两大前沿—-软件和网络—-的交叉点。长期以来,软件研究主要关注软件设计的分类、设计方法的演化,很少客观地评估不同的设计选择对系统行为的影响。而相反地,网络研究主要关注系统之间通信行为的细节、如何改进特定通信机制的表现,常常忽视了一个事实,那就是改变应用程序的互动风格比改变互动协议,对整体表现有更大的影响。我这篇文章的写作目的,就是想在符合架构原理的前提下,理解和评估以网络为基础的应用软件的架构设计,得到一个功能强、性能好、适宜通信的架构。”
12.2 名称
Fielding 将他对互联网软件的架构原则,定名为REST,即 Representational State Transfer 的缩写。我对这个词组的翻译是”表现层状态转化”。
如果一个架构符合 REST 原则,就称它为 RESTful 架构。
要理解 RESTful 架构,最好的方法就是去理解 Representational State Transfer 这个词组到底是什么意思,它的每一个词代表了什么涵义。如果你把这个名称搞懂了,也就不难体会 REST 是一种什么样的设计。
12.3 资源(Resources)
REST 的名称”表现层状态转化”中,省略了主语。”表现层”其实指的是”资源”(Resources)的”表现层”。
所谓”资源”,就是网络上的一个实体,或者说是网络上的一个具体信息。它可以是一段文本、一张图片、一首歌曲、一种服务,总之就是一个具体的实在。你可以用一个 URI (统一资源定位符)指向它,每种资源对应一个特定的 URI。要获取这个资源,访问它的 URI 就可以,因此 URI 就成了每一个资源的地址或独一无二的识别符。
所谓”上网”,就是与互联网上一系列的”资源”互动,调用它的 URI。
在 RESTful 风格的应用中,每一个 URI 都代表了一个资源。
12.4 表现层(Representation)
“资源”是一种信息实体,它可以有多种外在表现形式。我们把”资源”具体呈现出来的形式,叫做它的”表现层”(Representation)。
比如,文本可以用 txt 格式表现,也可以用 HTML 格式、XML 格式、JSON 格式表现,甚至可以采用二进制格式;图片可以用 JPG 格式表现,也可以用 PNG 格式表现。
URI 只代表资源的实体,不代表它的形式。严格地说,有些网址最后的 “.html” 后缀名是不必要的,因为这个后缀名表示格式,属于 “表现层” 范畴,而 URI 应该只代表”资源”的位置。它的具体表现形式,应该在 HTTP 请求的头信息中用 Accept 和 Content-Type 字段指定,这两个字段才是对”表现层”的描述。
12.5 状态转化(State Transfer)
访问一个网站,就代表了客户端和服务器的一个互动过程。在这个过程中,势必涉及到数据和状态的变化。
互联网通信协议 HTTP 协议,是一个无状态协议。这意味着,所有的状态都保存在服务器端。因此,如果客户端想要操作服务器,必须通过某种手段,让服务器端发生”状态转化”(State Transfer)。而这种转化是建立在表现层之上的,所以就是”表现层状态转化”。
客户端用到的手段,只能是 HTTP 协议。具体来说,就是 HTTP 协议里面,四个表示操作方式的动词:GET、POST、PUT、DELETE。它们分别对应四种基本操作:
- GET 用来获取资源
- POST 用来新建资源(也可以用于更新资源)
- PUT 用来更新资源
- DELETE 用来删除资源
12.6 综述
综合上面的解释,我们总结一下什么是 RESTful 架构:
- 每一个 URI 代表一种资源;
- 客户端和服务器之间,传递这种资源的某种表现层;
- 客户端通过四个 HTTP 动词,对服务器端资源进行操作,实现”表现层状态转化”
12.7 误区
RESTful 架构有一些典型的设计误区。
最常见的一种设计错误,就是 URI 包含动词。因为”资源”表示一种实体,所以应该是名词,URI 不应该有动词,动词应该放在 HTTP 协议中。
举例来说,某个 URI 是 /posts/show/1,其中 show 是动词,这个 URI 就设计错了,正确的写法应该是 /posts/1,然后用 GET 方法表示 show。
如果某些动作是HTTP动词表示不了的,你就应该把动作做成一种资源。比如网上汇款,从账户 1 向账户 2 汇款 500 元,错误的 URI 是:
- POST /accounts/1/transfer/500/to/2
正确的写法是把动词 transfer 改成名词 transaction,资源不能是动词,但是可以是一种服务:
POST /transaction HTTP/1.1
Host: 127.0.0.1
from=1&to=2&amount=500.00另一个设计误区,就是在URI中加入版本号:
- http://www.example.com/app/1.0/foo
- http://www.example.com/app/1.1/foo
- http://www.example.com/app/2.0/foo
因为不同的版本,可以理解成同一种资源的不同表现形式,所以应该采用同一个 URI。版本号可以在 HTTP 请求头信息的 Accept 字段中进行区分(参见 Versioning REST Services):
Accept: vnd.example-com.foo+json; version=1.0
Accept: vnd.example-com.foo+json; version=1.1
Accept: vnd.example-com.foo+json; version=2.012.8 命名规则
路径又称”终点”(endpoint),表示 API 的具体网址。实际开发中常见的规范如下:
- 网址中不能有动词,只能有名词,API 中的名词也应该使用复数。因为 REST 中的资源往往和数据库中的表对应,而数据库中的表都是同种记录的”集合”(collection)。如果 API 调用并不涉及资源(如计算,翻译等操作)的话,可以用动词。比如:
GET /calculate?param1=11¶m2=33。 - 不用大写字母,建议用中杠 - 不用下杠 _ 。比如邀请码写成
invitation-code而不是invitation_code。 - 善用版本化 API。当我们的 API 发生了重大改变而不兼容前期版本的时候,我们可以通过 URL 来实现版本化,比如
Http://api.example.com/v1、http://apiv1.example.com。版本不必非要是数字,只是数字用的最多,日期、季节都可以作为版本标识符,项目团队达成共识就可。 - 接口尽量使用名词,避免使用动词。 RESTful API 操作(HTTP Method)的是资源(名词)而不是动作(动词)。
GET /classes:列出所有班级
POST /classes:新建一个班级
GET /classes/classId:获取某个指定班级的信息
PUT /classes/classId:更新某个指定班级的信息(一般倾向整体更新)
PATCH /classes/classId:更新某个指定班级的信息(一般倾向部分更新)
DELETE /classes/classId:删除某个班级
GET /classes/classId/teachers:列出某个指定班级的所有老师的信息
GET /classes/classId/students:列出某个指定班级的所有学生的信息
DELETE classes/classId/teachers/ID:删除某个指定班级下的指定的老师的信息
理清资源的层次结构,比如业务针对的范围是学校,那么学校会是一级资源:/schools,老师: /schools/teachers,学生: /schools/students 就是二级资源
过滤信息(Filtering)
如果我们在查询的时候需要添加特定条件的话,建议使用 url 参数的形式。比如我们要查询 state 状态为 active 并且 name 为 guidegege 的班级:
GET /classes?state=active&name=guidegege比如我们要实现分页查询:
GET /classes?page=1&size=10 //指定第1页,每页10个数据状态码(Status Codes)
| 2xx:成功 | 3xx:重定向 | 4xx:客户端错误 | 5xx:服务器错误 |
|---|---|---|---|
| 200 成功 | 301 永久重定向 | 400 错误请求 | 500 服务器错误 |
| 201 创建 | 304 资源未修改 | 401 未授权 | 502 网关错误 |
| 403 禁止访问 | 504 网关超时 | ||
| 404 未找到 | |||
| 405 请求方法不对 |
12.9 SpringMVC 的支持
SpringMVC 对 RESTful 提供了非常全面的支持,主要有如下几个注解:
@RestController
这个注解是一个组合注解:
@Target(ElementType.TYPE)
@Retention(RetentionPolicy.RUNTIME)
@Documented
@Controller
@ResponseBody
public @interface RestController {
/**
* The value may indicate a suggestion for a logical component name,
* to be turned into a Spring bean in case of an autodetected component.
* @return the suggested component name, if any (or empty String otherwise)
* @since 4.0.1
*/
@AliasFor(annotation = Controller.class)
String value() default "";
}一般,直接用 @RestController 来标记 Controller,可以不使用 @Controller
请求方法中,提供了常见的请求方法:
@PostMapping@GetMapping@PutMapping@DeleteMapping
另外还有一个提取请求地址中的参数的注解 @PathVariable
@GetMapping("/book/{id}")//http://localhost:8080/book/2
public Book getBookById(@PathVariable Integer id) {
Book book = new Book();
book.setId(id);
return book;
}参数 2 将被传递到 id 这个变量上
13. 静态资源访问
在 SpringMVC 中,静态资源,默认都是被拦截的,例如 html、js、css、jpg、png、txt、pdf 等等,都是无法直接访问的。因为所有请求都被拦截了,所以,针对静态资源,我们要做额外处理,处理方式很简单,直接在 SpringMVC 的配置文件中,添加如下内容:
<mvc:resources mapping="/static/html/**" location="/static/html/"/>mapping 表示映射规则,也是拦截规则,就是说,如果请求地址是/static/html这样的格式的话,那么对应的资源就去/static/html/这个目录下查找。
在映射路径的定义中,最后是两个 *,这是一种 Ant 风格的路径匹配符号,一共有三个通配符:
| 通配符 | 含义 |
|---|---|
| ** | 匹配多层路径 |
| * | 匹配一层路径 |
| ? | 匹配任意单个字符 |
一个比较原始的配置方式可能如下:
<mvc:resources mapping="/static/html/**" location="/static/html/"/>
<mvc:resources mapping="/static/js/**" location="/static/js/"/>
<mvc:resources mapping="/static/css/**" location="/static/css/"/>但是,由于 ** 可以表示多级路径,所以,以上配置,我们可以进行简化:
<mvc:resources mapping="/**" location="/"/>14. 拦截器
SpringMVC 中的拦截器,相当于Jsp/Servlet中的过滤器,只不过拦截器的功能更为强大。
拦截器的定义非常容易:
@Component
public class MyInterceptor1 implements HandlerInterceptor {
/**
* 这个是请求预处理的方法,只有当这个方法返回值为 true 的时候,后面的方法才会执行
* @param request
* @param response
* @param handler
* @return
* @throws Exception
*/
public boolean preHandle(HttpServletRequest request, HttpServletResponse response, Object handler) throws Exception {
System.out.println("MyInterceptor1:preHandle");
return true;
}
public void postHandle(HttpServletRequest request, HttpServletResponse response, Object handler, ModelAndView modelAndView) throws Exception {
System.out.println("MyInterceptor1:postHandle");
}
public void afterCompletion(HttpServletRequest request, HttpServletResponse response, Object handler, Exception ex) throws Exception {
System.out.println("MyInterceptor1:afterCompletion");
}
}
@Component
public class MyInterceptor2 implements HandlerInterceptor {
/**
* 这个是请求预处理的方法,只有当这个方法返回值为 true 的时候,后面的方法才会执行
* @param request
* @param response
* @param handler
* @return
* @throws Exception
*/
public boolean preHandle(HttpServletRequest request, HttpServletResponse response, Object handler) throws Exception {
System.out.println("MyInterceptor2:preHandle");
return true;
}
public void postHandle(HttpServletRequest request, HttpServletResponse response, Object handler, ModelAndView modelAndView) throws Exception {
System.out.println("MyInterceptor2:postHandle");
}
public void afterCompletion(HttpServletRequest request, HttpServletResponse response, Object handler, Exception ex) throws Exception {
System.out.println("MyInterceptor2:afterCompletion");
}
}拦截器定义好之后,需要在 SpringMVC 的配置文件中进行配置:
<mvc:interceptors>
<mvc:interceptor>
<mvc:mapping path="/**"/>
<ref bean="myInterceptor1"/>
</mvc:interceptor>
<mvc:interceptor>
<mvc:mapping path="/**"/>
<ref bean="myInterceptor2"/>
</mvc:interceptor>
</mvc:interceptors>如果存在多个拦截器,拦截规则如下:
- preHandle 按拦截器定义顺序调用
- postHandler 按拦截器定义逆序调用
- afterCompletion 按拦截器定义逆序调用
- postHandler 在拦截器链内所有拦截器返成功调用
- afterCompletion 只有 preHandle 返回 true 才调用
第七章、SpringMVC整合
1. MVC框架整合思想
1.1 搭建Web运行环境
<dependency>
<groupId>javax.servlet</groupId>
<artifactId>javax.servlet-api</artifactId>
<version>3.1.0</version>
<scope>provided</scope>
</dependency>
<dependency>
<groupId>javax.servlet</groupId>
<artifactId>jstl</artifactId>
<version>1.2</version>
</dependency>
<!-- https://mvnrepository.com/artifact/javax.servlet.jsp/javax.servlet.jsp-api -->
<dependency>
<groupId>javax.servlet.jsp</groupId>
<artifactId>javax.servlet.jsp-api</artifactId>
<version>2.3.1</version>
<scope>provided</scope>
</dependency>
<dependency>
<groupId>org.springframework</groupId>
<artifactId>spring-web</artifactId>
<version>5.1.14.RELEASE</version>
</dependency>
<dependency>
<groupId>org.springframework</groupId>
<artifactId>spring-core</artifactId>
<version>5.1.14.RELEASE</version>
</dependency>
<dependency>
<groupId>org.springframework</groupId>
<artifactId>spring-beans</artifactId>
<version>5.1.14.RELEASE</version>
</dependency>
<dependency>
<groupId>org.springframework</groupId>
<artifactId>spring-tx</artifactId>
<version>5.1.14.RELEASE</version>
</dependency>
<dependency>
<groupId>org.springframework</groupId>
<artifactId>spring-jdbc</artifactId>
<version>5.1.14.RELEASE</version>
</dependency>
<dependency>
<groupId>org.mybatis</groupId>
<artifactId>mybatis-spring</artifactId>
<version>2.0.2</version>
</dependency>
<dependency>
<groupId>com.alibaba</groupId>
<artifactId>druid</artifactId>
<version>1.1.18</version>
</dependency>
<dependency>
<groupId>mysql</groupId>
<artifactId>mysql-connector-java</artifactId>
<version>5.1.48</version>
</dependency>
<dependency>
<groupId>org.mybatis</groupId>
<artifactId>mybatis</artifactId>
<version>3.4.6</version>
</dependency>
<dependency>
<groupId>junit</groupId>
<artifactId>junit</artifactId>
<version>4.11</version>
<scope>test</scope>
</dependency>
<!-- https://mvnrepository.com/artifact/org.springframework/spring-context -->
<dependency>
<groupId>org.springframework</groupId>
<artifactId>spring-context</artifactId>
<version>5.1.4.RELEASE</version>
</dependency>
<dependency>
<groupId>org.springframework</groupId>
<artifactId>spring-aop</artifactId>
<version>5.1.14.RELEASE</version>
</dependency>
<dependency>
<groupId>org.aspectj</groupId>
<artifactId>aspectjrt</artifactId>
<version>1.8.8</version>
</dependency>
<dependency>
<groupId>org.aspectj</groupId>
<artifactId>aspectjweaver</artifactId>
<version>1.8.3</version>
</dependency>
<dependency>
<groupId>org.slf4j</groupId>
<artifactId>slf4j-log4j12</artifactId>
<version>1.7.25</version>
</dependency>
<dependency>
<groupId>log4j</groupId>
<artifactId>log4j</artifactId>
<version>1.2.17</version>
</dependency>1.2 为什么要整合MVC框架
- MVC框架提供了控制器(Controller)调用Service
DAO —> Service - 请求响应的处理
- 接受请求参数 request.getParameter(“”)
- 控制程序的运行流程
- 视图解析 (JSP JSON Freemarker Thyemeleaf )
1.3 Spring可以整合那些MVC框架
- struts1
- webwork
- jsf
- struts2
- springMVC
1.4 Spring整合MVC框架的核心思路
1.4.1 准备工厂
Web 开发过程中如何创建工厂?
ApplicationContext ctx = new WebXmlApplicationContext("/applicationContext.xml");如何保证工厂唯一,同时被共用?
- 共用:工厂存储在
ServletContext这个作用域中,ServletContext.setAttribute("xxx", ctx); - 唯一:在
ServletContext对象创建的同时创建工厂ServletContextListener在ServletContext对象创建的同时,被调用(只会被调用一次),把创建工厂的代码写在ServletContextListener中,也会保证只调用一次,保证了工厂的唯一性
Spring 封装了一个 ContextLoaderListener,主要做了两件事:
- 创建工厂
- 把工厂存在
ServletContext中
ContextLoaderListener 使用方式:web.xml 中
<listener>
<listener-class> org.springframework.web.context.ContextLoaderListener </listen-class>
</listener>
<context-param>
<param-name> contextConfigLocation </param-name>
<param-value> classpath:applicationContext.xml </param-value>
</context-param>同时需要在web.xml 中也需要加上MVC相关
<servlet>
<servlet-name>springmvc</servlet-name>
<servlet-class>org.springframework.web.servlet.DispatcherServlet</servlet-class>
<init-param>
<param-name>contextConfigLocation</param-name>
<!--MVC的配置文件-->
<param-value>classpath:spring-servlet.xml</param-value>
</init-param>
</servlet>
<servlet-mapping>
<servlet-name>springmvc</servlet-name>
<url-pattern>/</url-pattern>
</servlet-mapping>1.4.2 代码整合
依赖注入:把Sevice对象注入个控制器对象
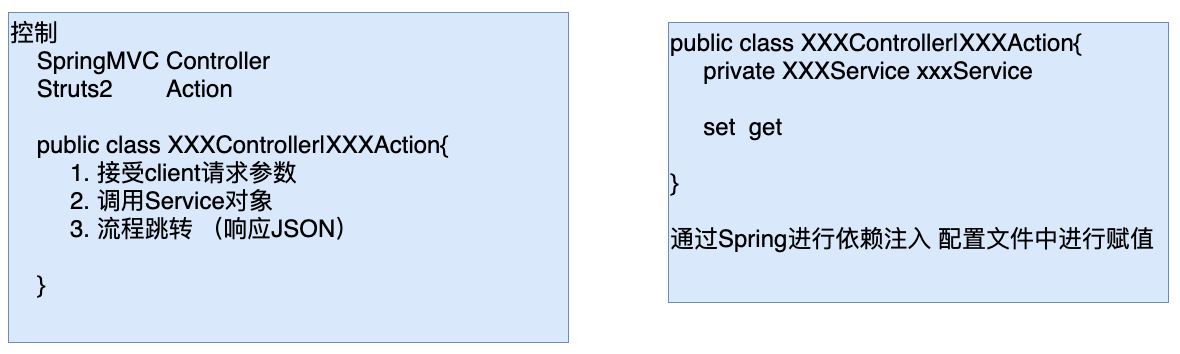
2 .基于注解SpringMVC
2.1 创建工程
创建一个普通的 Maven 工程(注意,这里可以不必创建 Web 工程),并添加 SpringMVC 的依赖,同时,这里环境的搭建需要用到 Servlet ,所以我们还需要引入 Servlet 的依赖(一定不能使用低版本的 Servlet),最终的 pom.xml 文件如下:
<dependency>
<groupId>org.springframework</groupId>
<artifactId>spring-webmvc</artifactId>
<version>5.1.6.RELEASE</version>
</dependency>
<dependency>
<groupId>javax.servlet</groupId>
<artifactId>javax.servlet-api</artifactId>
<version>4.0.1</version>
<scope>provided</scope>
</dependency>2.2 添加 Spring 配置
工程创建成功之后,首先添加 Spring 的配置文件,如下:
@Configuration
@ComponentScan(basePackages = "org.javaboy", useDefaultFilters = true, excludeFilters = {@ComponentScan.Filter(type = FilterType.ANNOTATION, classes = Controller.class)})
public class SpringConfig {
}@Configuration注解表示这是一个配置类,在我们这里,这个配置的作用类似于applicationContext.xml@ComponentScan注解表示配置包扫描,里边的属性和 xml 配置中的属性都是一一对应的,useDefaultFilters表示使用默认的过滤器,然后又除去 Controller 注解,即在 Spring 容器中扫描除了 Controller 之外的其他所有 Bean 。
2.3 添加 SpringMVC 配置
接下来再来创建 springmvc 的配置文件:
@Configuration
@ComponentScan(basePackages = "org.javaboy",useDefaultFilters = false,includeFilters = {@ComponentScan.Filter(type = FilterType.ANNOTATION,classes = Controller.class)})
public class SpringMVCConfig {
}注意,如果不需要在 SpringMVC 中添加其他的额外配置,这样就可以了。即 视图解析器、JSON 解析、文件上传……等等,如果都不需要配置的话,这样就可以了
2.4 配置 web.xml
此时,我们并没有 web.xml 文件,这时,我们可以使用 Java 代码去代替 web.xml 文件,这里会用到 WebApplicationInitializer ,具体定义如下:
public class WebInit implements WebApplicationInitializer {
public void onStartup(ServletContext servletContext) throws ServletException {
//首先来加载 SpringMVC 的配置文件
AnnotationConfigWebApplicationContext ctx = new AnnotationConfigWebApplicationContext();
ctx.register(SpringMVCConfig.class);
// 添加 DispatcherServlet
ServletRegistration.Dynamic springmvc = servletContext.addServlet("springmvc", new DispatcherServlet(ctx));
// 给 DispatcherServlet 添加路径映射
springmvc.addMapping("/");
// 给 DispatcherServlet 添加启动时机
springmvc.setLoadOnStartup(1);
}
}WebInit 的作用类似于 web.xml,这个类需要实现 WebApplicationInitializer 接口,并实现接口中的方法,当项目启动时,onStartup 方法会被自动执行,我们可以在这个方法中做一些项目初始化操作,例如加载 SpringMVC 容器,添加过滤器,添加 Listener、添加 Servlet 等。
注意:
由于我们在 WebInit 中只是添加了 SpringMVC 的配置,这样项目在启动时只会去加载 SpringMVC 容器,而不会去加载 Spring 容器,如果一定要加载 Spring 容器,需要我们修改 SpringMVC 的配置,在 SpringMVC 配置的包扫描中也去扫描@Configuration注解,进而加载 Spring 容器,还有一种方案可以解决这个问题,就是直接在项目中舍弃 Spring 配置,直接将所有配置放到 SpringMVC 的配置中来完成,这个在 SSM 整合时是没有问题的,在实际开发中,较多采用第二种方案,第二种方案,SpringMVC 的配置如下:
@Configuration
@ComponentScan(basePackages = "org.javaboy")
public class SpringMVCConfig {
}这种方案中,所有的注解都在 SpringMVC 中扫描,采用这种方案的话,则 Spring 的配置文件就可以删除了
2.5 测试
最后,添加一个 HelloController ,然后启动项目进行测试:
@RestController
public class HelloController {
@GetMapping("/hello")
public String hello() {
return "hello";
}
}启动项目,访问接口,结果如下:
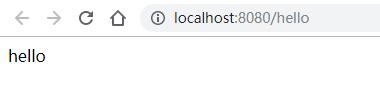
2.6 其他配置
2.6.1 静态资源过滤
静态资源过滤在 SpringMVC 的 XML 中的配置如下:
<mvc:resources mapping="/**" location="/"/>在 Java 配置的 SSM 环境中,如果要配置静态资源过滤,需要让 SpringMVC 的配置继承 WebMvcConfigurationSupport ,进而重写 WebMvcConfigurationSupport 中的方法,如下:
@Configuration
@ComponentScan(basePackages = "org.javaboy")
public class SpringMVCConfig extends WebMvcConfigurationSupport {
@Override
protected void addResourceHandlers(ResourceHandlerRegistry registry) {
registry.addResourceHandler("/js/**").addResourceLocations("classpath:/");
}
}重写 addResourceHandlers 方法,在这个方法中配置静态资源过滤,这里我将静态资源放在 resources 目录下,所以资源位置是 classpath:/ ,当然,资源也可以放在 webapp 目录下,此时只需要修改配置中的资源位置即可。如果采用 Java 来配置 SSM 环境,一般来说,可以不必使用 webapp 目录,除非要使用 JSP 做页面模板,否则可以忽略 webapp 目录。
2.6.2 视图解析器
在 XML 文件中,通过如下方式配置视图解析器:
<bean class="org.springframework.web.servlet.view.InternalResourceViewResolver">
<property name="prefix" value="/WEB-INF/jsp/"/>
<property name="suffix" value=".jsp"/>
</bean>如果通过 Java 类,一样也可以实现类似功能。
首先为我们的项目添加 webapp 目录,webapp 目录中添加一个 jsp 目录,jsp 目录中添加 jsp 文件:
然后引入 JSP 的依赖:
<dependency>
<groupId>javax.servlet.jsp</groupId>
<artifactId>javax.servlet.jsp-api</artifactId>
<version>2.3.1</version>
</dependency>然后,在配置类中,继续重写方法:
@Configuration
@ComponentScan(basePackages = "org.javaboy")
public class SpringMVCConfig extends WebMvcConfigurationSupport {
@Override
protected void configureViewResolvers(ViewResolverRegistry registry) {
registry.jsp("/jsp/", ".jsp");
}
}接下来,在 Controller 中添加控制器即可访问 JSP 页面:
@Controller
public class HelloController2 {
@GetMapping("/hello2")
public String hello() {
return "hello";
}
}2.6.3 路径映射
有的时候,我们的控制器的作用仅仅只是一个跳转,就像上面小节中的控制器,里边没有任何业务逻辑,像这种情况,可以不用定义方法,可以直接通过路径映射来实现页面访问。如果在 XML 中配置路径映射,如下:
<mvc:view-controller path="/hello" view-name="hello" status-code="200"/>这行配置,表示如果用户访问 /hello 这个路径,则直接将名为 hello 的视图返回给用户,并且响应码为 200,这个配置就可以替代 Controller 中的方法。
相同的需求,如果在 Java 代码中,写法如下:
@Configuration
@ComponentScan(basePackages = "org.javaboy")
public class SpringMVCConfig extends WebMvcConfigurationSupport {
@Override
protected void addViewControllers(ViewControllerRegistry registry) {
registry.addViewController("/hello3").setViewName("hello");
}
}此时,用户访问 /hello3 接口,就能看到名为 hello 的视图文件
2.6.4 JSON 配置
SpringMVC 可以接收JSON 参数,也可以返回 JSON 参数,这一切依赖于 HttpMessageConverter
HttpMessageConverter 可以将一个 JSON 字符串转为 对象,也可以将一个对象转为 JSON 字符串,实际上它的底层还是依赖于具体的 JSON 库
所有的 JSON 库要在 SpringMVC 中自动返回或者接收 JSON,都必须提供和自己相关的 HttpMessageConverter
SpringMVC 中,默认提供了Jackson和 gson 的 HttpMessageConverter ,分别是:MappingJackson2HttpMessageConverter 和 GsonHttpMessageConverter
正因为如此,我们在 SpringMVC 中,如果要使用 JSON ,对于 jackson 和 gson 我们只需要添加依赖,加完依赖就可以直接使用了。具体的配置是在 AllEncompassingFormHttpMessageConverter 类中完成的
如果开发者使用了 fastjson,那么默认情况下,SpringMVC 并没有提供 fastjson 的 HttpMessageConverter ,这个需要我们自己提供,如果是在 XML 配置中,fastjson 除了加依赖,还要显式配置 HttpMessageConverter,如下:
<mvc:annotation-driven>
<mvc:message-converters>
<bean class="com.alibaba.fastjson.support.spring.FastJsonHttpMessageConverter">
</bean>
</mvc:message-converters>
</mvc:annotation-driven>在 Java 配置的 SSM 中,我们一样也可以添加这样的配置:
@Configuration
@ComponentScan(basePackages = "org.javaboy")
public class SpringMVCConfig extends WebMvcConfigurationSupport {
@Override
protected void configureMessageConverters(List<HttpMessageConverter<?>> converters) {
FastJsonHttpMessageConverter converter = new FastJsonHttpMessageConverter();
converter.setDefaultCharset(Charset.forName("UTF-8"));
FastJsonConfig fastJsonConfig = new FastJsonConfig();
fastJsonConfig.setCharset(Charset.forName("UTF-8"));
converter.setFastJsonConfig(fastJsonConfig);
converters.add(converter);
}
}然后,就可以在接口中直接返回 JSON 了,此时的 JSON 数据将通过fastjson生成
3.Spring Boot 中自定义 SpringMVC
用过 Spring Boot 的小伙伴都知道,我们只需要在项目中引入 spring-boot-starter-web 依赖,SpringMVC 的一整套东西就会自动给我们配置好,但是,真实的项目环境比较复杂,系统自带的配置不一定满足我们的需求,往往我们还需要结合实际情况自定义配置。
3.1 概览
首先我们需要明确,跟自定义 SpringMVC 相关的类和注解主要有如下四个:
- WebMvcConfigurerAdapter
- WebMvcConfigurer
- WebMvcConfigurationSupport
- @EnableWebMvc
这四个中,除了第四个是注解,另外三个两个类一个接口,里边的方法看起来好像都类似,但是实际使用效果却大不相同,因此很多小伙伴容易搞混。
3.2 WebMvcConfigurerAdapter
我们先来看 WebMvcConfigurerAdapter,这个是在 Spring Boot 1.x 中我们自定义 SpringMVC 时继承的一个抽象类,这个抽象类本身是实现了 WebMvcConfigurer 接口,然后抽象类里边都是空方法,我们来看一下这个类的声明:
public abstract class WebMvcConfigurerAdapter implements WebMvcConfigurer {
//各种 SpringMVC 配置的方法
}再来看看这个类的注释:
/**
* An implementation of {@link WebMvcConfigurer} with empty methods allowing
* subclasses to override only the methods they're interested in.
* @deprecated as of 5.0 {@link WebMvcConfigurer} has default methods (made
* possible by a Java 8 baseline) and can be implemented directly without the
* need for this adapter
*/这段注释关于这个类说的很明白了。同时我们也看到,从 Spring5 开始,由于我们要使用 Java8,而 Java8 中的接口允许存在 default 方法,因此官方建议我们直接实现 WebMvcConfigurer 接口,而不是继承 WebMvcConfigurerAdapter 。
也就是说,在 Spring Boot 1.x 的时代,如果我们需要自定义 SpringMVC 配置,直接继承 WebMvcConfigurerAdapter 类即可。
3.3 WebMvcConfigurer
根据上一小节的解释,小伙伴们已经明白了,WebMvcConfigurer 是我们在 Spring Boot 2.x 中实现自定义配置的方案。
WebMvcConfigurer 是一个接口,接口中的方法和 WebMvcConfigurerAdapter 中定义的空方法其实一样,所以用法上来说,基本上没有差别,从 Spring Boot 1.x 切换到 Spring Boot 2.x ,只需要把继承类改成实现接口即可。
松哥在之前的案例中(40 篇原创干货,带你进入 Spring Boot 殿堂!),凡是涉及到自定义 SpringMVC 配置的地方,也都是通过实现 WebMvcConfigurer 接口来完成的。
3.4 WebMvcConfigurationSupport
前面两个都好理解,还有一个 WebMvcConfigurationSupport ,这个又是干什么用的呢?
松哥之前有一篇文章中用过这个类,不知道小伙伴们有没有留意,就是下面这篇:
这篇文章我放弃了 Spring 和 SpringMVC 的 xml 配置文件,转而用 Java 代替这两个 xml 配置。那么在这里我自定义 SpringMVC 配置的时候,就是通过继承 WebMvcConfigurationSupport 类来实现的。在 WebMvcConfigurationSupport 类中,提供了用 Java 配置 SpringMVC 所需要的所有方法。我们来看一下这个方法的摘要:
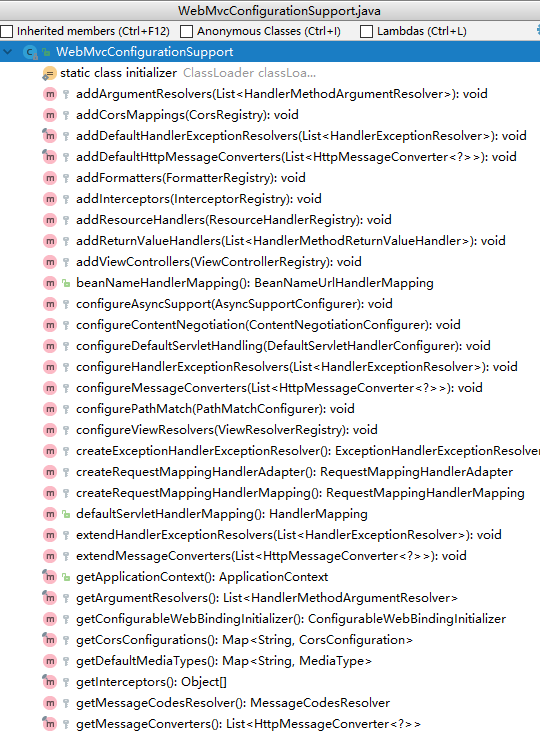
有一点眼熟,可能有小伙伴发现了,这里的方法其实和前面两个类中的方法基本是一样的。
在这里首先大家需要明确的是,WebMvcConfigurationSupport 类本身是没有问题的,我们自定义 SpringMVC 的配置是可以通过继承 WebMvcConfigurationSupport 来实现的。但是继承 WebMvcConfigurationSupport 这种操作我们一般只在 Java 配置的 SSM 项目中使用,Spring Boot 中基本上不会这么写,为什么呢?
小伙伴们知道,Spring Boot 中,SpringMVC 相关的自动化配置是在 WebMvcAutoConfiguration 配置类中实现的,那么我们来看看这个配置类的生效条件:
@Configuration
@ConditionalOnWebApplication(type = Type.SERVLET)
@ConditionalOnClass({ Servlet.class, DispatcherServlet.class, WebMvcConfigurer.class })
@ConditionalOnMissingBean(WebMvcConfigurationSupport.class)
@AutoConfigureOrder(Ordered.HIGHEST_PRECEDENCE + 10)
@AutoConfigureAfter({ DispatcherServletAutoConfiguration.class, TaskExecutionAutoConfiguration.class,
ValidationAutoConfiguration.class })
public class WebMvcAutoConfiguration {
}我们从这个类的注解中可以看到,它的生效条件有一条,就是当不存在 WebMvcConfigurationSupport 的实例时,这个自动化配置才会生生效。因此,如果我们在 Spring Boot 中自定义 SpringMVC 配置时选择了继承 WebMvcConfigurationSupport,就会导致 Spring Boot 中 SpringMVC 的自动化配置失效。
Spring Boot 给我们提供了很多自动化配置,很多时候当我们修改这些配置的时候,并不是要全盘否定 Spring Boot 提供的自动化配置,我们可能只是针对某一个配置做出修改,其他的配置还是按照 Spring Boot 默认的自动化配置来,而继承 WebMvcConfigurationSupport 来实现对 SpringMVC 的配置会导致所有的 SpringMVC 自动化配置失效,因此,一般情况下我们不选择这种方案。
在 Java 搭建的 SSM 项目中(纯 Java 代码搭建 SSM 环境),因为本身就没什么自动化配置,所以我们使用了继承 WebMvcConfigurationSupport。
3.5 @EnableWebMvc
最后还有一个 @EnableWebMvc 注解,这个注解很好理解,它的作用就是启用 WebMvcConfigurationSupport。我们来看看这个注解的定义:
/**
* Adding this annotation to an {@code @Configuration} class imports the Spring MVC
* configuration from {@link WebMvcConfigurationSupport}, e.g.:可以看到,加了这个注解,就会自动导入 WebMvcConfigurationSupport,所以在 Spring Boot 中,我们也不建议使用 @EnableWebMvc 注解,因为它一样会导致 Spring Boot 中的 SpringMVC 自动化配置失效。
3.6 总结
- Spring Boot 1.x 中,自定义 SpringMVC 配置可以通过继承 WebMvcConfigurerAdapter 来实现。
- Spring Boot 2.x 中,自定义 SpringMVC 配置可以通过实现 WebMvcConfigurer 接口来完成。
- 如果在 Spring Boot 中使用继承 WebMvcConfigurationSupport 来实现自定义 SpringMVC 配置,或者在 Spring Boot 中使用了 @EnableWebMvc 注解,都会导致 Spring Boot 中默认的 SpringMVC 自动化配置失效。
- 在纯 Java 配置的 SSM 环境中,如果我们要自定义 SpringMVC 配置,有两种办法,第一种就是直接继承自 WebMvcConfigurationSupport 来完成 SpringMVC 配置,还有一种方案就是实现 WebMvcConfigurer 接口来完成自定义 SpringMVC 配置,如果使用第二种方式,则需要给 SpringMVC 的配置类上额外添加 @EnableWebMvc 注解,表示启用 WebMvcConfigurationSupport,这样配置才会生效。换句话说,在纯 Java 配置的 SSM 中,如果你需要自定义 SpringMVC 配置,你离不开 WebMvcConfigurationSupport ,所以在这种情况下建议通过继承 WebMvcConfigurationSupport 来实现自动化配置。
本博客所有文章除特别声明外,均采用 CC BY-SA 4.0 协议 ,转载请注明出处!